Adding an HDMI port to the original Xbox
Microsoft shipped the original Xbox with a composite AV cable, which was fine for 2001, but composite doesn’t work very well with modern HDTVs. You could buy a component cable for your system, but official Microsoft cables are hard to find and expensive. Not all HDTVs even have support for component either. If only the original Xbox had an HDMI port. This post outlines the process of adding an HDMI port to the original Xbox.
Things you’ll need
Here’s a list of items that you’ll need for adding an HDMI port to the original Xbox.
- A multimeter.
- An original Xbox console.
- A small component to HDMI converter, I used this model, which is cheap, and has an upscaler built in.
- A soldering iron and solder.
- Some small diameter wires, I used the wires inside of a CAT5e Ethernet cable.
- A Dremel, or other tool to cut the Xbox case.
- A hot glue gun.
You may want to research other component to HDMI converters. The model I bought is cheap, and works, but you might want something better. Cheap converters can add additional latency, and not make a perfect conversion. I didn’t personally notice any additional latency or color problems with the model I bought, but your mileage may vary. You probably don’t need something with an upscaler either.
Preparing the Xbox motherboard
Begin by taking apart your console. You will need to completely remove the motherboard, so that you can access the solder points for the video connector underneath the board. There are guides on how to disassemble the Xbox if you haven’t done this step before.
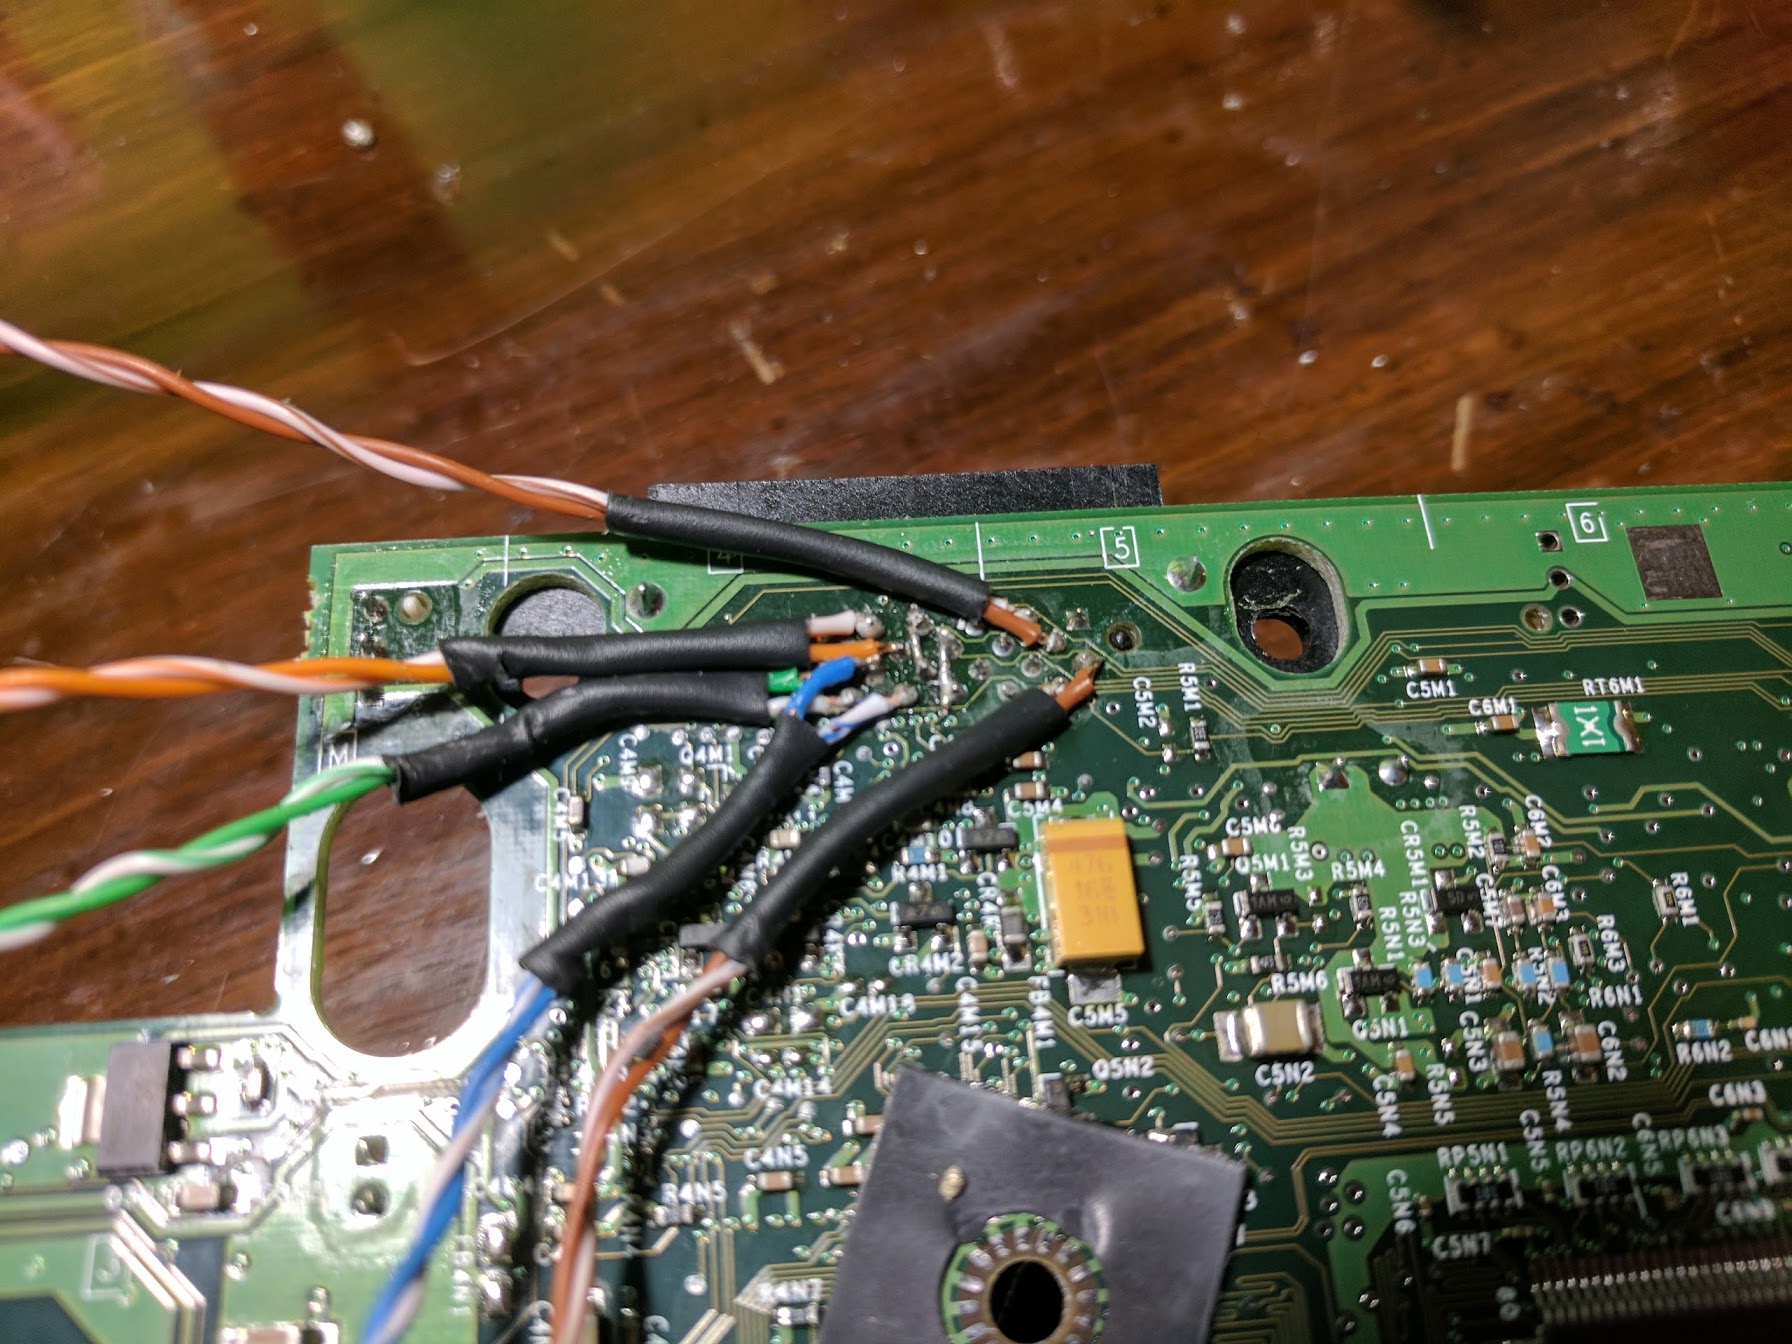
There is a set of twenty solder points right underneath the video output port on the back of the console. You will need to solder a total of ten wires to these pins. You will also need to bridge a couple pairs of pins together to set the video output mode.

Additionally you will need to connect power wires to power the component converter. In my case I connected a pair of thicker wires to the underside of the 20-pin ATX connector.
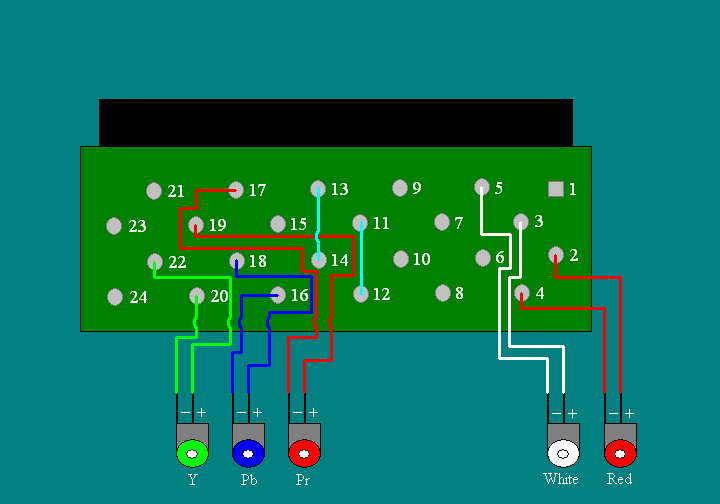
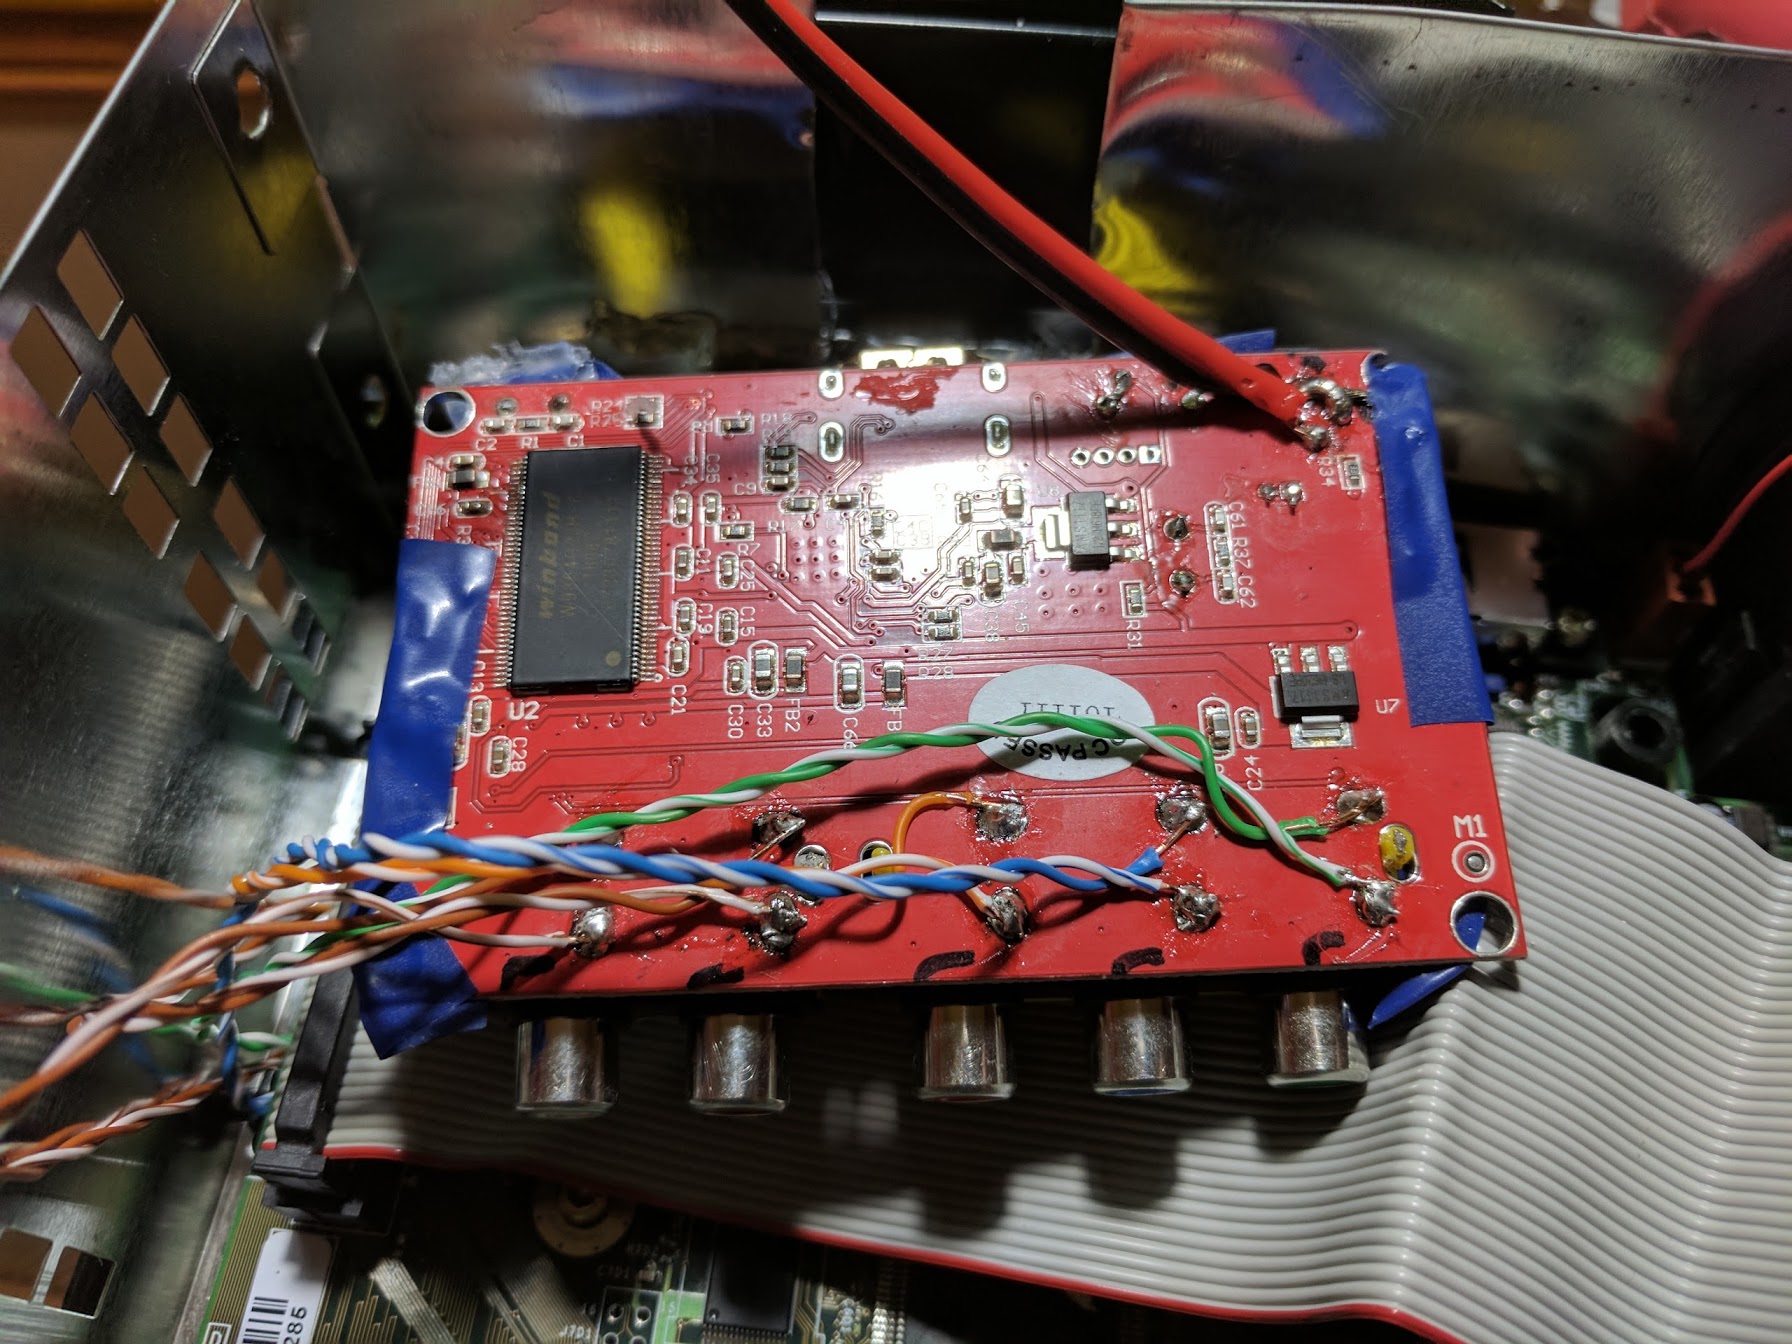
I have provided a schematic of where you should connect your wires, and then a picture of the final result. Here are some things that may be useful.
- Heating up the existing solder points, and adding a little bit extra solder, will make attaching wires slightly easier.
- Using the correct gauge wire will also make the process much easier. You don’t want the wires to be too thick.
- Make sure you cut the wires extra long so that you have extra wire to work with when connecting them to the converter box.
- Avoid routing the wires on top of each other, it can be hard to put the motherboard back into the console if there is too much underneath the board.
- Routing the cables in the direction opposite of the power supply seemed to be the easiest.
- I covered the areas I worked on with electrical tape to prevent the solder points from making contact with the metal case of the Xbox.
- Connecting pins 13 and 14, and 11 and 12, are used to set the mode of the Xbox to advanced AV mode. If you would like to continue to use the AV port for composite, you will want to connect those two pairs of solder points through external switches, instead of directly bridging the connections.
Preparing the Xbox case

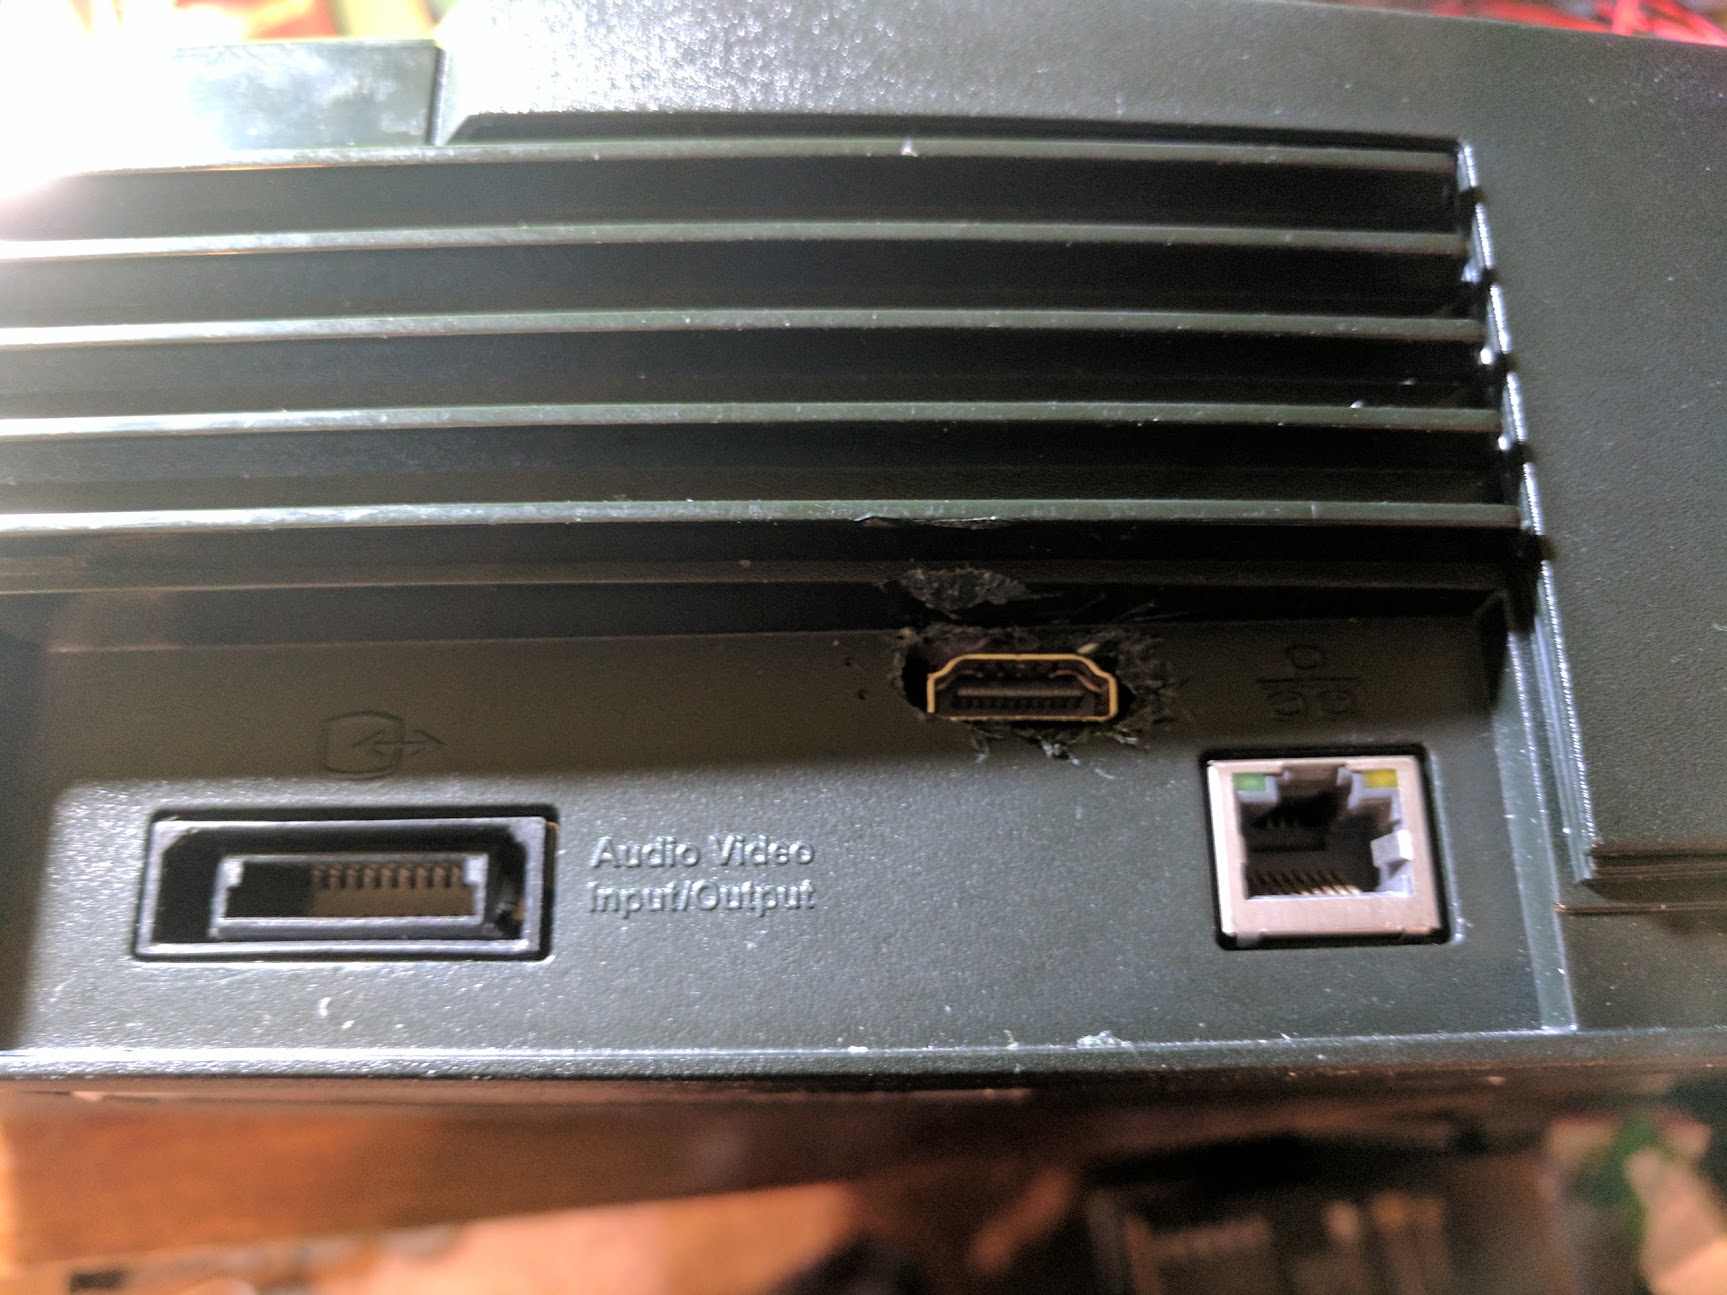
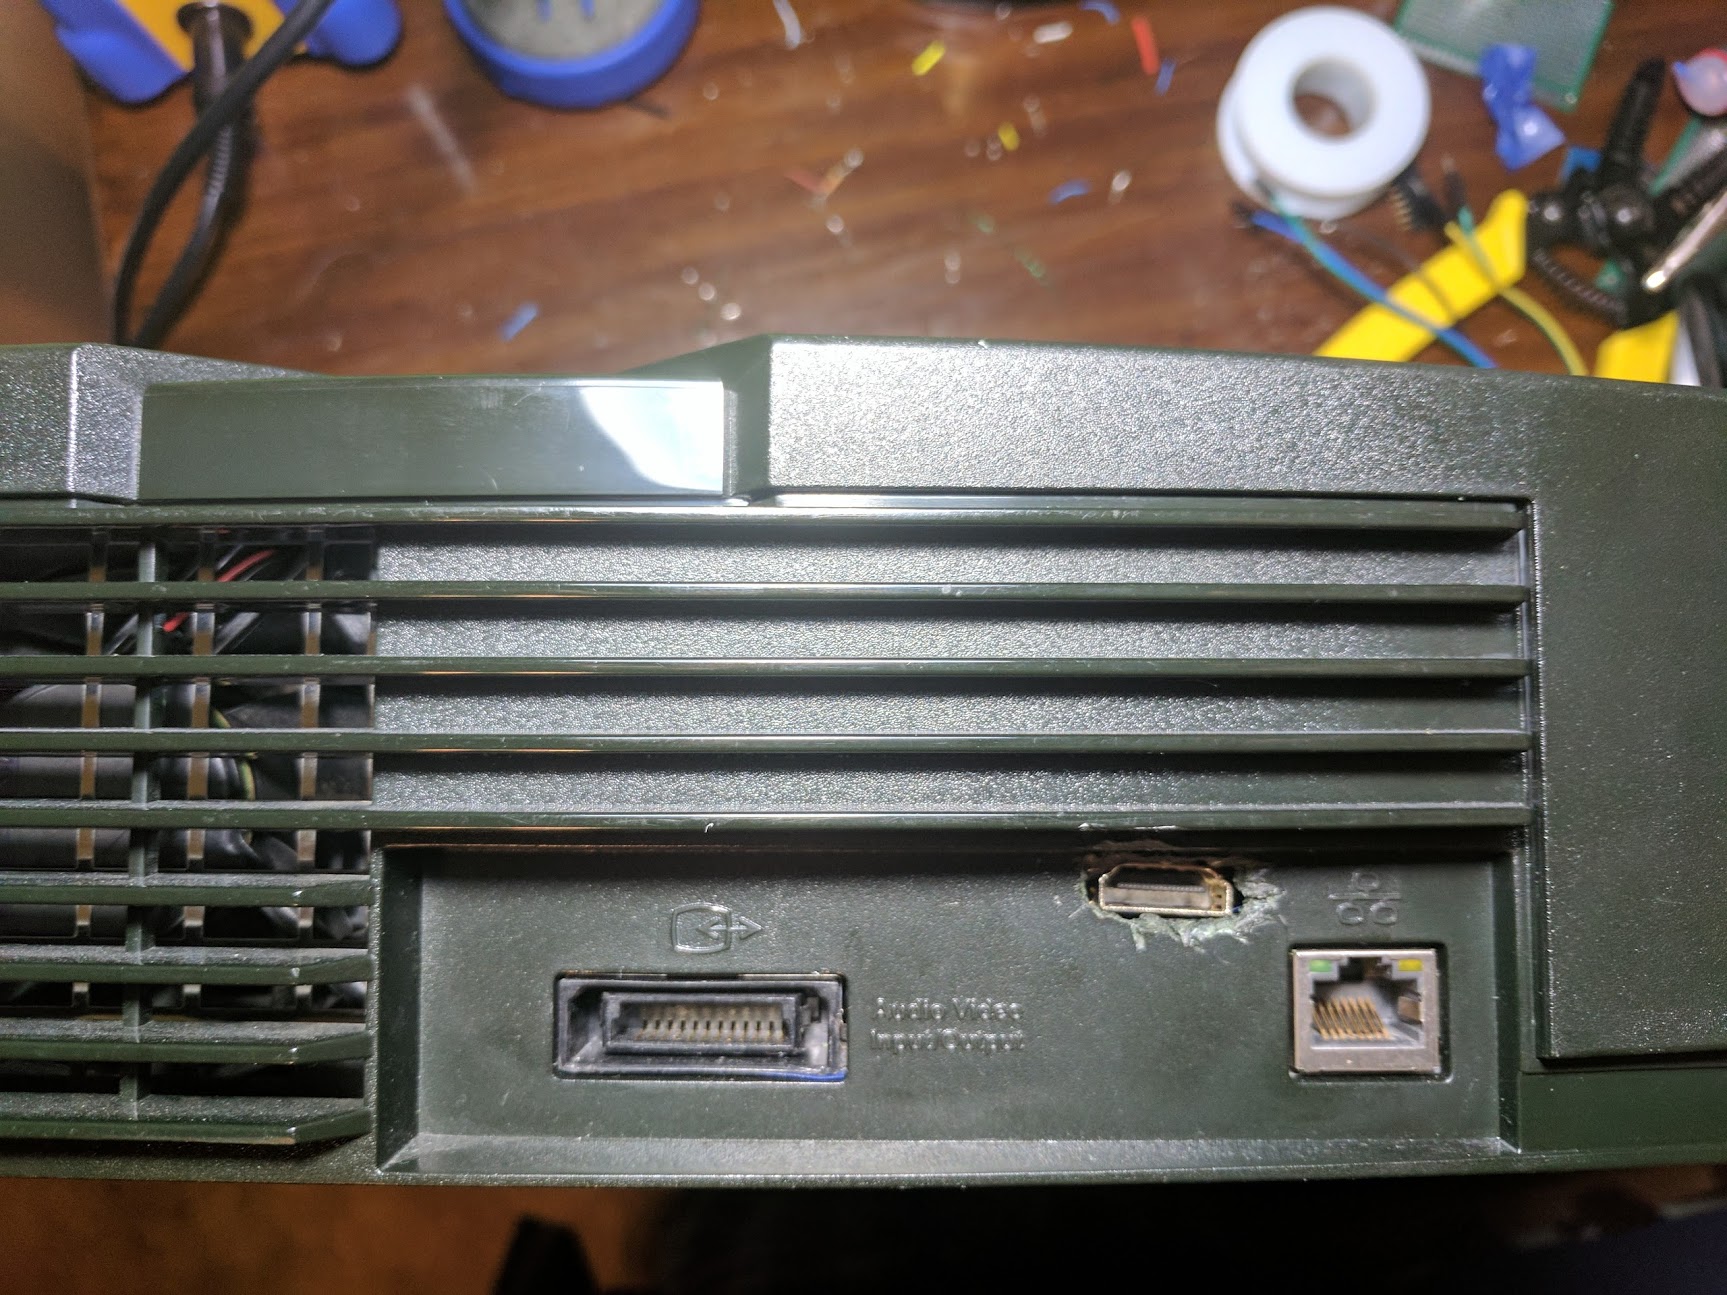
To prepare the Xbox’s case you will need to cut a small HDMI sized hole in the back of the console. I made my hole right above the area in between the Ethernet and AV ports.
I also had to modify the plastic tray that the DVD drive sits on top of. This was to allow the component converter device to have more room to sit. Keep in mind that this tray is used to help route air from the fans through the areas that need cooled, so you don’t want to cut away too much plastic.
Preparing the component converter
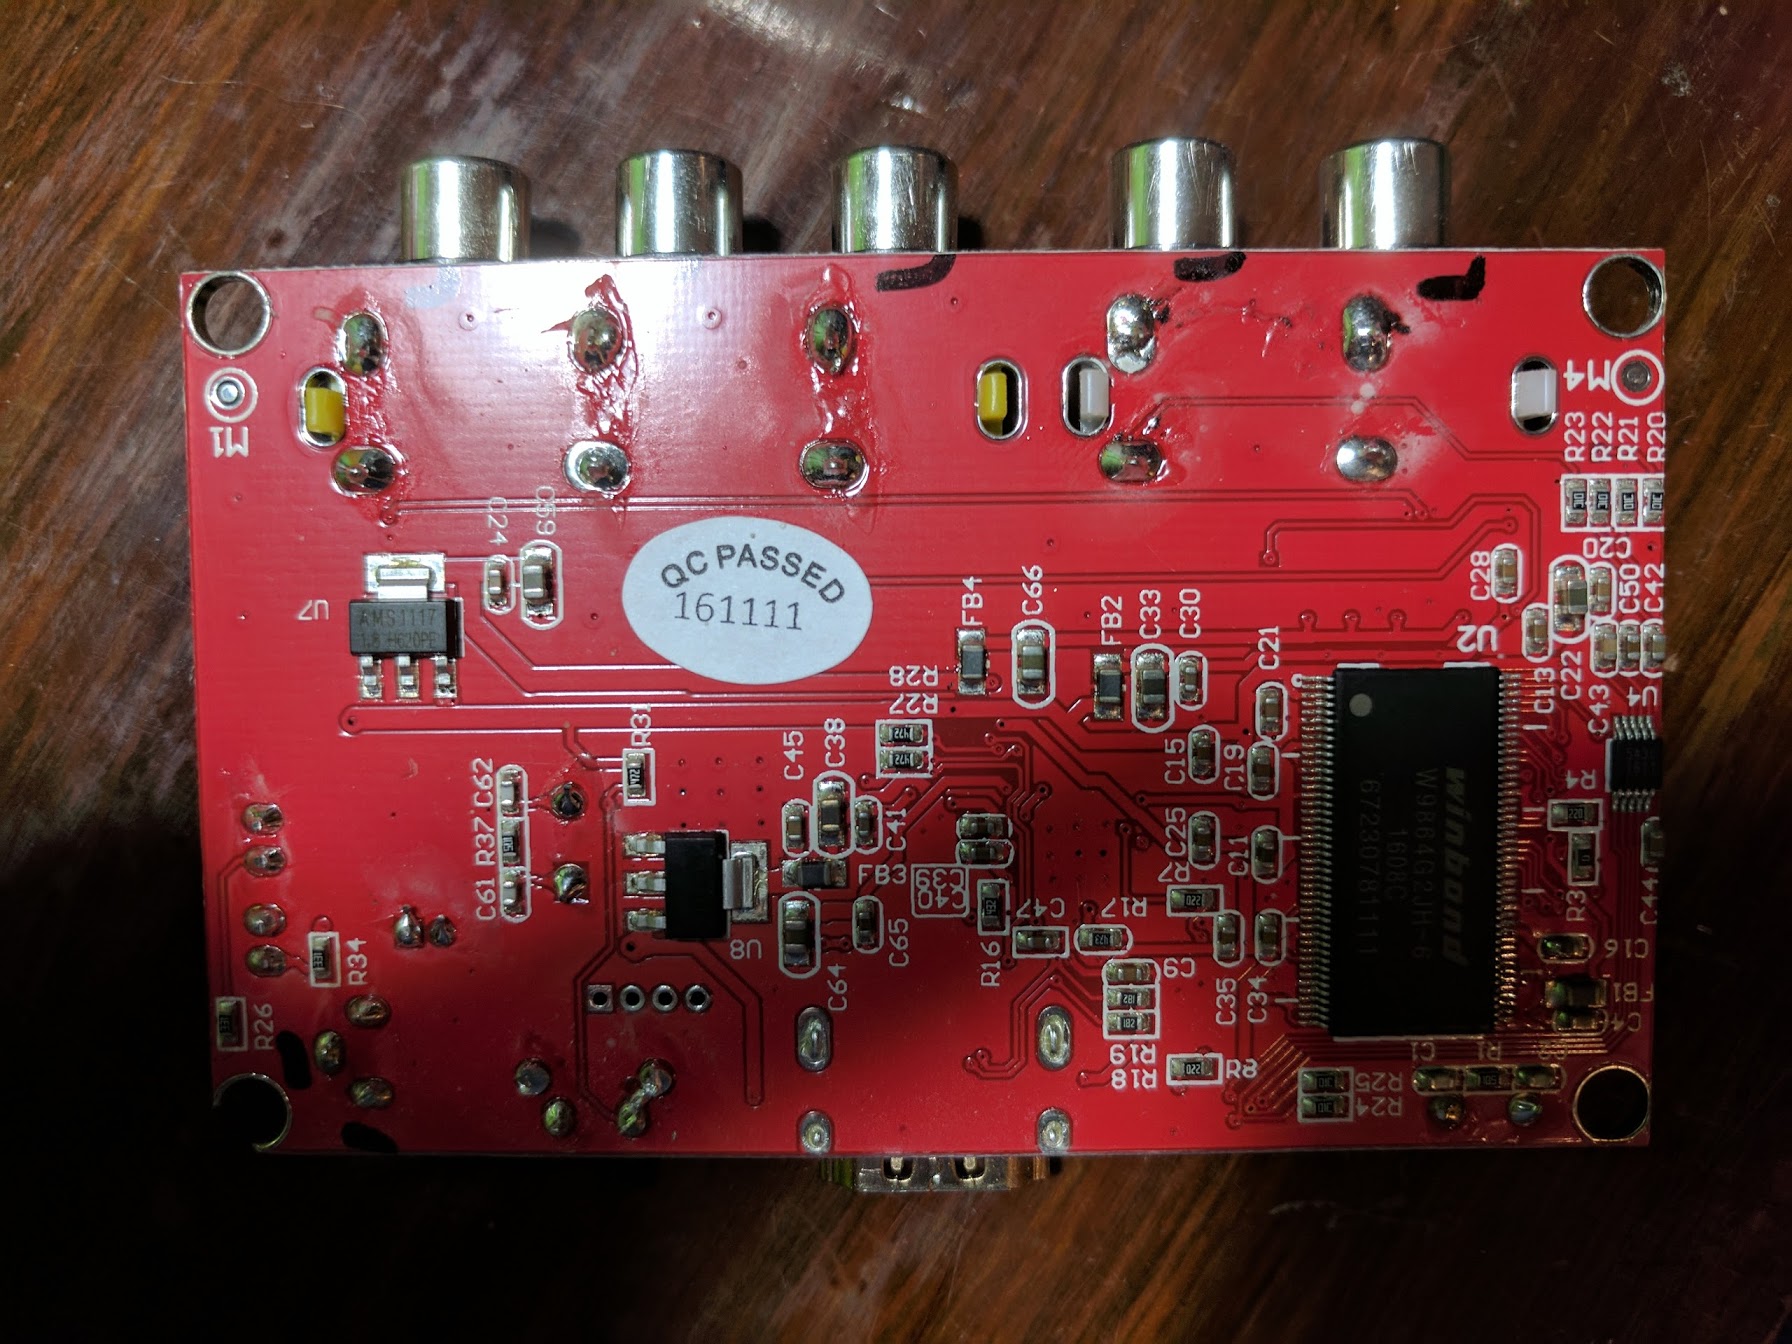
First take apart the converter box. Mine had four screws underneath the four rubber feet. You should now have access to the board that was inside of the casing. You should then be able to locate the solder points for the component cable jacks, and the DC power input port.
You’ll want to use a multimeter to determine which solder points correspond to which parts of the jack. The outer metal on the jack corresponds to the negative wires on the Xbox. In my case the center of the power jack is positive. I drew my findings onto the board with a permanent marker so that I wouldn’t forget.
With the converter I bought I also had to remove the resolution toggle button. To make the board more compact you may even want to remove the component and power jacks entirely.
Connecting the Xbox to the component converter
Now that you have prepared the Xbox and the component converter you can connect them together. This is pretty straightforward. All you have to do is solder the ten wires from the AV port to the corresponding solder points on the converter. You will also need to connect the two power wires to power the converter.
Make your wires as short as possible. I hot glued my converter box to the console so that the HDMI port was sticking out the back. You will also want to cover the component converter board with electrical tape to prevent it from making electrical contact with any part of the Xbox.
Results
You should now be able to power up your Xbox and connect it directly to an HDTV through HDMI. Surprisingly, I was able to get better image quality through the internal component cable wiring than through cheap aftermarket component cables, but you may get different results depending on how you wired everything. Additionally, I didn’t notice any additional latency going through the HDMI to component converter.
This mod is a great way to make the original Xbox a more modern console that is more convenient to connect to modern HDTVs. For around $25, and a few hours of time, you should be able to add an HDMI port to your original Xbox.
I also own a Xenon Xbox 360, which was the first revision that came without an HDMI port. I plan on doing a similar mod to my Xbox 360, but maybe using a VGA to HDMI converter instead.
FAQ
I posted this project to Reddit on /r/OriginalXbox, and /r/DIY, and got quite a few comments. I’ve collected many of those comments to create this FAQ section.
- What’s wrong with that HDMI hole?
- It’s what it looks like, I used a knife to cut the hole. It’s not the cleanest cut, but it’s functional. I probably should have used my Dremel, but I did this project at night and I didn’t want to wake anyone up.
- One interesting suggestion I got was to use a hot razor blade to cut through the plastic. The burnt plastic fumes aren’t very healthy, and it wouldn’t cut through metal, but otherwise it seems like a pretty cool idea. I’m going to look into making a heated razor cut tool with an electric heating element.
- Won’t the component to HDMI converter add a lot of latency?
- It does add latency, but it’s not something that I noticed. In other words I can still play games just fine. Others may be more sensitive to the latency though. I wish I had a device that let me test the latency.
- Why didn’t you just leave the component to HDMI converter box outside of the console?
- That’s what I originally did. It added some unnecessary bulk to the outside of the system, and required another power brick.
- Originally I was just going to wire a power cable out of the Xbox to power the converter box, but decided to try to make the entire thing internal.
- Besides space savings, I was also able to not use component cables. If you don’t already have component cables, that would save you some money.
- Do you have any pictures and videos of the video quality before and after?
- I don’t at this time, but that’s something I’d like to do. I’ll probably wait until I have a capture card that can record HDMI and component video signals, so that I can get a good picture. I don’t imagine taking a picture of my screen with a camera will look very good.
- Why didn’t you use a panel mount HDMI cable?
- This is actually a great idea. I didn’t think of it, but it would result in the cleanest external appearance, and would be the most sturdy.
- Can the Xbox even output HD video?
- There were several variations of this question. The Xbox can output most games at 480p, and many games at 720p and 1080i. The graphics still look 15 years old, but the resolution isn’t that bad.
- What about the VGA cable mod?
- The Xbox can display video over VGA with some modifications. This could result in even better image quality. It’s worth looking into this.
- Does the port fall into the Xbox every time you use it?
- Nope, it’s really sturdy. Hot glue is stronger than most people think. I haven’t had any problems with the port coming loose.
- Could the audio and video quality be increased by doing…?
- I got a comment saying that somebody named Ozone is working on a mod that would allow the Xbox to output directly to HDMI, a direct digital signal. This would be the ideal mod. Sadly I can’t find much information online about this.
- I got another comment mentioning converters with SPDIF inputs. This would allow the audio signal to be digital, and would allow for 5.1 channel audio output.
- Another comment mentioned using a higher quality converter box. This would be a good idea, but if I were doing this I would make it external. That way I could connect multiple consoles to the good converter though a component switch.
- I was also asked if HDMI makes the image quality any better. The answer is no, it doesn’t. In this case it’s not any better.
[…] March I added an HDMI port to my original Xbox. This is a similar post covering the process of adding an HDMI port to the PS2 fat. The PS2 has a […]
I just did this with that exact converter. You don’t need to wire the component negatives, and you can pull 5v (for converter power) from one of the red wires at the connector leading to the power supply, and ground to one of the grounding rings at the mount screws.
Friend where did u find the exact converter?
I bought it from Amazon: http://amzn.to/2r585pY
Can you just wire a hdmi cable in directly?
No, there needs to be some sort of converter in between.
Hi Trevor, you mentioned the grounds for the components don’t need connecting do you mind elaborating? iwas looking at mking a component break out box using a regular AV cable (red, white, yellow) desoldering the pins and adding the cables for the components and the pins to activate advanced AV pack. Would i need to ground the 3 (red, green, blue) on the connector? Any help would be much appreciated.
great Articale btw William, Ill be trying this when i have a TV with HDMI. Thank you for a well written article and pictures 🙂
I just did this mod but the picture is very fuzzy and it sometimes goes completely black. Any ideas?
It probably has to do with your wiring. Make sure they’re as short as possible
Is it not possible to simply remove the current output and mount the hdmi port in its place?
Yes, instead of cutting the hole in the case the stock video output port could be removed.
Just for clarification, the converter you’ve linked that you used internally can work just fine externally? I purchased a converter and it wasn’t displaying on the tv. Looking for a quick easy fix.
Yeah, it works externally as well, you’ll just need some original Xbox component video cables. I actually used mine externally for a while before I made it internal like in this post.
Thanks now i can use the Xbox
Like I always say it doesn’t matter what it looks like as long as it sevice its purpose thanks for all the good information
Hi I have this https://www.amazon.com/Portta-Extractor-Converter-Digital-Support/dp/B00HIW7TZC can you help me figure out where I need to wire it
Is that just an HDMI audio extractor? I’m not sure what you’re trying to do with that.
It’s a HDMI to av converter