PS3 custom firmware installation (fat CECHA01, and slim CECH-2101A)
Installing custom firmware onto my PS3 was one of my goals I mentioned in my project introduction post. This post describes my experiences during PS3 custom firmware installation on my fat CECHA01 console, and my brother’s slim CECH-2101A console.
Update: I have written another post going into more detail on custom firmware installation using a Teensy on a CECH-2001A PS3 slim.
What is custom firmware, and what it’s used for
Before I begin I’d like to provide some background information. Sony released firmware version 3.55 for the PS3 in late 2010. In this version Sony messed up the encryption system which allowed the PS3 hacking community to create custom firmware updates that could be installed, also called custom firmware or CFW.
The majority of PS3 consoles are running firmware versions newer than 3.55, which doesn’t have the same encryption problem. Systems run newer firmware either through the factory, or through official system updates.
Custom firmware allows running homebrew software, allowing the PS3 to do much more than originally intended. Here are a few uses of custom firmware:
- Backing up game discs onto the hard drive, and playing them without the disc.
- Playing PS2 games through software emulation on non backwards compatible consoles.
- Viewing system temperatures, and manually controlling fan speed.
There are many more uses, those are just a few. I personally installed custom firmware primarily to be able to view system temperatures, so that I could mod my CECHA01 to run cooler, and to be able to play backups of my games.
Custom firmware requirements
To install custom firmware your PS3 needs to be downgradable to firmware version 3.55. Because 3.55 was the last exploitable system firmware version, all installation methods involve downgrading to 3.55 through flashing the firmware memory chip on the motherboard.
In general all fat systems are downgradable, while most slims are, and no super slims are. There is a more detailed list on the PS3 developer wiki, look at the downgradable min praxis column that corresponds to your model number. You can find the model number on the sticker on the back of your system., it should begin in CECH.
There are two types of firmware memory chips that are downgradable, dual NAND, and single NOR. Every fat system model number CECHAxx through CECHGxx use NAND chips, and the other downgradable systems use NOR chips.
In my case the CECHA01 fat has dual NAND chips, and the CECH-2101A slim has a single NOR chip.
Custom firmware installation methods
There are many methods of installing custom firmware. Two of the more popular methods involve using a Teensy++ 2.0 microcontroller, and using an E3 Flasher. An E3 Flasher only works for NOR consoles, while the Teensy works with both NAND and NOR consoles. You can read about other methods on the PS3 developer wiki.
In either case the custom firmware installation process involves making several backups of the firmware memory chip. A validation program is used to verify that your backup dumps are valid. If they are you can patch the dump, and then write it to the console. The patched dump will allow you to install custom firmware through a USB device.
To make the dump you will need to connect the flashing device to the firmware memory chip. This can either be done using a clip, or through soldering directly to the chip, or by using alternate soldering points. For my CECHA01 I used a clip, and for my brother’s CECH-2101A, I used alternate soldering.
I decided to go with the Teensy because it appeared to be the most reliable, and least expensive flashing method for NAND consoles. I used a NAND clip because the CECHA01’s motherboard requires soldering directly onto the legs of both of the NAND chips. A $30 clip seemed like a reasonable price to pay to avoid spending a lot of time soldering.
I flashed the CECH-2101A after I had already flashed the CECHA01, so I already had the Teensy. Instead of buying another clip I decided to try to use the alternate soldering points on the board, since they were much larger and easier to solder to than legs of a chip.
To use a Teensy you need to follow the 3.3V Teensy conversion guide.
CECHA01 flashing using a Teensy and a NAND clip
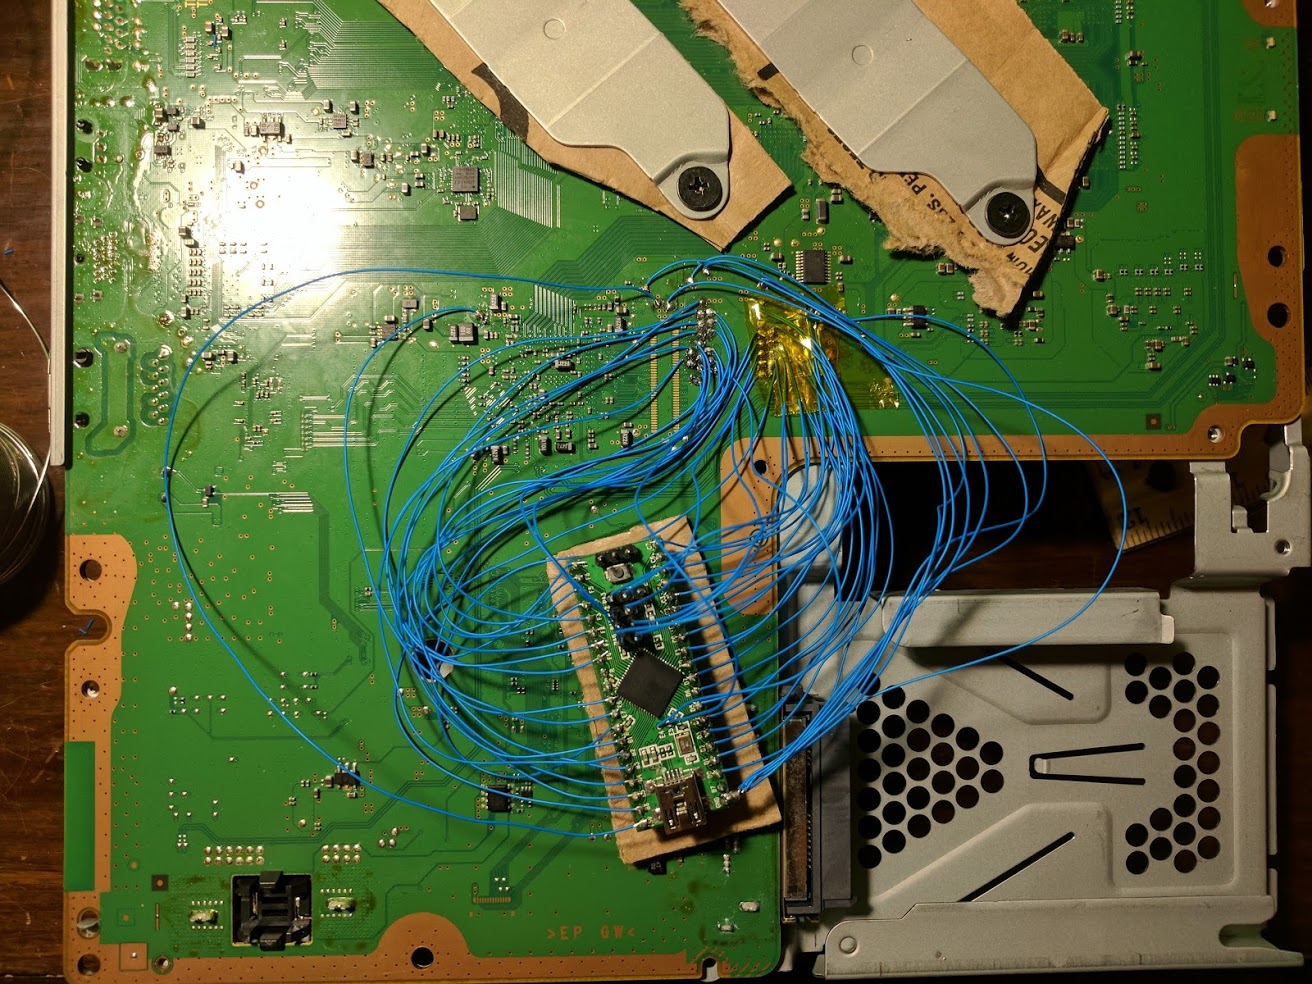
In order to fit onto the chip, the edges of the NAND clip needed to be trimmed. I used an X-Acto knife to shave off a little bit at a time, periodically testing it, until it sat flush with the board. You need to cut the clip so that none of the pins get damaged, and so that there is a gap for any of the surface mount components on the board near the chip.
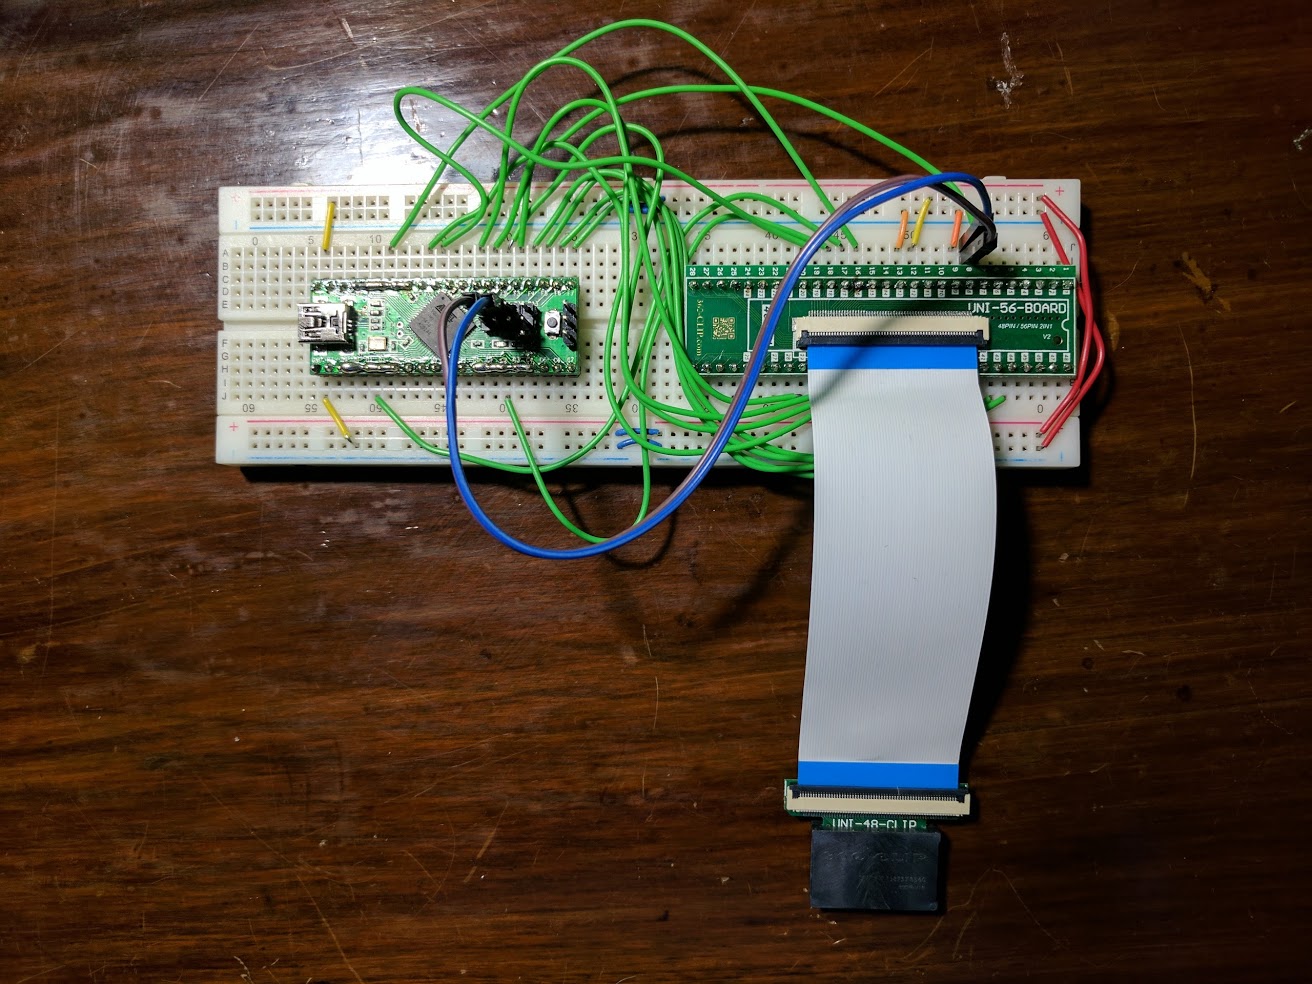
I connected the clip to a breadboard where I wired the pins to the Teensy using breadboard wires. Initially I wired the Teensy using the dual NAND wiring diagram, but found the connection to be unreliable when dumping. The signal booster wiring diagram worked much better, so that’s what I’d recommend.
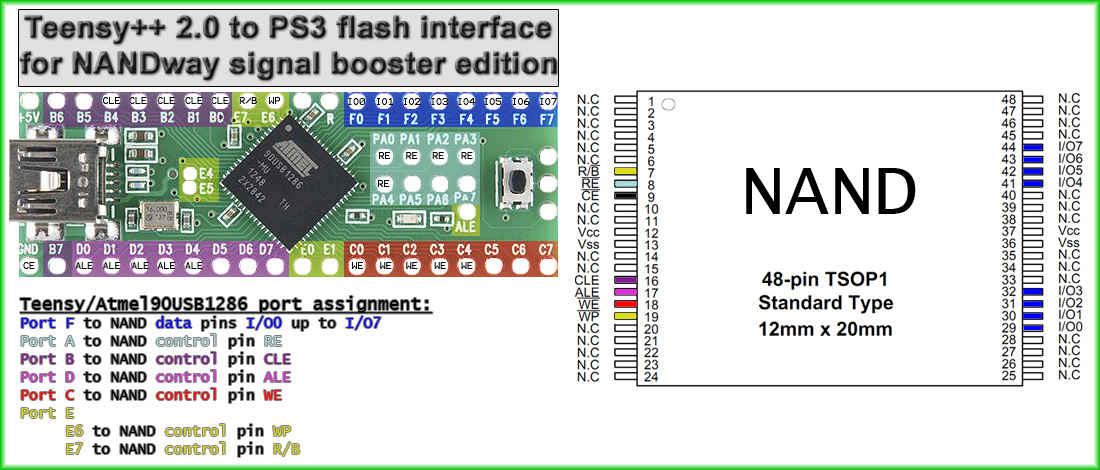
Once connected, I used a Python program called NANDway, along with its corresponding Teensy program. The program has a command that lets you view information about the chip, if you get unknown listed for the manufacturer or model, then something isn’t working.
There is also a command that dumps the firmware image, and another that writes the firmware image. The NAND consoles have dual NAND chips, so I had to take three backups of each chip, and then combine them using a program. Once combined I could patch the image, split it back into two images, and then flash them to each chip.
The NAND chips are large, so it takes around twenty minutes to read the chips. I was able to write a difference image file which only flashed the differences between the stock images and the patched images, this saved some time flashing the chips.
The guide I followed had me boot into a service mode, and downgrade to the Rogero 3.55 downgrader firmware using a flash drive and the Teensy.
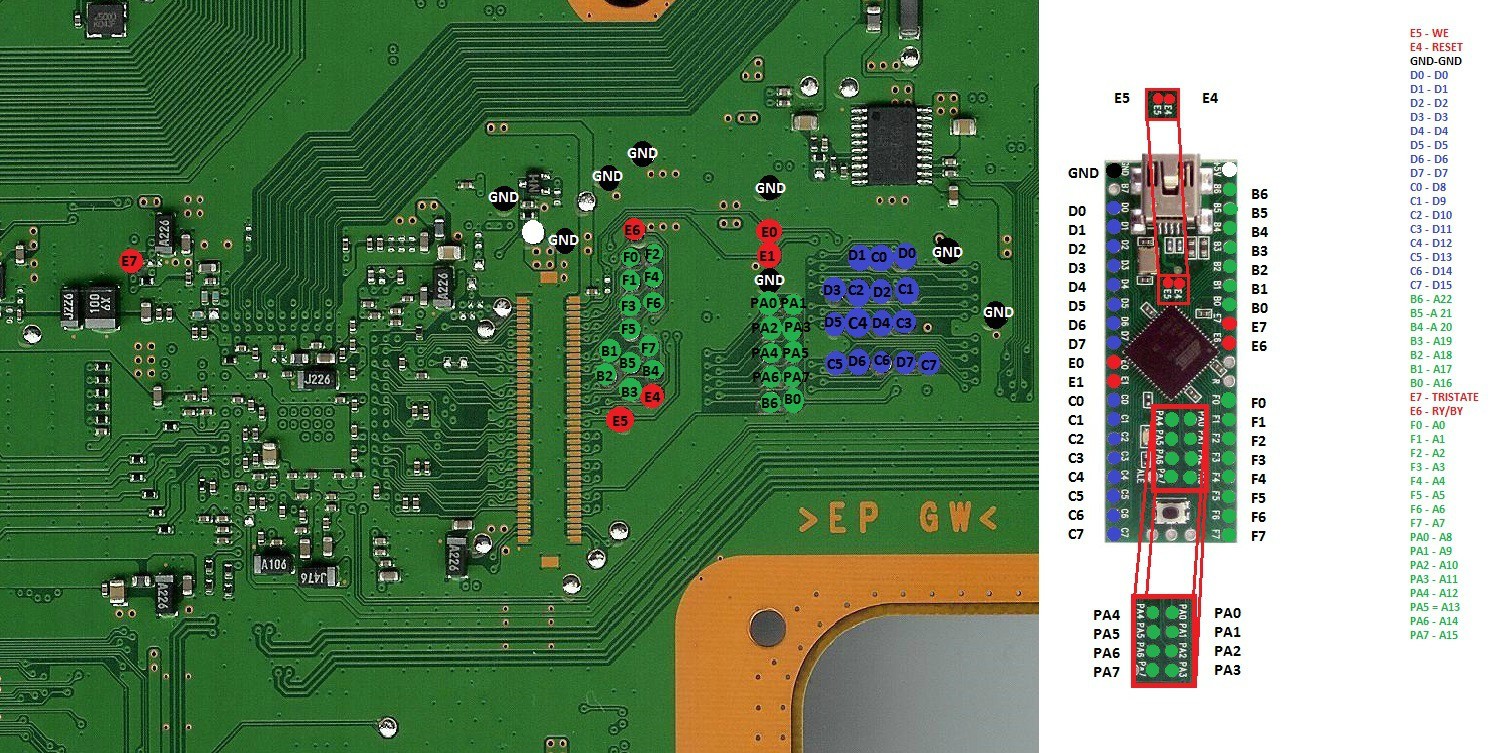
CECH-2101A flashing using a Teensy and alternate soldering points
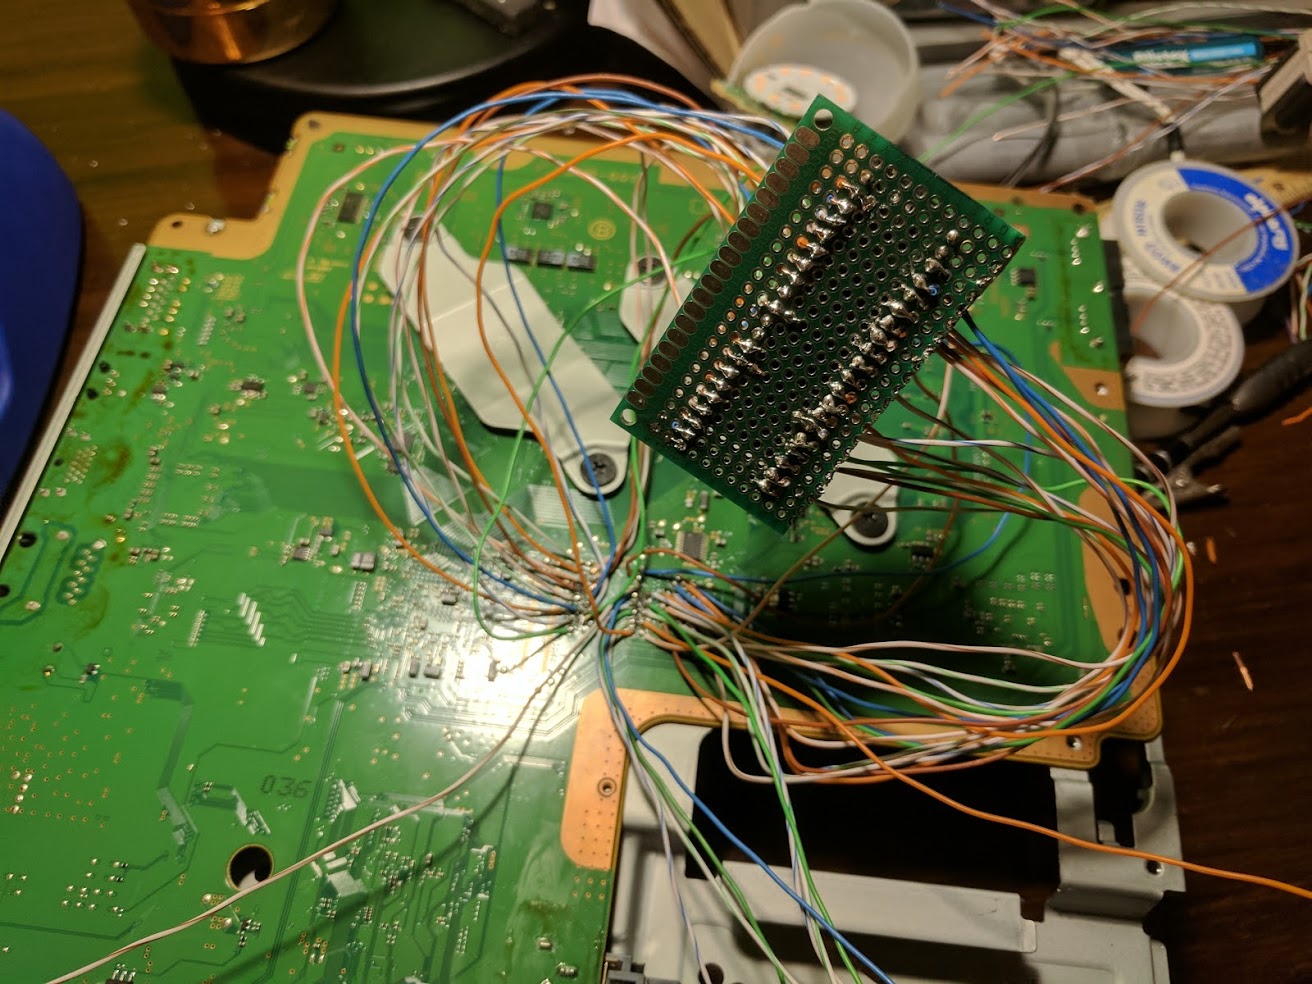
I used the 24 AWG wires from CAT5e Ethernet cables to connect the alternate soldering points to the Teensy. It took a long time, and I wasn’t able to get the chip recognized by the Teensy.
I believe that my problem was related to how I was powering the PS3 and the Teensy, but I’m not exactly sure, there could have also been a problem with my wiring.
Being more careful, and using better wire, allowed me to successfully solder the Teensy to the board. I used 30 AWG silver plated, Kynar insulated wrapping wire. It’s really nice wire, the insulation doesn’t melt as easily, the silver bonds with solder really nicely, and it’s thin enough that I can more easily work with adjacent points.
One of the problems with my first wiring attempt was how I was powering everything. You are supposed to wire the Teensy to the 3.3V, and ground pins on the PS3. Before connecting the Teensy to the computer, you need to connect the power supply and front panel to the PS3, and power it on. This is different from the CECHA01 console where I was able to power everything directly through the Teensy.
Similar to the CECHA01, I was able to use NORway, along with its corresponding Teensy program. Reading, verifying, patching, and flashing was basically the same process, except with only one chip, so there was no need to combine files.
The guide I followed had me remove the Teensy, and then turn on the PS3 with the console fully assembled.
PS3 custom firmware installation
For both consoles the actual custom firmware installation once patched was identical. All I had to do was put the custom firmware update file onto a flash drive in PS3/UPDATE folder as PS3UPDAT.PUP, and then install it from the regular update using external media in the PS3’s interface.
It’s important that you don’t have any games in the Blu-ray drive, and that you don’t update from the Internet. In either case you may end up updating your system to stock firmware accidentally, requiring you to repeat the flashing process.
Conclusions
I would definitely recommend using some form of a clip instead of soldering. Soldering is fine, but it’s just very time consuming. If you value your time a $30 clip is worth it. I also recommend using a breadboard with the clip, so that you can easily adjust the wiring if it isn’t quite right, or if you need to flash a different console.
I actually ended up buying an E3 Flasher in between my attempts of flashing the slim console. It arrived after the better wire arrived, so I didn’t end up using it. If you aren’t interested in downgrading any NAND consoles then the E3 Flasher appears to be a good option.
If you are soldering, I recommend high quality wire, it makes the soldering process much faster and easier. Clips can be purchased from websites like AliExpress for a reasonable price A Teensy can be purchased from many places, including Amazon.
Custom firmware is amazing. It makes the PS3 much more functional. You can even play online if you are careful and use programs like PSNPatch before you go online.
This post was just an overview of the installation process. You can find more information on this Reddit wiki page.
[…] March I wrote a post about installing custom firmware onto a CECHA01 PS3 fat, and a CECH-2101A PS3 slim. This post goes […]
Can you post links where to buy the breadboard, nand clip and teensy?