NB Miata project – Performance modifications after six months
In my last post I covered my experiences looking for and purchasing my current project car, an NB Miata. I also covered preventative maintenance work to get the car up to a known reliable state so that I could move forward with other mods and really enjoying the car.
This post covers NB Miata performance mods that I have done to my car during the first six months of ownership. I explain what I did, why I did it, and what my experiences were with various different mods.
Full exhaust system
When I first got my Miata it had an engine code related to the post-cat O2 sensor. My car was originally a California car so it originally had two cat system. A pre-cat built into the exhaust manifold downpipe, and a secondary cat downstream from there. O2 sensors are placed before and after the pre-cat. The secondary O2 sensor is just for emissions, so it didn’t impact the use of the car. I still wanted to fix it, but wasn’t in a rush.
Initially I just replaced the O2 sensors with new ones hoping that it would solve my issue. It did for a bit, but eventually I was still getting the same code. After some research it appeared that there may be an issue with my pre-cat. There were two possibilities:
- A broken up cat. If this was the case it isn’t really an issue.
- A clogged cat. If this was the case it could eventually cause engine damage.
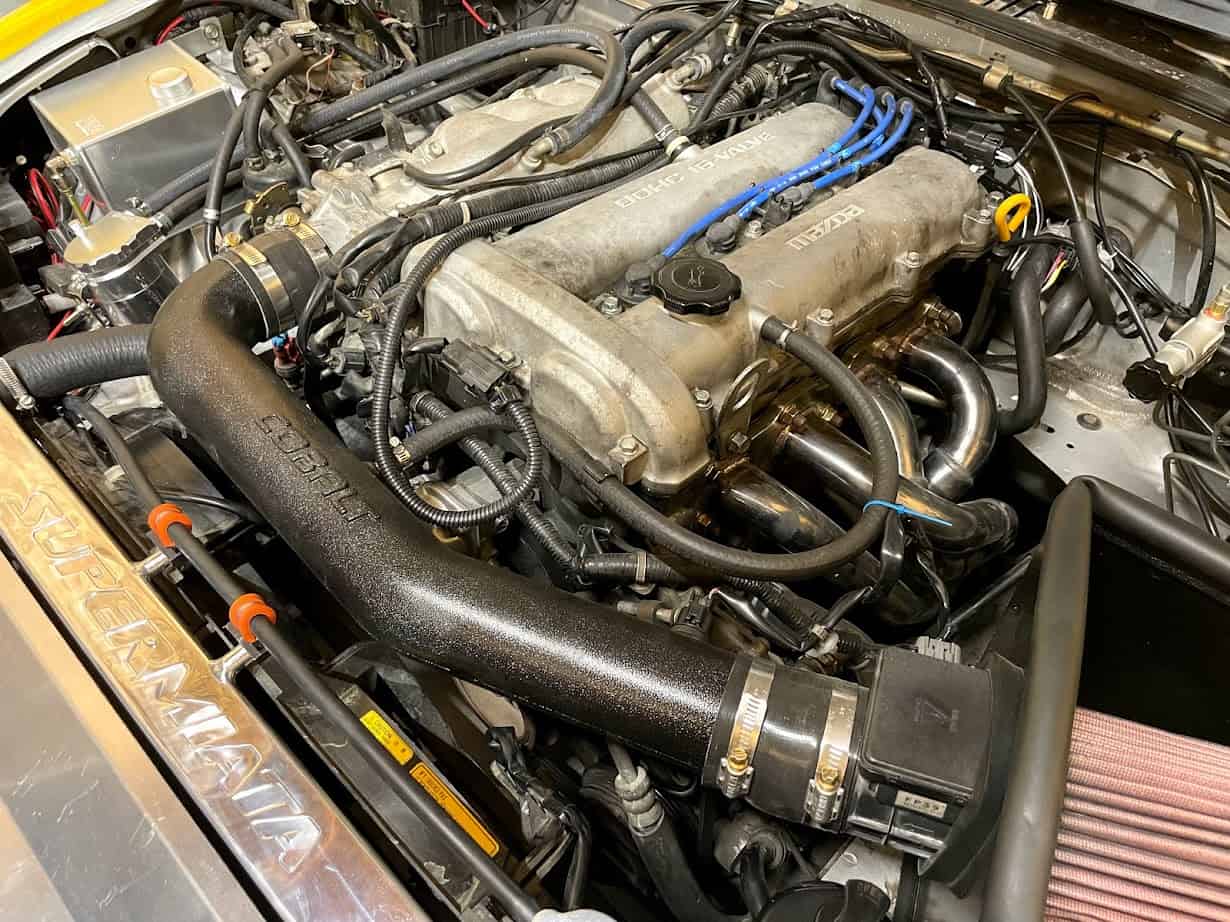
I needed to determine what was up with the pre-cat. I decided to just order a set of headers to replace the pre-cat. I’d get more flow and power, and wouldn’t have to worry about the potential of having a clogged cat. I went with Raceland since they were the cheapest and immediately available.
Raceland headers
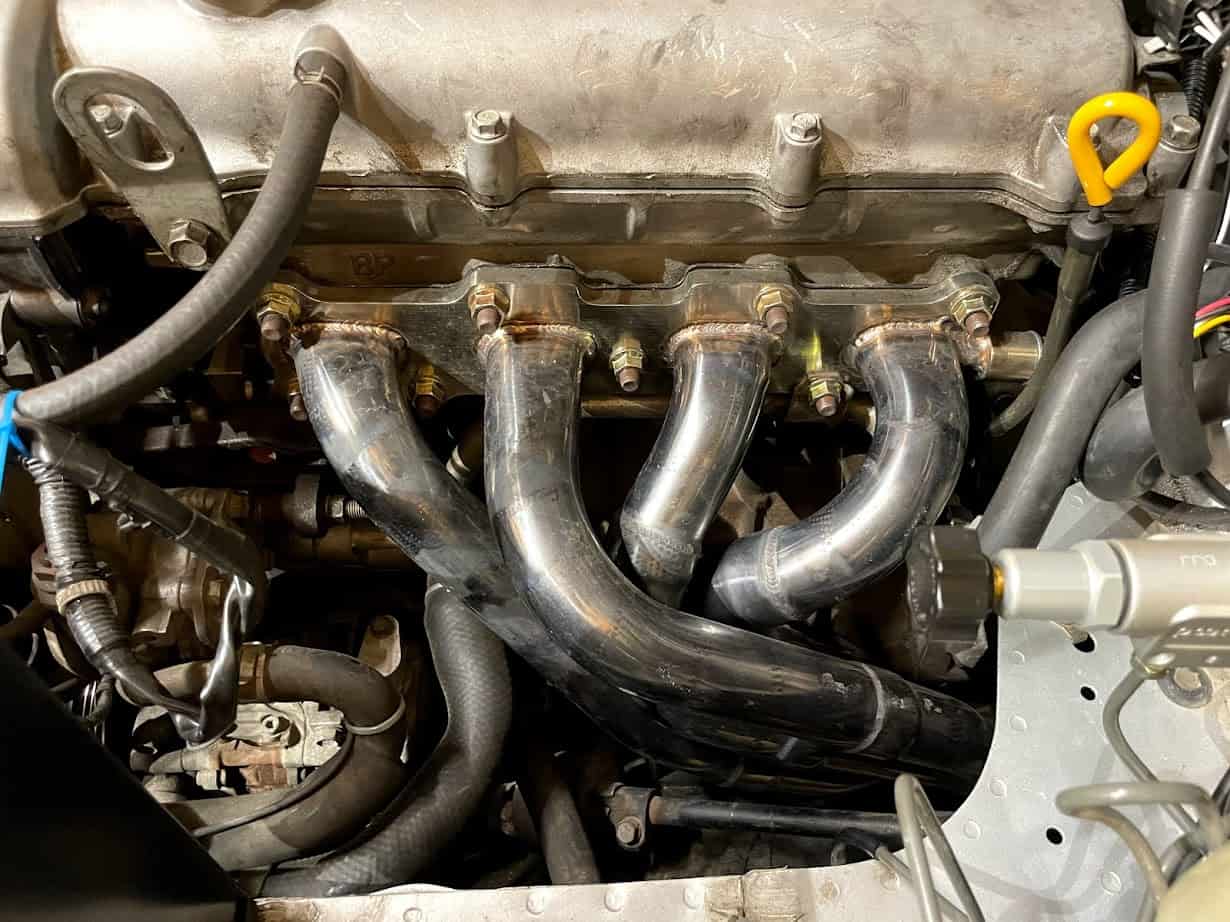
After removing the pre-cat from the car I realized that it was in fact gutted. There was no pre-cat, just an empty section, so I could have kept using the car as-is. I still went ahead and installed the Raceland headers since I had them. They were kind of a pain to install. I had to lift up the engine to make room to slide them in. They made contact with the transmission tunnel so I had to hammer at both the headers and the transmission tunnel a bit. I also had a hard time lining up the midpipe flange with the headers flange.
Installing headers obviously didn’t solve my OBD2 codes, it actually ended up making more codes appear. I no longer had a place for the second O2 sensor, and I never got the EGR pipe reconnected. To get the second O2 sensor installed I had to remove the midpipe from the car to add an O2 bung. The problem with doing this was how rusted the flanges and flange hardware was. There was no way I was getting the exhaust out without cutting. I don’t have a welder, and don’t really have large enough circuit to run one in my small apartment garage, so cutting and rewelding the pipe wasn’t really an option.
Cobalt midpipe
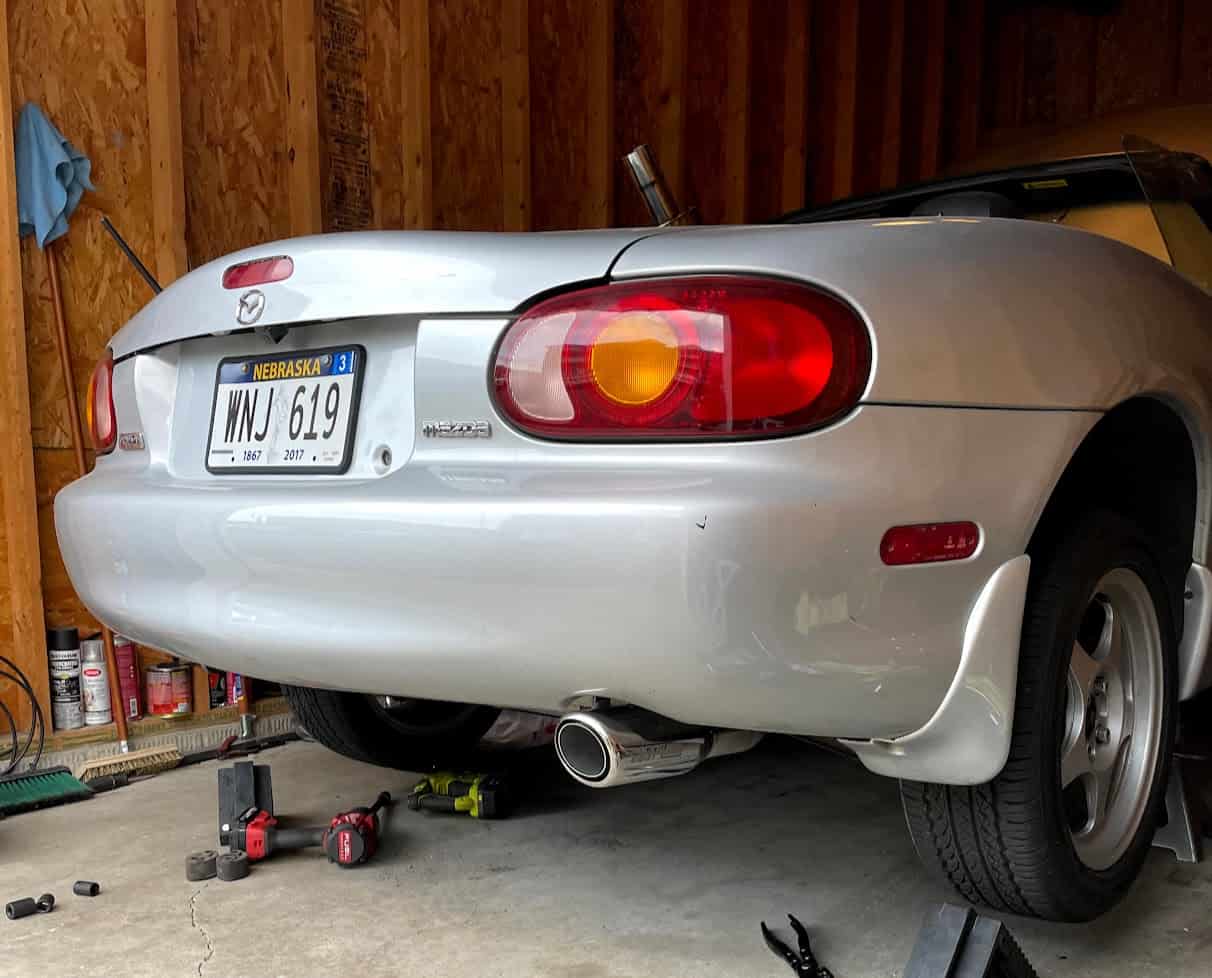
So my obvious solution was to buy a whole new exhaust system. I’d get a better sound, and I’d be able to get that post-cat O2 sensor installed. It would also give me the opportunity to install another O2 bung for a wideband for a standalone ECU. My ideal exhaust was something that was louder than stock, but not too loud. Something that I could hear when driving, the stock system is only really audible when stopped. I didn’t want something that would drone and get annoying on the highway, or get the cops called on me.
I ended up going with a Cobalt midpipe with a Racing Beat Power Pulse muffler. The Cobalt midpipe was basically the cheapest catted performance midpipe with immediate availability. The muffler was a tougher decision due to how many options there were. A lot of people describe the Racing Beat as being too quiet, but it turns out it’s perfect. I can hear it when driving now. It has a slightly deepened stock tone. Under heavy acceleration it really puts out some nice noise, but it also remains quiet and doesn’t drone when cruising.
I found it very interesting to see the quality differences between the components in the exhaust system. The Racing Beat muffler had the best quality, it had perfect beautiful welds. The Cobalt midpipe didn’t have any leaks or anything, but had much uglier welds. My particular Raceland headers were really good looking, but didn’t have the best fitment. I’m sure a lot of this varies from sample to sample, but I’m definitely a fan of mine.
Engine mounts
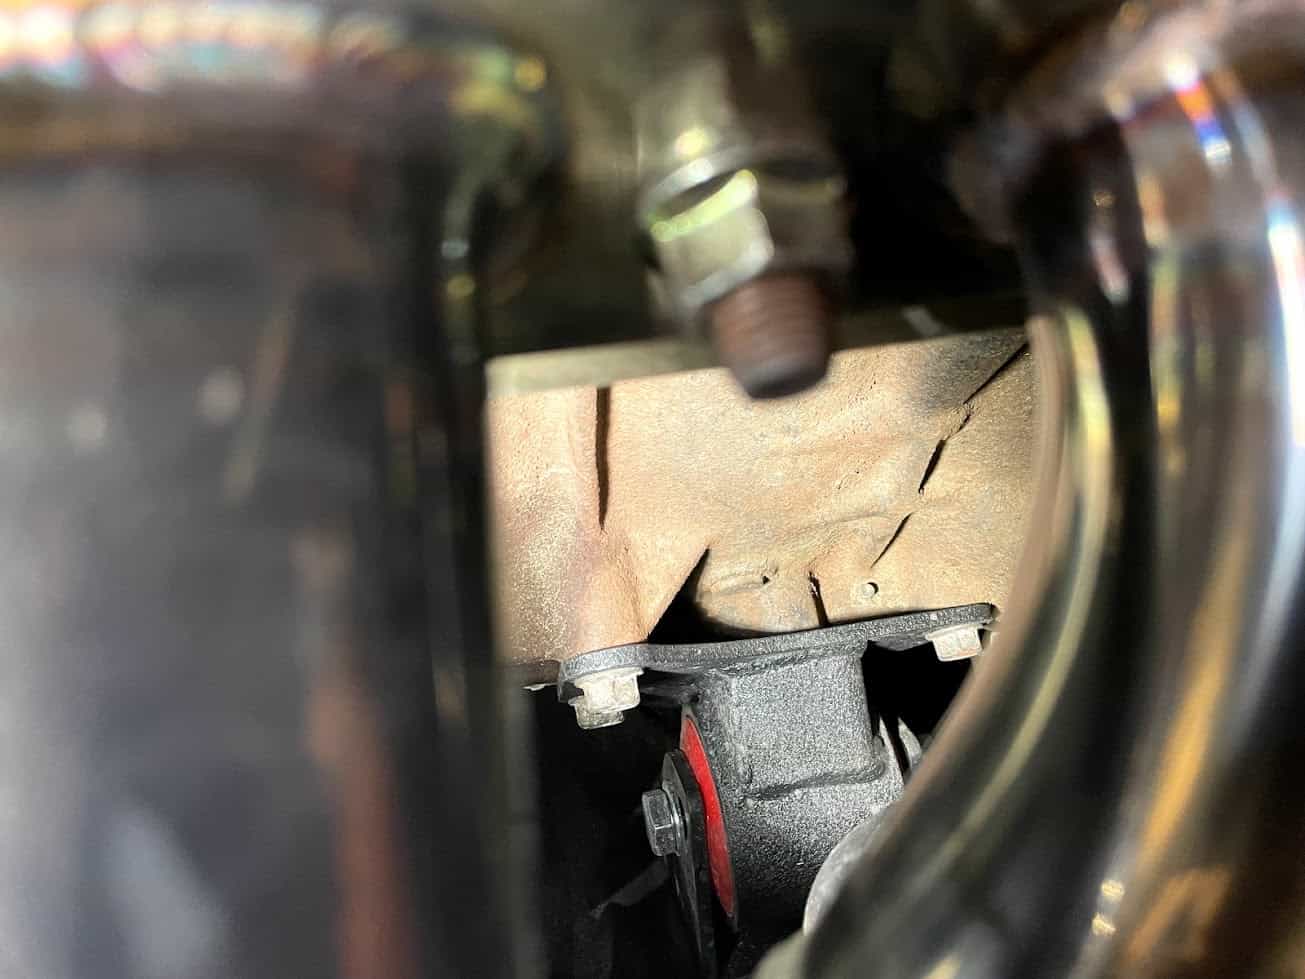
Miata engine mounts are known to wear out over time, especially under hard driving. They can get to the point where the rubber part of the mount is completely split in half. The worn rubber will still hold the engine, it just will move a lot more than it should. I didn’t know the condition of the engine mounts in my car, so I decided to just replace them. I might as well considering taking them out of the car to inspect is just as much work as replacing them.
There are several options when it comes to Miata engine mounts:
- Standard rubber OEM replacement. These are a fairly soft rubber, that allow some movement, but dampens the engine vibrations the best. You get the most comfortable ride.
- MazdaSpeed competition rubber mounts. These are a little stiffer, and keep the original rubber design.
- Aftermarket poly engine mounts. They come in various stiffness ratings, but are all generally much stiffer than the rubber style.
There are a couple of reasons you may want to have stiffer engine mounts.
- Avoid mis-shifting due to transmission/engine movement under hard acceleration.
- Longer lasting mounts. Poly mounts tend to hold up better over time, especially under hard driving and with increased horsepower.
The big disadvantage that comes with stiffer engine mounts is that you get increased NVH (noise, vibration, harshness) from the engine into the rest of the car. You may be able to feel the engine running at stop lights, see parts of the car like the rearview mirror shake, and other things like that. It’s really all about balancing stiffness and comfort based on your preferences.
Innovative poly engine mounts
I personally purchased Innovative poly engine mounts in the softest rating they sell. I wanted to have something stiffer than stock, but not too stiff. These particular mounts use a lot more poly bushing material than most poly engine mounts making them more comfortable, while still retaining the stiffness. They also come with a lifetime warranty so that if they ever wear out I can get a replacement bushing.
Replacing the engine mounts was super easy and quick. I did one side at a time, and kept the subframe bolts loose until I had everything aligned before lowering the engine and fully tightening everything. After examining the engine mounts I took off I saw that they were cracked. They weren’t fully separated, but they definitely were on their way out.
One of my concerns was how much additional NVH the mounts would add to the car. I’m happy to report that it isn’t really a whole lot more harsh than the stock mounts. It was a little harsher for a little while after installing the mounts, especially when stopped on an incline for whatever reason. Over time the mounts seemed to quiet down, and it wasn’t really bad at any point. I personally feel the much improved shifter feel under acceleration makes up for the slight increase in NVH.
Cold air intake
The general consensus in the Miata community is that the stock intake system is going to deliver the most power, especially in the midrange, and especially if you don’t have a tune. For the most part the “cold” air intakes available for the Miata just make a cool noise at the expense of some midrange power. There are some exceptions that may actually genuinely make more power, especially with a tune. For example there are things like the Randall cold air intake that pulls actual cool air from behind the firewall.
My car originally came with one of those bad cold air intakes. It was some sort of eBay type intake that was just pulling super hot air from right above the exhaust headers. Additionally the cone filter was too big and was rubbing against the hood. It didn’t make a whole lot of sense to keep this setup. I removed it and put back on a stock intake system, even though I did like the sound it made.
Cobalt cold air intake
Not long after installing my exhaust I ended up deciding I wanted that cold air intake sound again. I figured the combination of a louder exhaust with the growl of a cold air intake would sound very nice. My goal was to find something that would actually provide colder air to the engine. I ended up choosing the Cobalt cold air intake. It has a good design, positioning of the air filter right behind the headlight, and an included heat shield to separate the intake filter from the rest of the engine bay.
The installation was super easy, and it really does work. I can’t really speak to the gains or losses in power though. The sound is good, and the intake air temperature is decreased compared to the stock intake air temperature. Of course both intakes will pull warm air from the engine bay when stopped. It’s a little pricey for basically a plastic tube with a filter on the end, but it does fit well, and did what I wanted it to do.
Improving chassis rigidity
One of the weaknesses of the Miata chassis is that it isn’t super ridged. For a convertible it’s fairly ridged, but when compared to fixed roof sports cars it has some room for improvement. There are a lot of aftermarket bracing options available to help improve the chassis rigidity. One of those braces are the Paco strong arms (sometimes called frog arms by other companies). They are braces that bolt into the unibody behind the fenders.
Paco Strong Arms
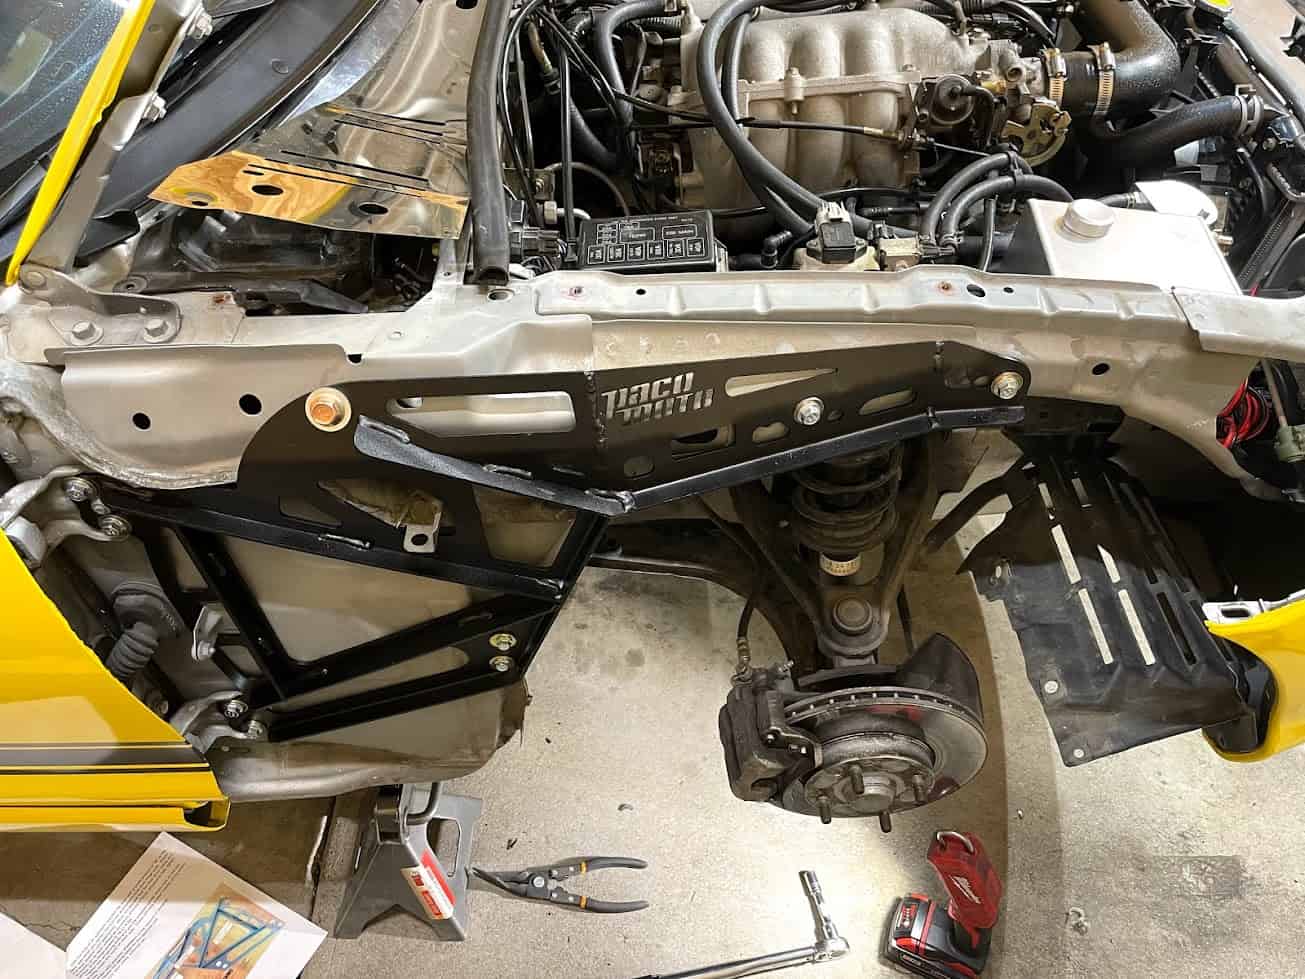
The Paco strong arms are relatively cheap, easy to install, and well reviewed, so I thought they’d be worth installing. Installation consisted of removing the front fenders, widening some holes, bolting in the arms, then putting everything back together. It only took a couple of hours to do. One thing I’d like to mention is that installing them involves unbolting the door hinges from the unibody. This can impact door alignment.
On the first side I ended up getting the door slightly out of alignment so it creaks when opening and closing. It’s the passenger side so it’s not used often, I’ll just need to get it aligned better at some point. When I did the second side I was more careful and jammed some microfibers in the door jamb to hold the door alignment more in place which seemed to help. It still isn’t 100% perfect alignment (slightly harder to open/close), but it doesn’t creak or anything.
After installation I was actually surprised at how big of a difference they made. I get a lot more feel in the front end when turning. Along with more front end stability, more front end grip, and less cowl shake. These are definitely worth the money, especially if you are like me and have no other bracing. It will be interesting to see how other bracing like frame rails and cross bracing improve the car. I’ve also heard that roll bars help.
Master cylinder brace
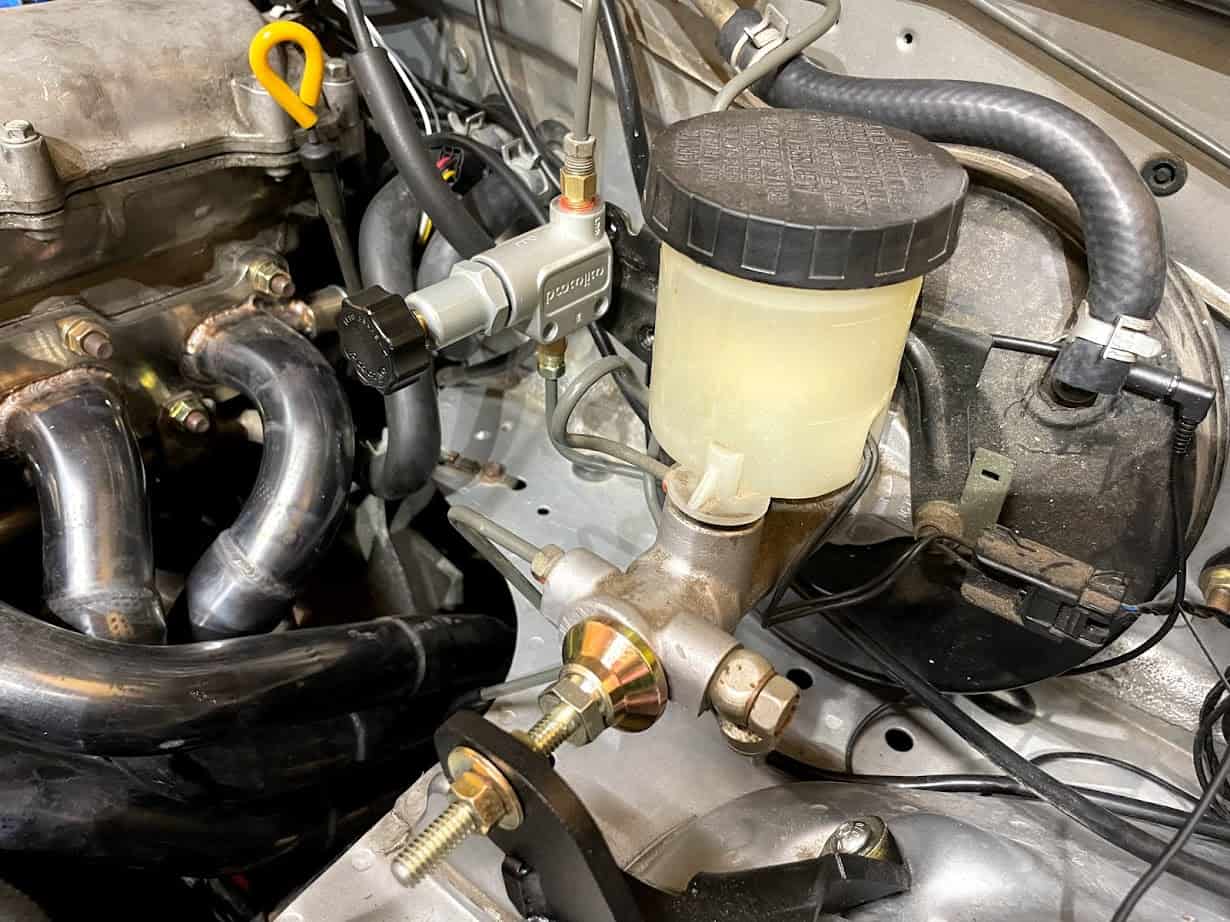
This is a super cheap and easy upgrade that really does improve the brake feel. It simply bolts to the strut tower area, and then has a piece that you can tighten up against the master cylinder. When you press on your brakes you’ll get a firmer feel, and a much more consistent hard braking experience. I was honestly surprised at the change in feel, you really wouldn’t expect there to be much master cylinder flex when pressing on the brakes.
Wheels & Tires
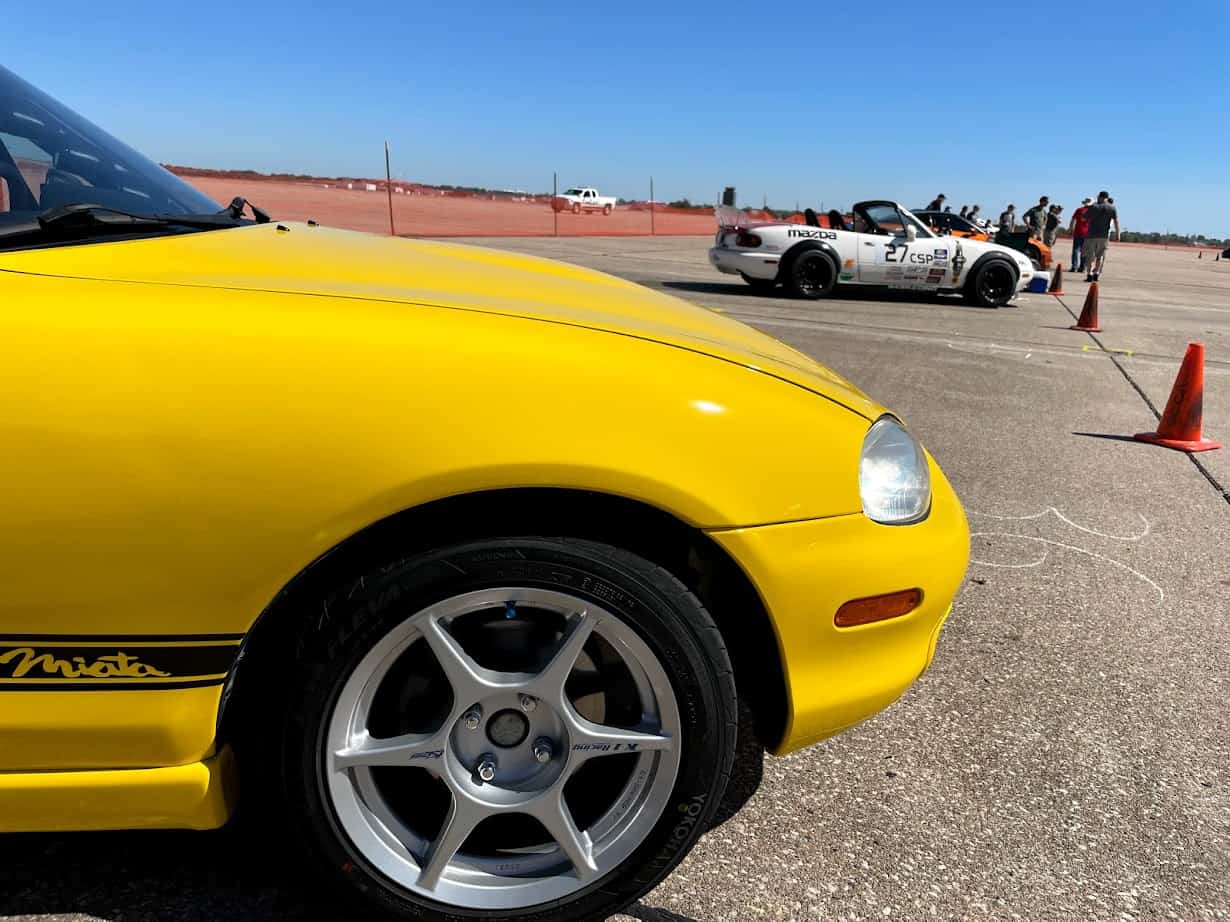
I was planning on driving my Miata on the track at some point, and ended up going for the first time in early September. Before signing up I wanted to make sure my car was ready. Most of the preparation recommendations seemed to revolve around having a fully sorted out car that wasn’t going to break down. I had that covered after I finished baselining my car. Another common recommendation was getting some nicer tires if you were running older tires, especially all-seasons.
All-season tires work fine on the street, but really don’t have a ton of grip. Low grip can really limit how fast you can go around a track. Additionally I read that some all-season tires can get damaged when they get driven hard and get really hot on the track. Things like becoming super slippery, or losing chunks of tread. I didn’t really want to risk damaging the fairly new all-season tires that came with the car, so I got a set of new summer tires.
Ideally I wanted something that was a dedicated high performance summer tire, but also something that didn’t have too much grip. I wanted to be able to still feel the limit of grip of the tire as a beginner. Super high grip tires also tend to wear out quicker, and not do so well in the rain. Ideally I’d be able to use my set all summer on the street.
Yokohama Advan Fleva V701 summer tires
I ended up getting a set of Yokohama Advan Fleva V701 tires. They were cheap, a name brand, had good reviews, and seemed to be the balance I was looking for. I had them installed on some Kosei K1 Racing wheels since they were lightweight, cheap, and looked good. The setup is 195/50R15 tires on 15×7 wheels with a +30mm offset. That is roughly the same as the wheel/tire dimensions that were already on the car (no rubbing, and good fitment).
As someone who has always had more economy oriented all-season tires in the past I can say that these tires are a huge upgrade. Before it was really easy to make the tires spin, and squeal on the street, even with a low horsepower Miata. It’s really hard to lose traction with these summer tires. Plus they actually ride more comfortably and smoothly. In some ways being able to make the tires squeal on the street really easily is fun, but having that additional grip really came in handy on the track.
These particular tires I purchased had a note on the product page saying not to use them when temperatures are below 40 degrees. That is really my only complaint so far. I’ll most likely need to put back on the all-season tires in the fall when it can be cool in the mornings. Having a summer tire that works all the way up until I put away the Miata for the winter when it starts to freeze and snow would be ideal. I don’t know if the 40 degree limit is a hard limit where the tire will be damaged. It may be more of just a liability thing where it has much reduced grip below 40 degrees.
ECU Tuning
In my opinion one of the drawbacks of the older Miatas is that their ECUs are very outdated and can’t really be tuned to increase performance. For a Miata to truly make more power it really needs to have a standalone ECU that is tuned to accept power mods. Even something like a stock car with an exhaust and intake can make more power with a good tune. So eventually at some point during my Miata ownership I’ll want to be running a standalone ECU.
ME442 standalone ECU
I ended up buying an ME442 ECU and attempted to get it running myself. The ME442 is a pretty popular ECU in the UK, and was a decent amount cheaper than the MS3 PNP ECUs sold in the United States. Installation was super easy. Take out the factory ECU, cut out holes in the case for the new hose and wires. After installing the wideband and running the vacuum line I was pretty much ready to go.
I loaded the basemap and started up the car. It took a little longer to start, but did start and run without needing to press on the gas. Looking at my AEM wideband was showing that the car was running really lean at idle. I went out and drove around the block just to see the state of the tune. It worked, but wasn’t really running as nicely as the stock ECU. It also wasn’t turning on the alternator to charge the battery so I didn’t drive it for very long before returning to my garage.
I spent a few hours tweaking settings trying to improve the setup. What eventually made me give up on the installation was that I still wasn’t able to get the alternator to charge. Additionally the engine was getting pretty warm and the fans weren’t turning on.
Trying to install the ME442 really showed me how much goes into a standalone ECU. There are a ton of settings, and how a basemap generally isn’t something that you can just flash and run with. I’d really like to be able to install and tune a standalone ECU by myself, but this may be something that does need an actual tuner with a dyno. I’ll try again in the future, maybe with a MS3 instead.
Dyno results
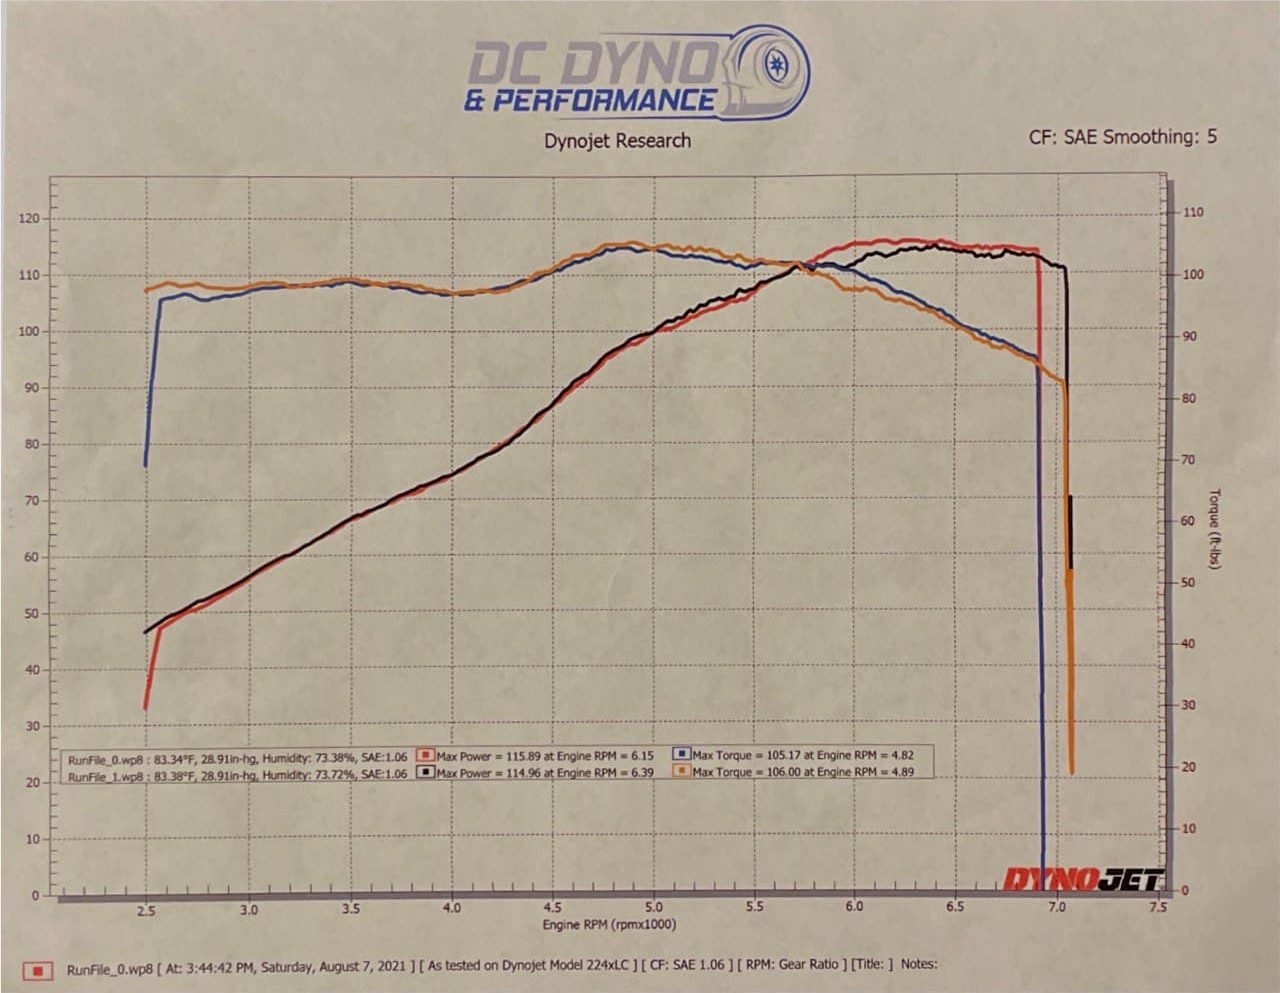
At one of the car shows I was at there was a mobile dyno you could run your car on for a small fee. The purpose of the dyno was a horsepower competition, which I obviously wasn’t going to stand a chance at. However, it did give me a good opportunity to see the current power level of the car. The dyno pulls happened fairly late in the summer so I had the full exhaust done, along with the preventative maintenance, and the cold air intake.
My best results out of the two runs were 115.89 hp at 6150 RPM and 106.00 lb-ft at 4890 RPM. These results seems to be in line with the higher end of stock numbers back when NB1 Miatas were new. That’s a good sign. I’m basically getting the most that I can out of the stock ECU. In order to get more power I’ll need to install a standalone ECU and adjust the tune to maximize the potential of my mods.
From my understanding installing a standalone ECU can actually get a decent amount of power out of a completely stock engine. Once you start doing mods like upgrading the intake manifold, and installing higher performance cams, you can get even more power. But at the end of the day a naturally aspirated car can only make so much power without spending a ton of money. The Miata really does show that you can have quite a bit of fun without a whole lot of power.
Conclusion
Miatas aren’t known for making a ton of power or being fast in a straight line. After six months with my Miata and installing multiple mods I’m still only making essentially stock power. However, I was able to really improve the driving experience of my car.
Over the six months I installed things like an exhaust system and intake gave my car a nice sound I can hear while driving. After installing engine mounts I had a much more precise shifter feel under acceleration. Summer tires and Paco strong arms gave me a much improved handling feel that made me more comfortable bringing my car to the track.
I’ll be publishing more posts in the near future covering more of my first six months with my Mazda Miata. Further down the road I’ll probably do additional performance mods that I’ll cover as well.