Cheap Xbox 360 S Trinity RGH using an LPT port and X360Ace
Out of the three seventh generation consoles that I have modded, I found the Xbox 360 to be the hardest to hack, mostly because of how hard it was to find current tutorials. Forums are filled with outdated information, and there are just so many different modchips, console revisions, and methods of hacking. I wanted to know how I could mod my Trinity console into a Trinity RGH console.
This post covers the process of doing an RGH2 mod on my Xbox 360 S Trinity console as cheaply as possible. Most guides mention buying expensive NAND programmers, glitch chips, QSB’s, and other specialized parts. I’ll be using a cheap $7 modchip, along with several dollars worth of electronics that you might already own.
What you’ll need
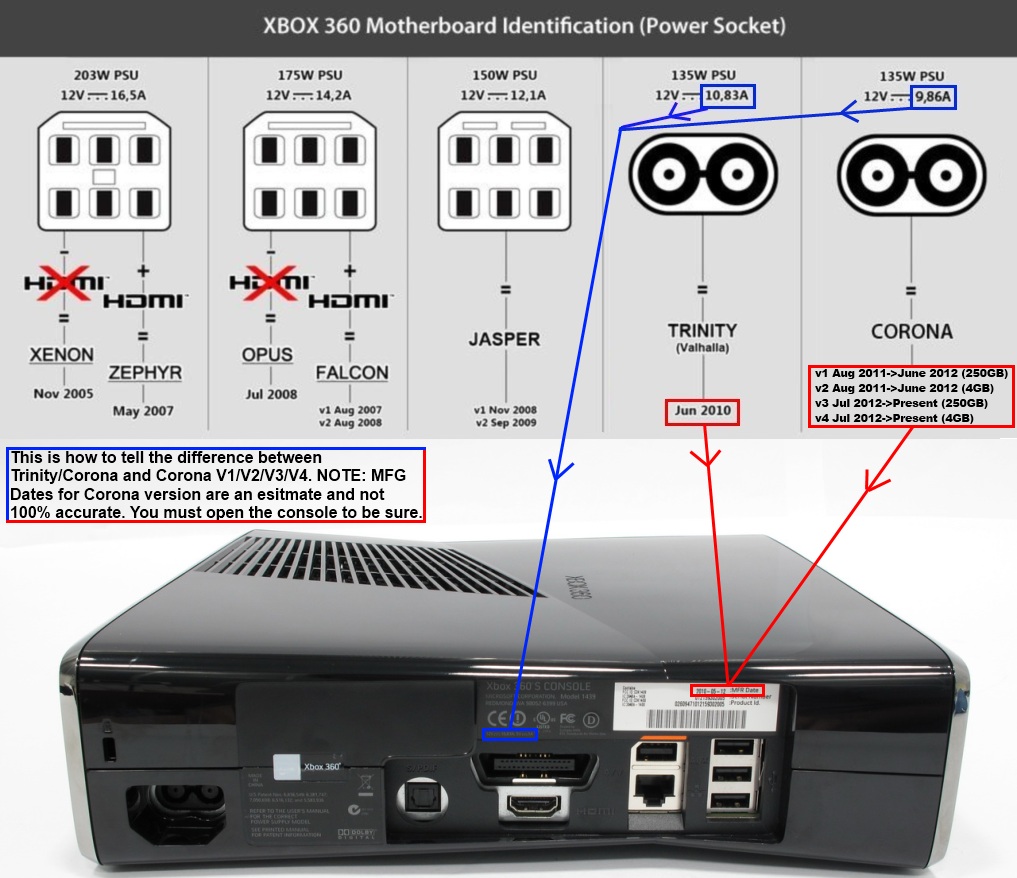
Here’s a short list of items that you’ll need in order to RGH your console. You can find out which model your Xbox 360 console is by looking at this chart. Having a second male LPT connector would be useful if you plan on hacking multiple consoles since you won’t have to resolder when switching between NAND flashing and glitch chip flashing.
You, or someone you know, probably has an old computer with an LPT port. Just look for something with an old purple printer port on the back, ideally running Windows XP. You’ll probably be able to find one for free.
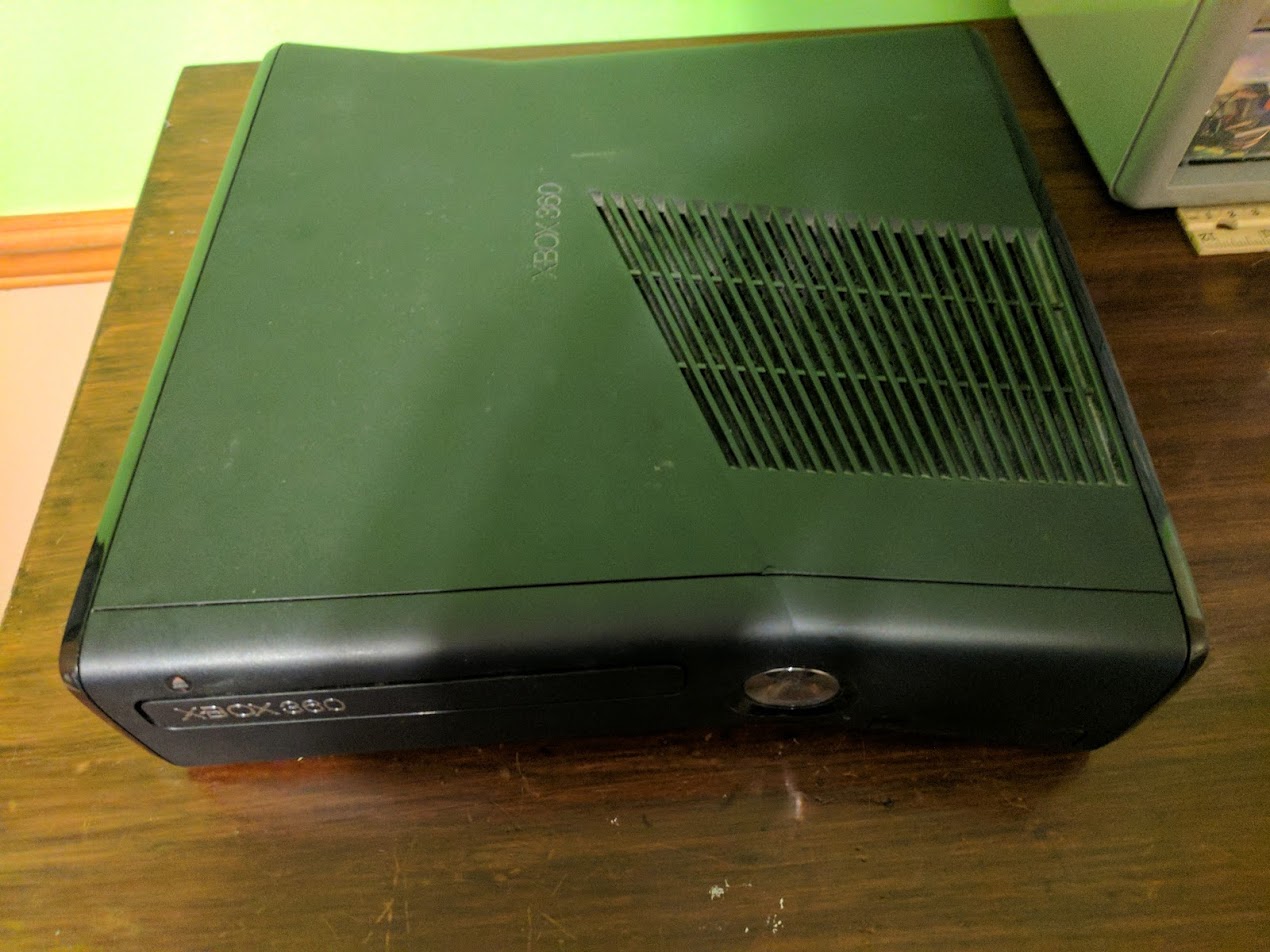
- Trinity Xbox 360 S console
- Soldering iron and solder
- X360Ace V3 glitch chip
- Male LPT connector
- 5x 100 ohm resistors
- 1x 3.3k ohm resistor
- A ~3.3V power source (2x AA batteries in series works)
- Wire
- An old computer with an LPT port
Additionally you’ll need some software, I’ve uploaded a zip file with all of the software needed for the guide below.
Step 1 – Preparing the Xbox 360 for a NAND dump
The first thing you’ll need to do is dump the NAND on your console. This is done by connecting the LPT port of a computer to seven points on the Xbox motherboard’s JTAG headers.
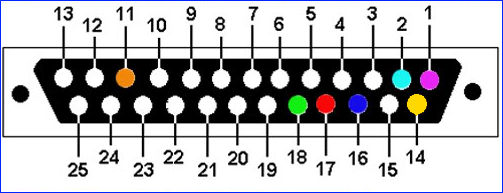
Above is a color coded image showing the back of an LPT connector, this is the side you are soldering to. Attach an 100 ohm resistor to pink, light blue, yellow, blue, and red. Then attach a short length of wire to each resistor, and to the remaining two colors on the port (green and orange). It should look something like the image below.
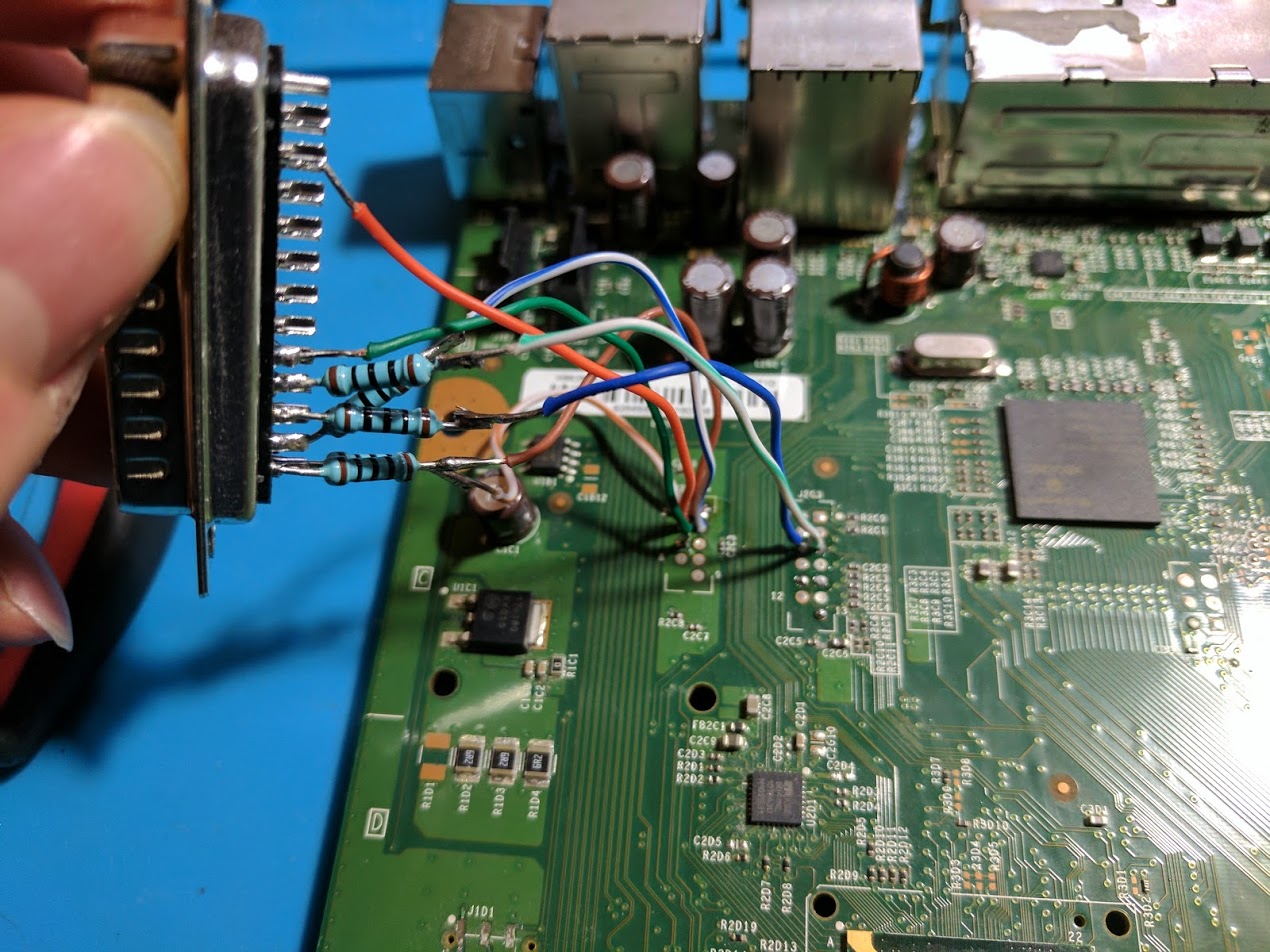
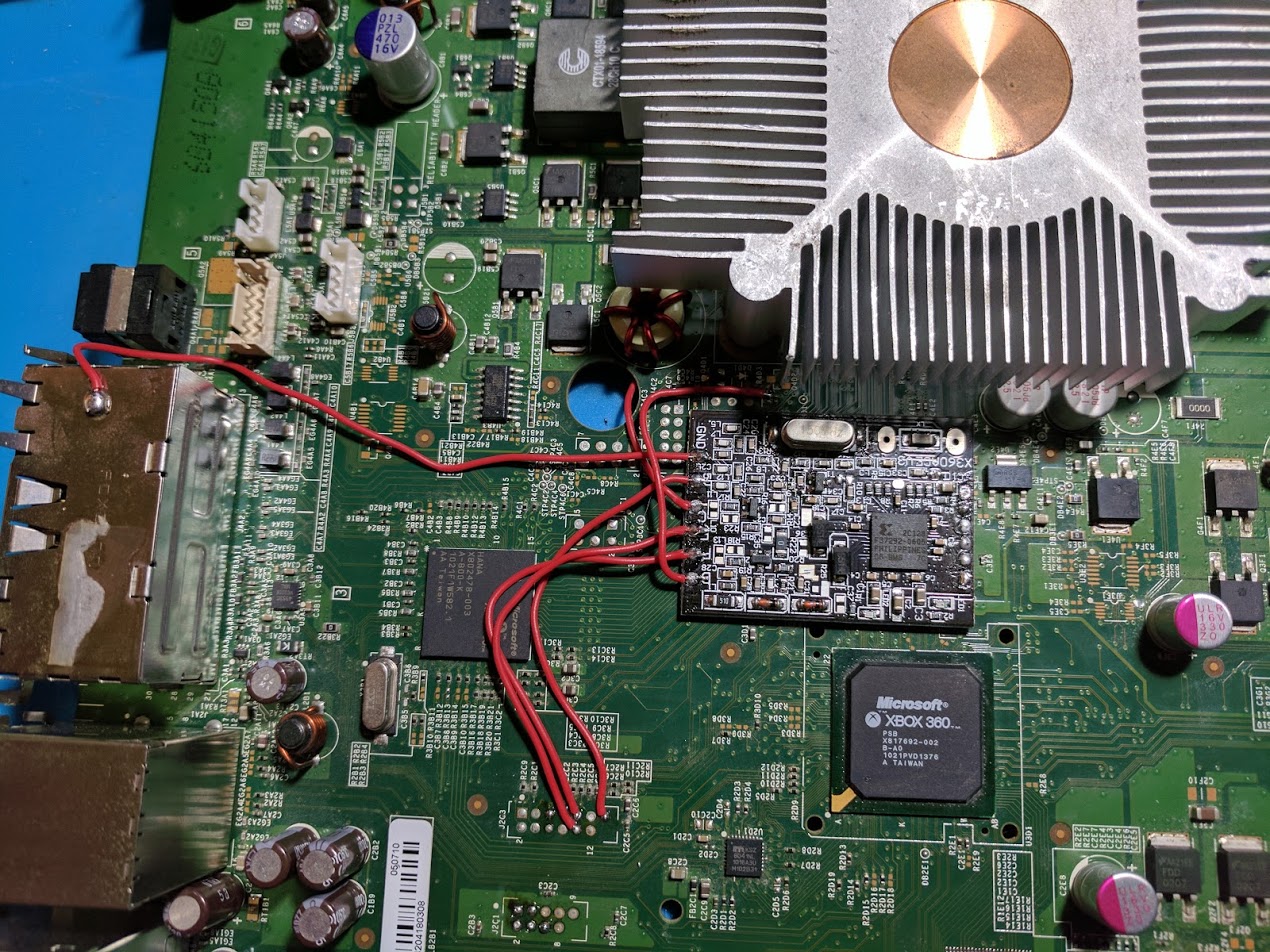
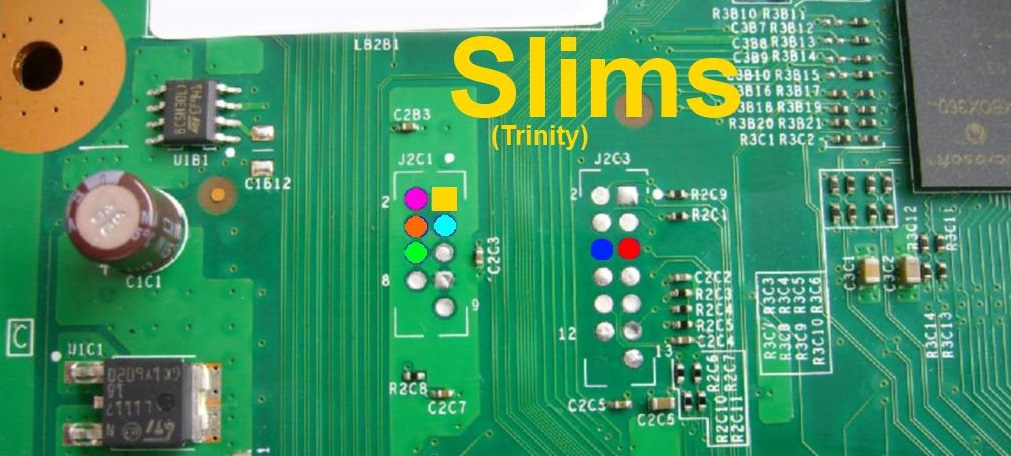
Now you need to solder the wires coming out of the LPT connector to the Xbox 360’s motherboard. Below is an image showing the same seven colors on the JTAG headers. Solder the LPT wires to the matching colored JTAG port holes. It should look something like the image above when done.
You might have noticed that my wires are very short. Short wires are very important. I had tried this with a Corona v5 console and a longer length of wire and wasn’t able to read the NAND chip at all. My working wires are about 6cm long. I don’t know the maximum length of wire that will work, but if you are having issues and your soldering is good, you might want to try shortening the wires. I used wires out of a CAT5e Ethernet cable.
Step 2 – Dumping the Xbox 360 NAND
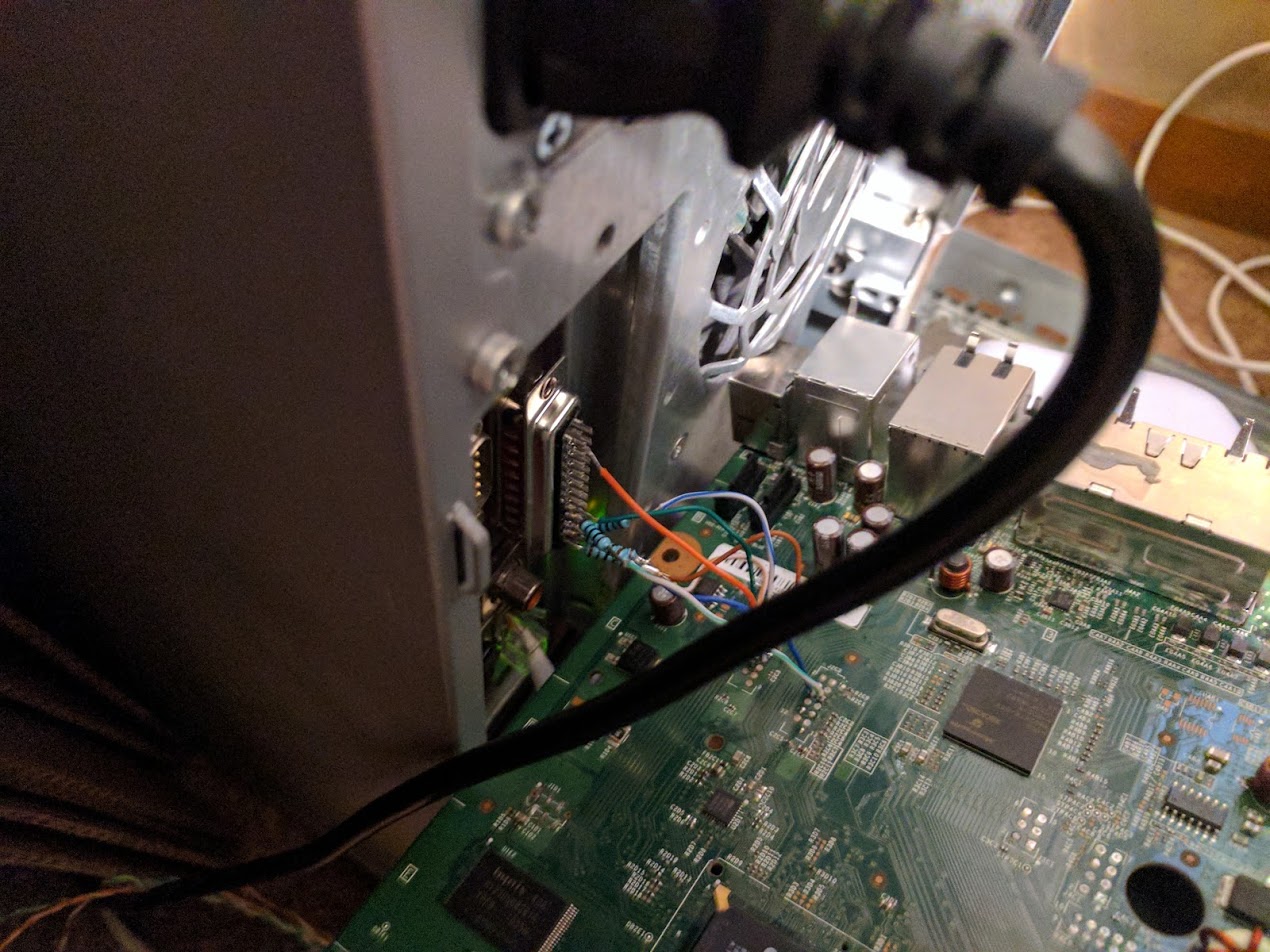
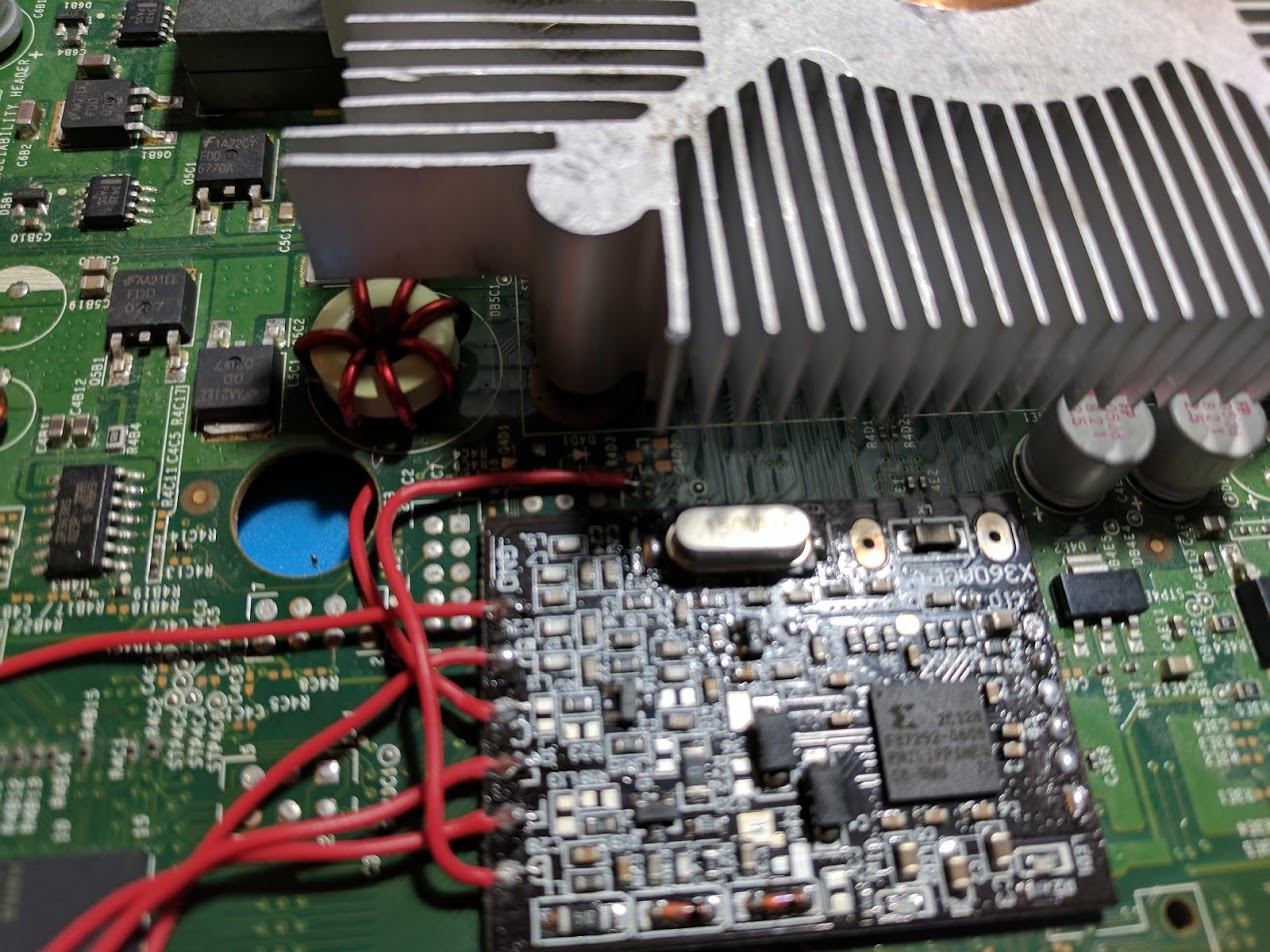
Now that you have an LPT connector soldered to your Xbox 360’s motherboard, you can dump the NAND. To do this connect the LPT connector to the LPT port on the back of your old computer. Then connect the power supply to the Xbox, but don’t turn on the console. Above is an image showing my board connected to a computer.
To read the NAND you’ll need to use a program called NANDPro30. For a Windows XP system you’ll need to install the port95nt.exe file for the LPT port to work. Once installed you can open a command prompt window, and browse to the location of the extracted NANDPro folder.
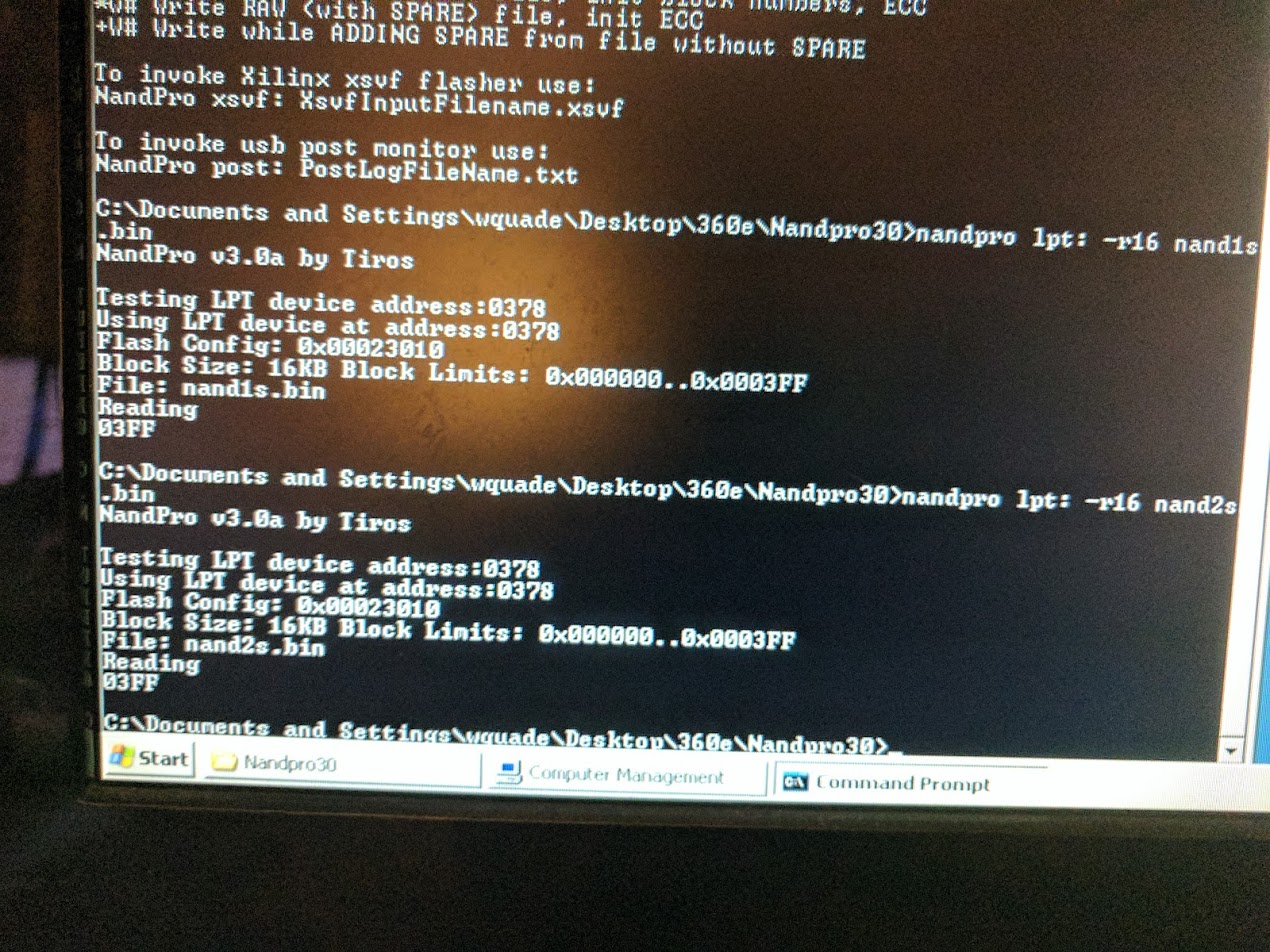
To read the NAND type in the following into the command prompt:
nandpro lpt: -r16 nand1.bin
It should say something about the NAND being read. It’ll take a while, so let it run. If you get an error check your solder connections, wire length, and LPT port settings in the BIOS (I was able to use default settings, but you might need to make some changes).
Once the reading has finished, run the same command a second time, but change nand1.bin to nand2.bin. It’s important that you read the NAND twice, so that you can compare them to know if you got a valid dump or not.
Step 3 – Generating and writing an ECC file to the NAND
Now you’ll need to prepare the NAND chip for the glitch chip. To do this you will need to generate an ECC file using another program called J-Runner. You might need to install a version of .NET Framework onto your computer to get J-Runner to work with Windows XP.
Begin by selecting the two NAND dumps you made with the load source, and load extra buttons. Then click NAND compare. If you don’t get a message saying NANDs are the same, you’ll need to go back to the second step until you can get at least two good NAND dumps. Good NAND dumps are really important.
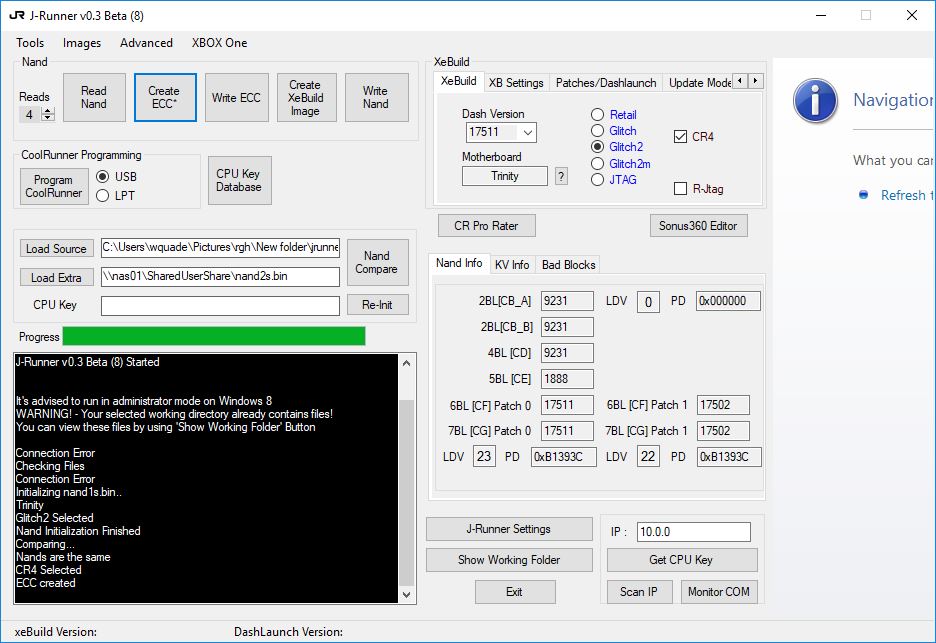
Now make some selections in the XeBuild section. Select your dash version, Glitch2, and check CR4. Now you can click on the create ECC button in the top left. You should see an ECC created message in the message log. Above is an image of the J-Runner program after doing all of the things listed above.
Now copy the image_00000000.ecc file from the output folder inside of the J-Runner program folder to the folder where you have NANDPro30 installed. With your Xbox 360 still connected to your computer, run the following in the same command prompt you used to dump your NAND.
nandpro lpt: -w16 image_00000000.ecc
This command writes the ECC image to the NAND chip. It’s much quicker than the NAND dumping because it only has to write to the first 50 blocks of the NAND. Below is the output of that command.

After writing the ECC file to the NAND your console will no longer be able to boot without a glitch chip installed, so you’ll need to finish this guide in order to use your console.
Step 4 – Flashing XSVF Trinity timing files to the X360Ace V3
The X360Ace V3 comes preprogrammed for Corona consoles, so you’ll need to flash updated XSVF timings to the chip for Trinity boards. I was able to do this using my LPT connector.
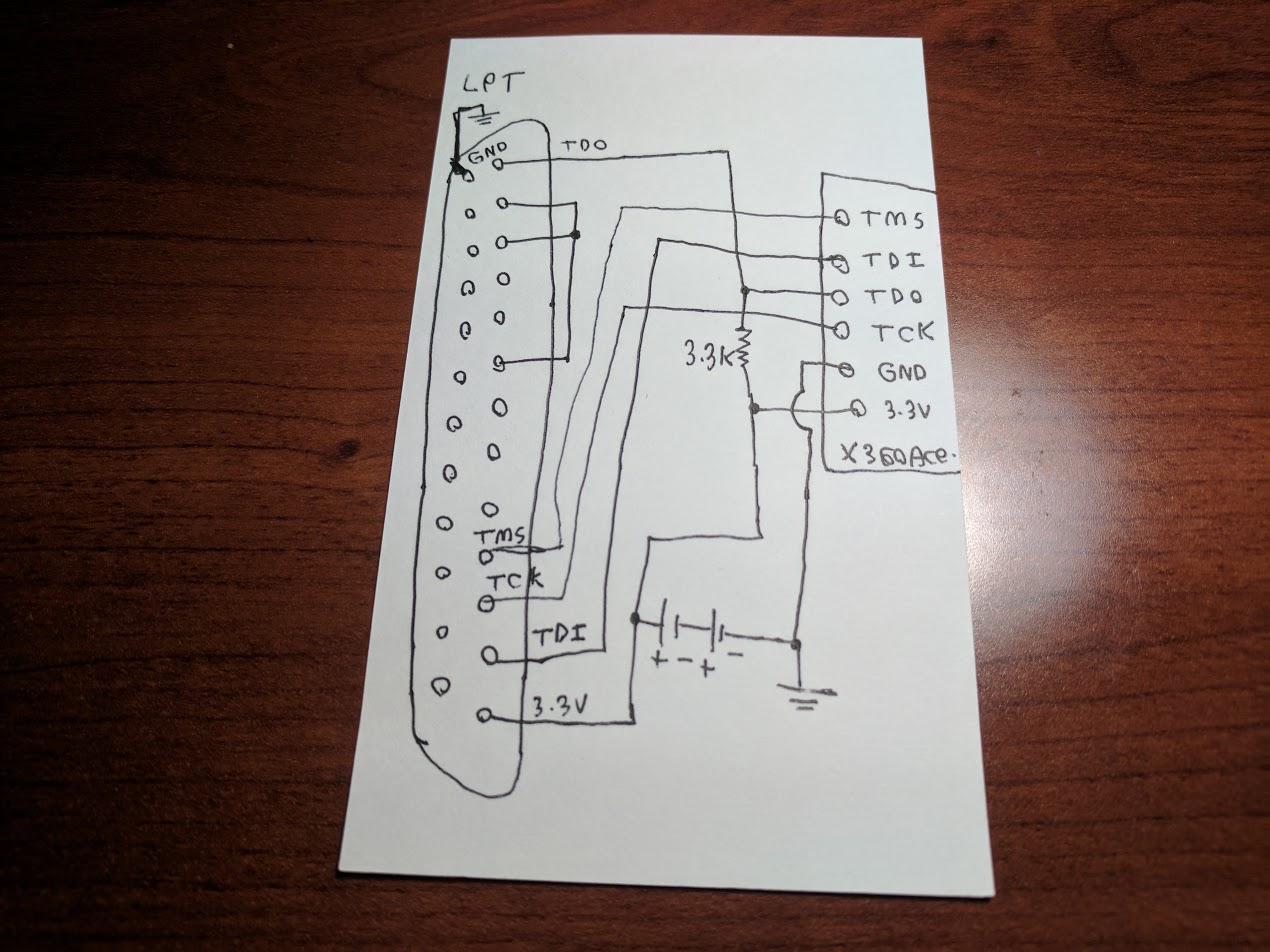
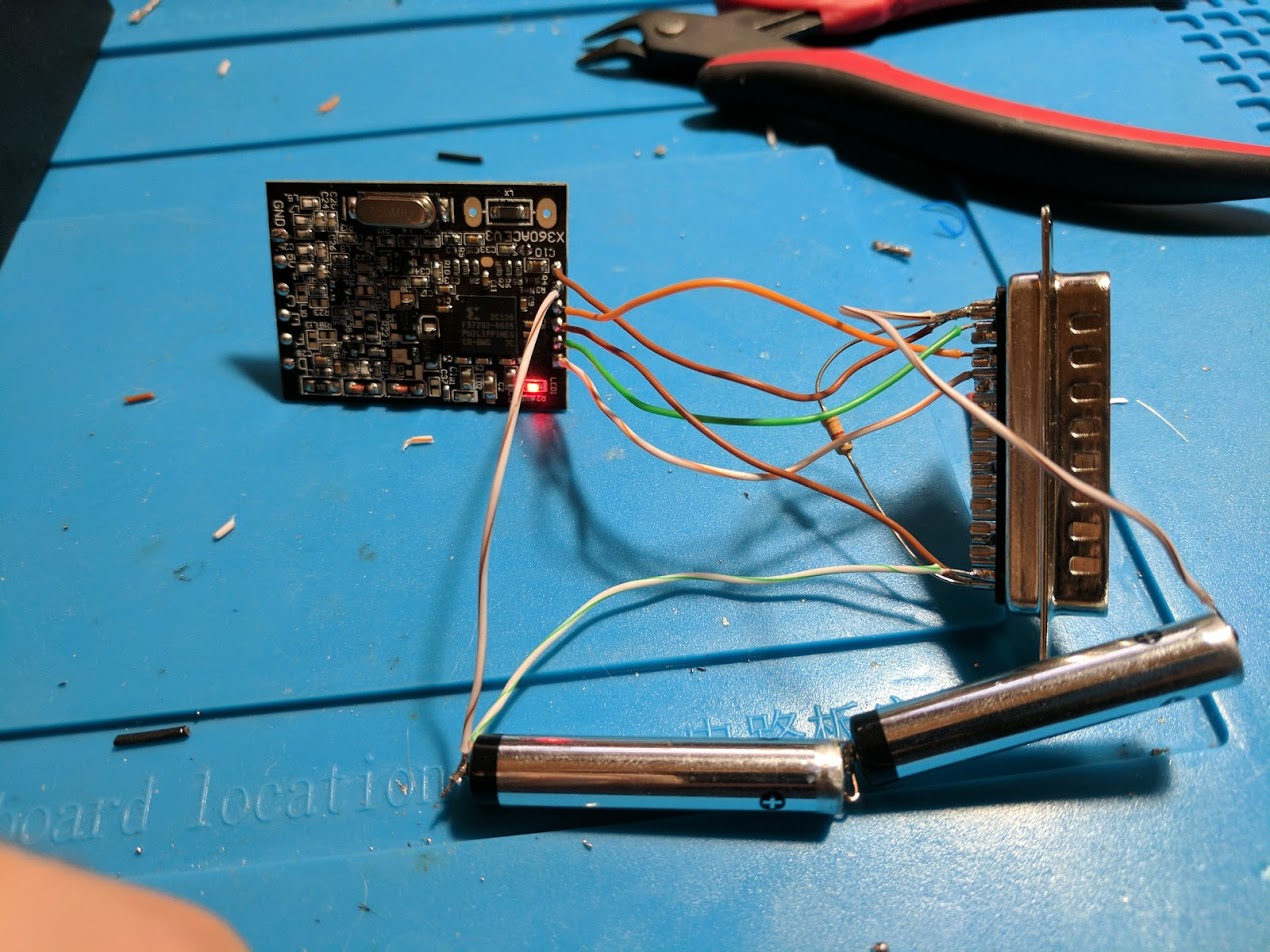
Above is a hand drawn schematic of how you need to connect the LPT connector to the X360Ace chip. The LPT connector is being viewed from the side you solder to, and the X360Ace text on the image is where the text is printed on the actual chip. The image has two 1.5V AAAA battery cells shown to get the 3V output. You can use any 3V or 3.3V source, something like a couple of AA batteries works. Below is an image of how I wired everything together.
To program the X360Ace chip plug in the LPT connector into the LPT port on your old computer, and open up J-Runner. Make sure you have selected LPT, and entered the port number, into the CoolRunner programming section, and then click on advanced, and then custom NAND/CR functions.
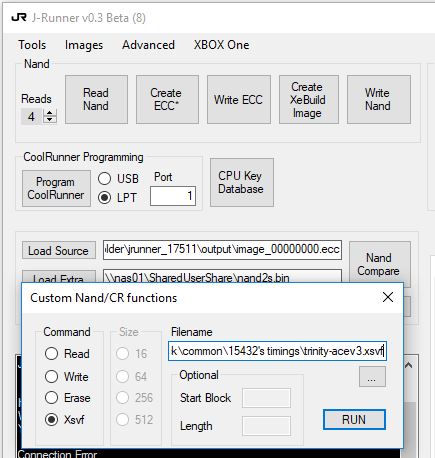
A windows should pop up, and look like the one displayed above. Select the XSVF command, and select the trinity-acev3.xsvf file for the filename. You can then click the run button.The J-Runner output window should have a success message printed on it. My X360Ace chip also had a green light that turned on. Below is an image of the J-Runner output window box.
Step 5 – Soldering the X360Ace V3 to your Trinity board
Once your X360Ace chip has been flashed with the updated timing file for Trinity boards, you can solder the X360Ace chip to your motherboard. This involves soldering the six included wires from the chip to various parts of the board.
I have some general soldering tips on this page. For the X360Ace make sure your wires are as short and direct as possible, and that there is as little exposed wire on the ends that touch the board as possible.
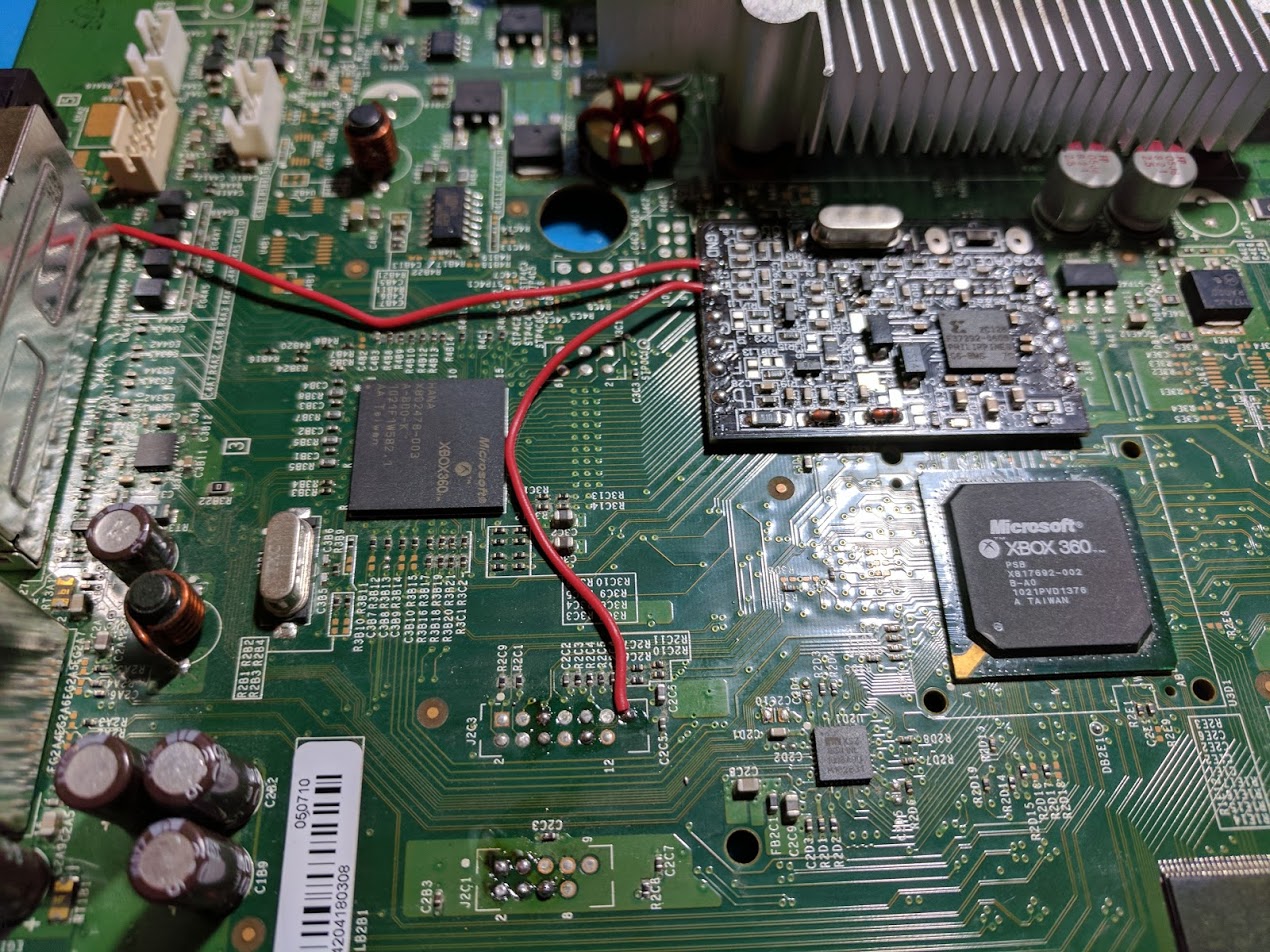
I started by wiring the ground wire from the ground pin, to the metal shielding around the video output ports. Then I wired the 5V line from the chip to the point on the JTAG header pictured above.
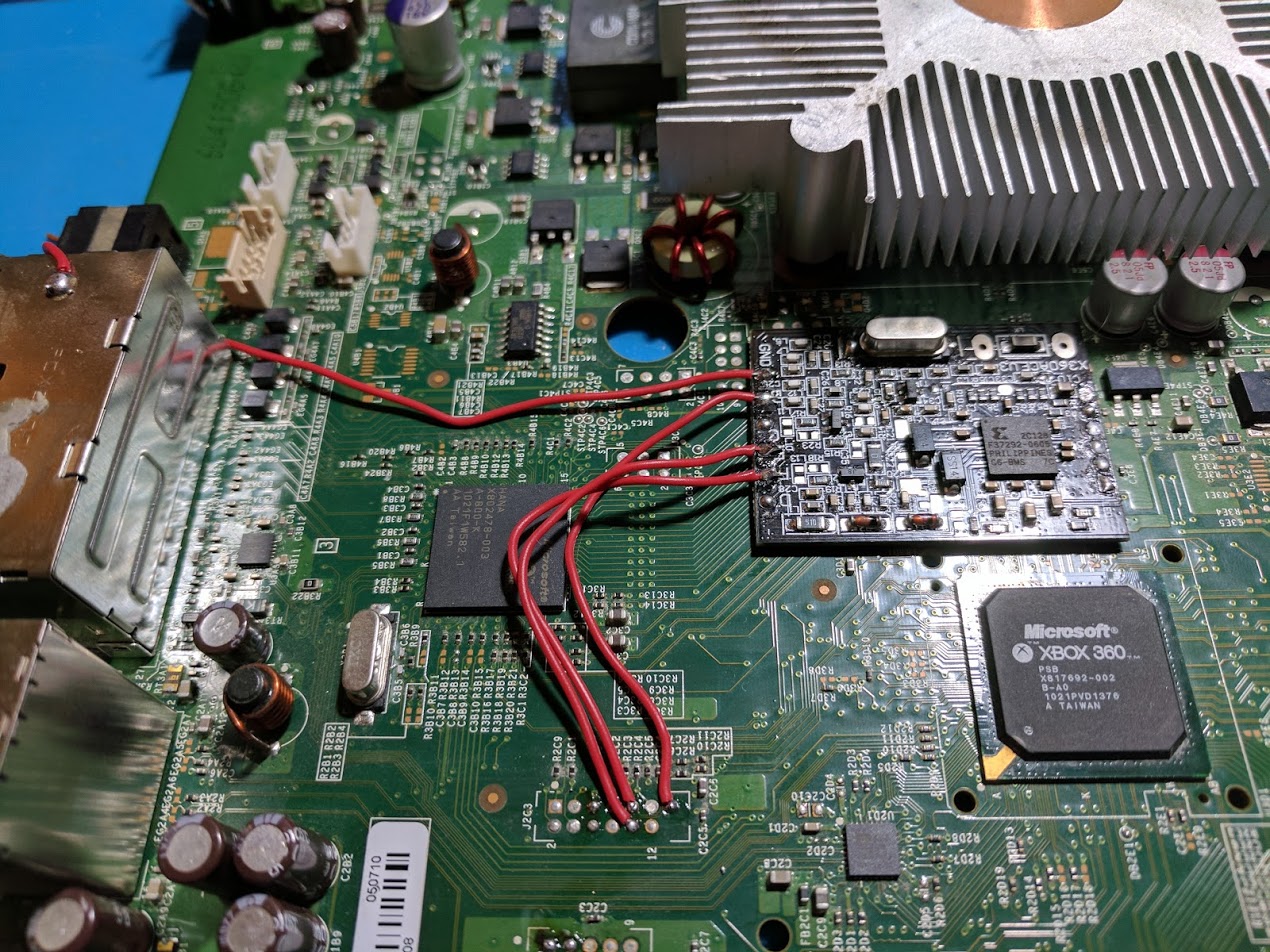
Next I wired the E and F points on the chip to the two corresponding points on the JTAG header pictured above. The F point is the one positioned closer to the X360Ace chip, and the E point is positioned farther away from the X360Ace chip.
Next I wired point C to one of the pads on the back of the Xbox 360 motherboard. Route it through the back through the hole, and connect it to the small point pictured above. The point is the second point on the second row, when counting from left to right, and from bottom to top.
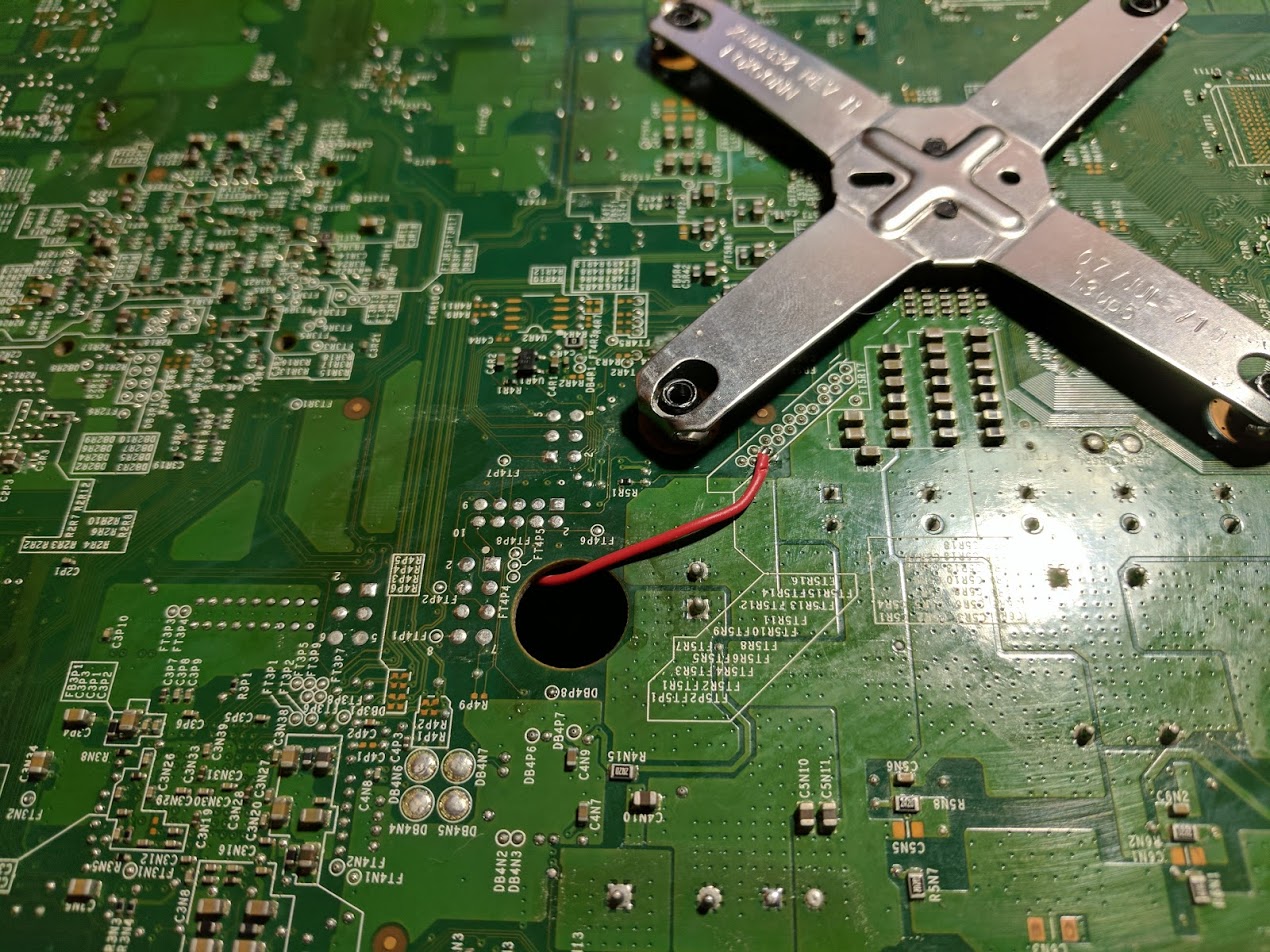
Finally wire the last point, point D. This point is the toughest to install, you may need to remove the heatsink if you can’t reach the resistor with it on.The image above shows the wiring to the resistor, but it’s really hard to see. There are two resistors right next to each other underneath the heatsink fins. Wire point D to the left resistor, on the side of the resistor that is closer to the processor.
Step 6 – Creating and flashing your XeBuild NAND image
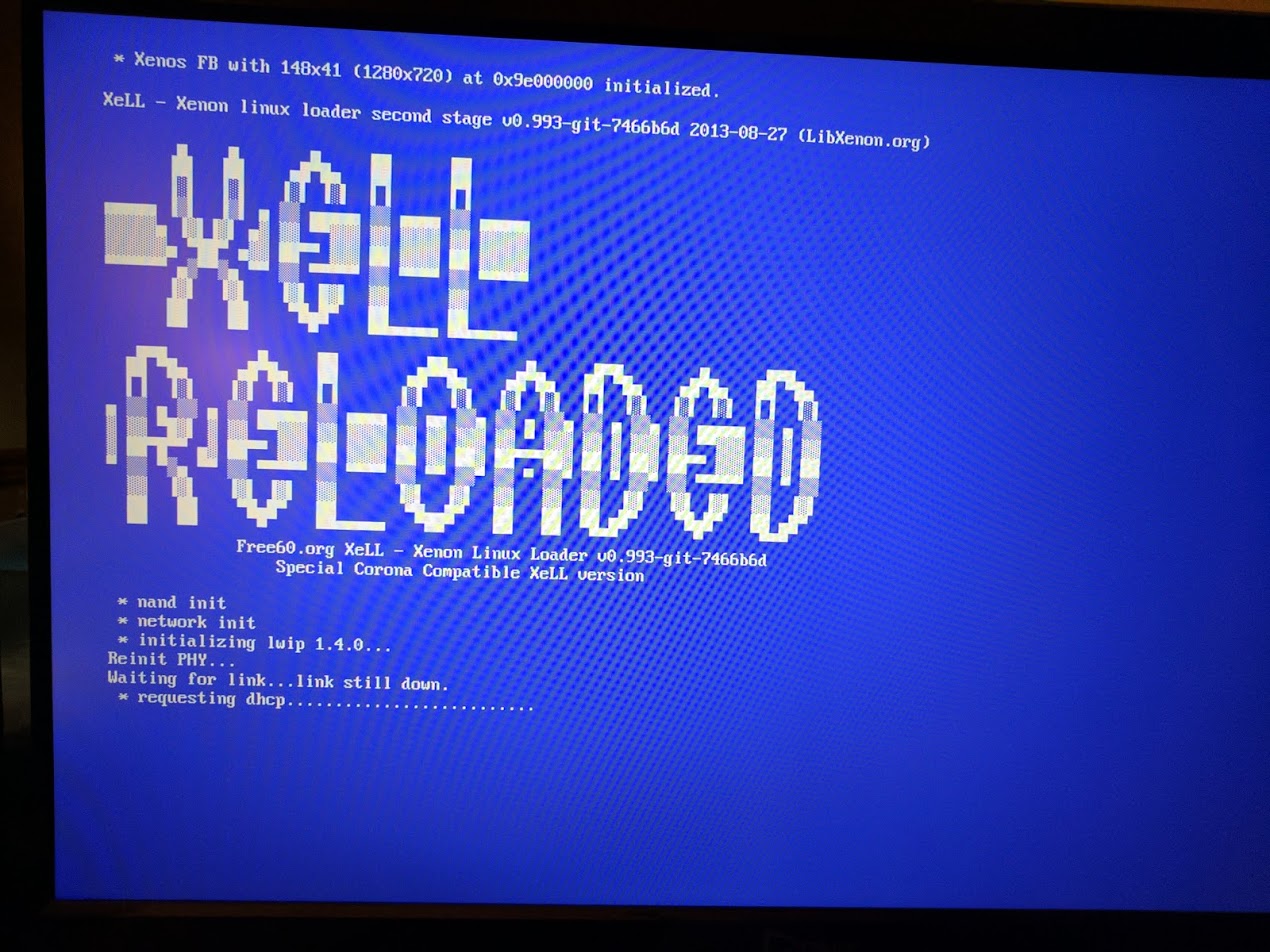
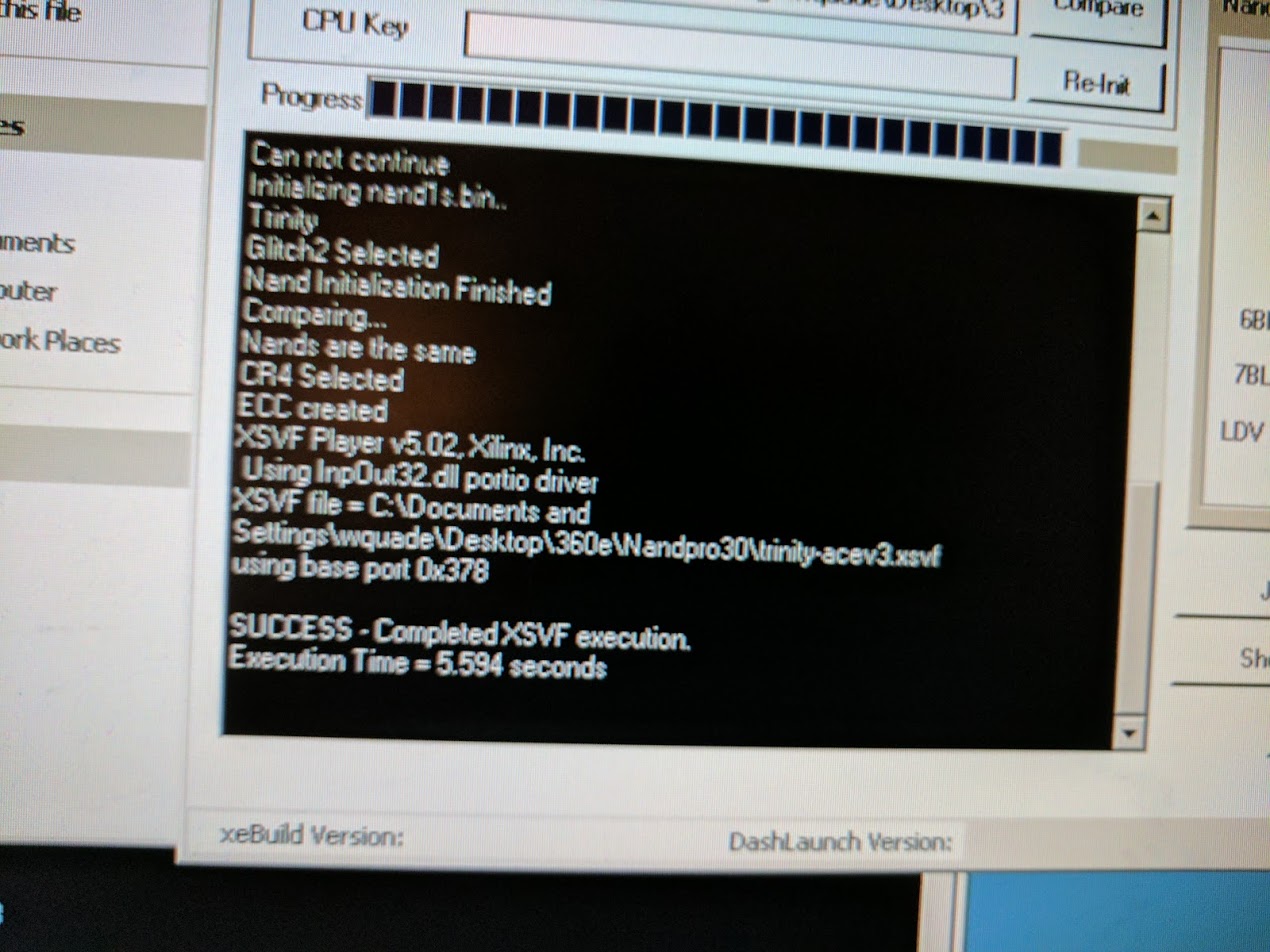
You can now fully assemble your console for this step. Once assembled turn on your console when it’s connected to a TV. You should see a blue screen with XeLL Reloaded displayed on it, just like the image above. Once it has finished booting you should see some text with the words “your cpu key:”. Type this string into the CPU Key field in J-Runner.
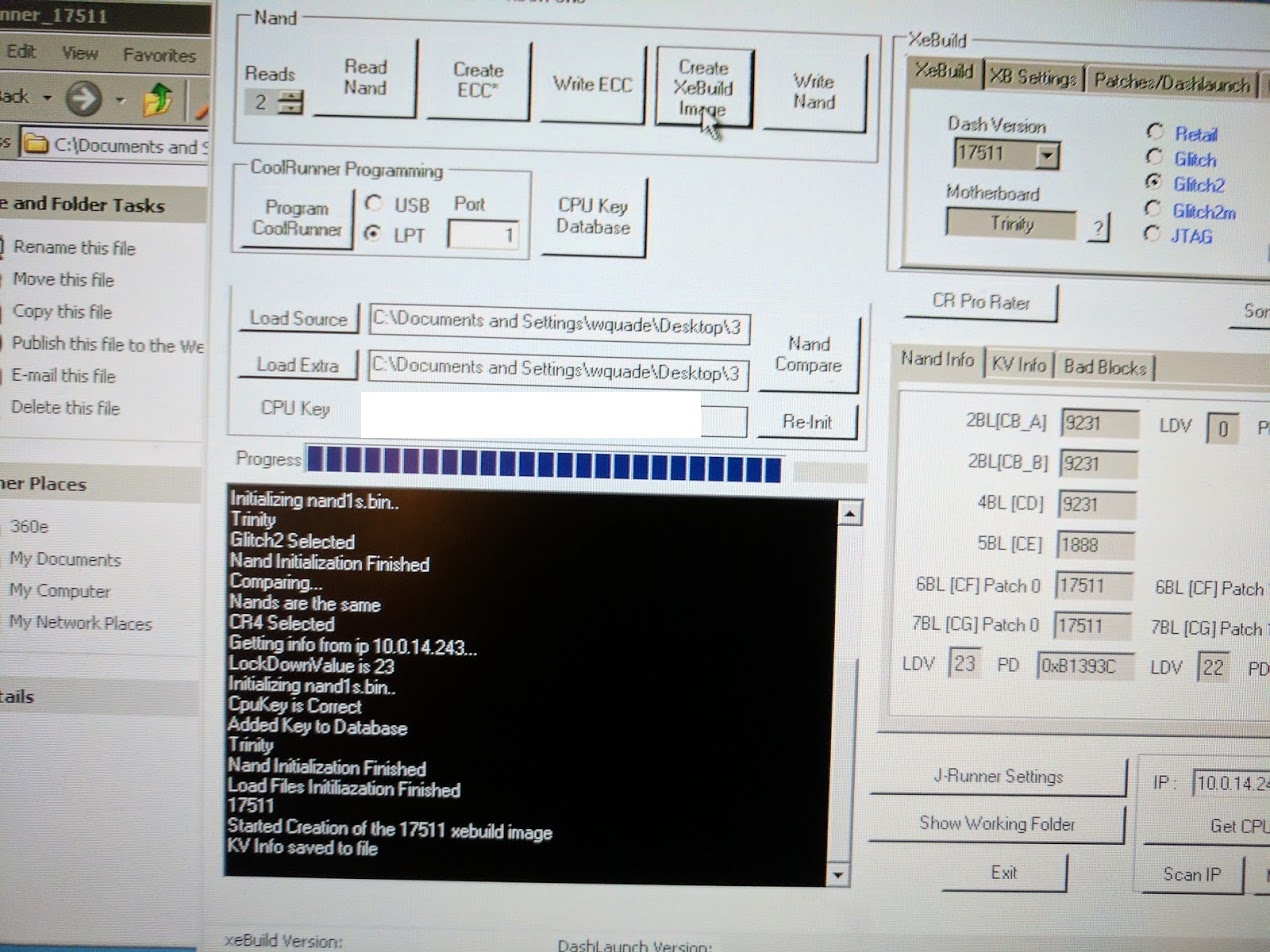
Make sure you still have your NAND dump from the second step selected, and that your dash version, Glitch2, and CR4 are all still selected. Then with the CPU key entered, click the Re-Init button. A message with the text of “Nand Initialization Finished” should appear in the message box. You can then click the Create XeBuild Image button. The image above shows the screen after pressing that button.
A numbered folder should appear in your J-Runner program folder, and it should have a file called updflash.bin inside. Copy this file to the root of a FAT32 formatted flash drive. Then shut off your console, put in the flash drive, and turn it back on.
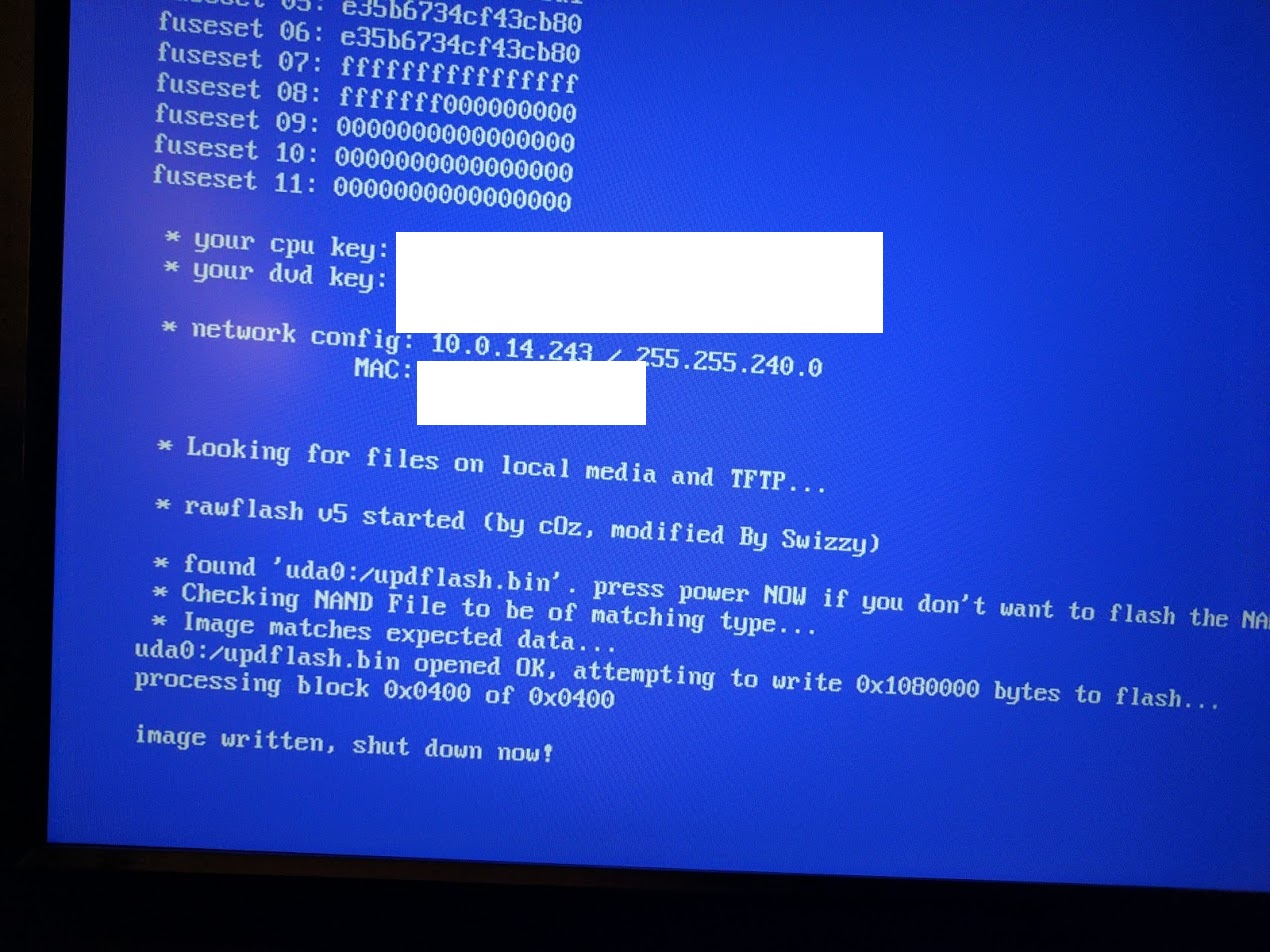
Once booted your console should have text saying it found the updflash.bin file, and that it is writing it to the flash. When finished it will say “image written, shut down now”. You can then restart your console. The output is in the image above.
Conclusions
If you followed all of the steps above correctly you should now have a Trinity RGH console. You can now run homebrew, emulators, game backups, and more. This post doesn’t cover the installation of software like XEXmenu, the Aurora dashboard, and DashLaunch. Here are some links that may help you get those pieces of software installed:
This guide may also be useful, it describes the modding process of all of the Xbox 360 models.
I found the Xbox 360 RGH process to be more difficult to the process of hacking other seventh generation consoles like the Wii, and the PS3, mostly because of the huge variety of hacking methods, and my desire to do it as cheaply as possible (it ended up being around $10). Doing another 360 now that I’ve done my first should be a lot easier.
Hello sir William, great tutorial! I did this way my Trinity without any problems but I’m trying now Corona V5 and no luck 🙁 NandPro says “no LPT controller flasher found”. Could be the wires (to long) or something else?
I did new LPT programmer. Resistors 100Ohms, short wires (max 5cm) soldered it all together and still can’t read nand 🙁 Where’s the problem? Please somebody help.
I’m unclear on the wiring diagram for reprogramming the Ace v3. You know the circuit symbols for the ground terminals on the Ace v3 and the LPT connector? What do I use as a ground terminal for in this case? Also, do I connect them to the computer or the Xbox 360 Ace chip?
All of the ground connectors come together to a single point (solder all of the wires connected to that point together).
Hi William! Thanks for sharing Your experience. I’m wondering if You got any informations about ace v4. On website http://x360ace.com/ they say it supports trinity, so according to this tutorial, we do everything same excluding copying timing files and soldering?
I’m gonna get chip in few days, so i’ll write if something is wrong for people who is interested in it.
Yeah, it looks like there are jumpers on the board to set it to work with Trinity boards. The v4 is the ideal chip currently because most of the v3’s out there are clones that don’t work as well as the originals did. Let me know how it goes.
Buenas colega unas preguntas puedo leer la mando con el chip rgh instalado en la consola con el cable lpt..
Y podría usar un convertidor de lpt a USB por q mi pc no trae el puerto lpt
As i promised, im gonna describe how i managed to force my trinity to work with new ace v4 chip. I had problems since the beginning – couldn’t read nand on my M4n78se motherboard with xp on board, then i tried on another, also with windows xp and still had an error. I’ve checked the wires, changed resistors and still had an errors. I’ve searched on se7ensins for some informations what’s wrong and found solution. I’ve renamed InpOut.dll file to Dlportio.dll and copied it to the nandpro folder ( i think this will be enough, but i did everything at… Read more »
I forgot to add that the wirings for LPT dumb doesn’t have to be so short. Mine had 27 cm. I used ata cable
Buenas colega escribo por q tengo unas dudas se puede estraer la nand de una Xbox Trinity con el cable ltp ..pero con el chip rgh pegado a la placa
Para hacer el proceso lo puedo hacer con una laptop con puerto lpt
Hi, I’m unable to dump the NAND. I have a Trinity, and I’ve redid the LPT flash dumper at least four times (wires less than 6cm long, including the length of the resistor), but each time NandPro starts testing on all three port numbers before it tells me it cannot detect the flash controller. However I was able to reprogram my Ace chip just fine (it also had the green light).
The computer I’m using is running Windows XP home edition SP3 (32 bit). In the bios settings the mode is set to “bi-directional”. I
Did you plug your console’s power supply into the motherboard when trying to make the dump?
Yes, I did (I made sure I connected it the right way). I also made sure I didn’t power it on by accident.
Try to do what i wrote in comments. Change the name of file and copy it to the folder of nandpro.
I don’t get how did you hook it back up to you’re computer
Which part are you talking about?
Where you hook it back up to you’re computer in the back do you have a picture of the back of the computer and do I have to use that kind of connter can I use one that plugs up to the TV to you’re computer connter?
It’s a parallel DB25 LPT port that I’m using. You’ll need to use an older computer.
Like how old 200?
It depends on the particular computer. Usually early Windows XP systems and earlier have parallel ports.
I don’t know anything about ports just about every computer I look up only has the purple port so what would I hook up the purple port to
Read the guide. You need to make your own cable using a connector: https://www.digikey.com/product-detail/en/amphenol-commercial-products/G17S2510110EU/G17S2510110EU-ND/1242625
Yeah I get that I’m talking about the back of the computer what are you plugging it up to
I wrote you on Facebook
Hi! This is an excellent guide, perfect for making a RGH installation without using those expensive nand readers. Just want to ask, can i use an LPT to USB adapter? Or, is there any kind of incompatibility?
It might work. Probably depends on the particular adapter though.
Hi William I have the exact Xbox with the same Modchip las day i tried to update my nand flash with simple nand flasher then make the nand and get the cpu key and make a new update flash file with xebuild but after update new flash it doesn’t boot anymore. (i did some mistakes and didn’t chose some important things in xebuild so i let it to be default) still i have the original nand that simple nan flasher gives to me, also i have tow cpu key that one simple nand flasher was make it in a file… Read more »
Great log of the work, I’m having a lot of trouble reading my nand however. I followed your instructions and improved my soldering as much as I could, but my pc has no lpt port so i also got an lpt to usb adaptor and whenever I try to read the nand it says cannot find device when i use both usb and lpt in the nandpro command prompt code. I’ve started a se7ensins page to try to get help, but everyone is saying to get expensive parts. The page is https://www.se7ensins.com/forums/threads/trinity-rgh-xbox-360-slim.1721983/#post-13635298. If you have time to help me figure… Read more »
I’d look for an old Windows XP computer with an actual LPT port. They tend to work best for this kind of thing and you can probably already have one or can find one for free or super cheap locally.
Thanks for the reply 🙂 I did just that and managed to find an old laptop running xp, I’m dumping the nand right now, but I’m having some trouble figuring out the wiring for the ace v3 to lpt and haven’t been able to find anything for it online (not in English anyways) showing how to connect the chip to lpt to change the timing files?
Is there any simpler way to show how to wire the lpt to the glitch chip to change the timing files? I’m a little confused with what wires to put where and how the batteries are connected. My nand dumps are almost done and I’m kinda hoping to get this finally done today if you have the time 🙂 thanks for the help.
Here are the pictures in the article. It’s kind of messy, but if you follow each line one at a time (from the first picture) it isn’t too complicated. The two batteries are connected together in series (+ -](+ -] to get about 3 volts. You may also already have a single 3V or 3.3V battery, the coin cell CR2032 batteries you find inside computers world work as long as they aren’t too discharged.


I got it all wired up, but when I try to write the new timing file in jrunner, I get
“ERROR: TD0 mismatch
ERROR at or near XSVF command #10 in the XSVF ASCII file.”
And there is no light on the ace chip that is turning on with the batteries connected
Also I’ve dumped my nand 4 times now and none of them match, I’m going to resolder some of the points to see if that helps.
Turns out that the ace chip was bad good thing I ordered 2 🙂 gonna try programming this other one now
The red light on the chip is on, but I get the same error when programming in jrunner using your file and following the instructions :/ not sure what to do now
I’d double check the soldering (you want really short wires, and nice and shiny solder joints with minimal exposed wire), especially the TDO connection since that’s what the error message says. The red light is a good sign though.
I’ll go resolder that connection right now, but I’ve done 6 nand dumps on NandPro30 and another 5 on nandpro20 but none of them match, how do I fix that? When I press show differences, it has at least 20 that come up in the command box of jrunner
I shortened up all the wires and reconnected them, but I’m getting the same tdo error
Could you post a link with pictures to your soldering? You can upload to imgur or another photo sharing website and just post a link.
http://imgur.com/a/wNLI0CM That’s the album of my ace to lpt, I can upload pictures of my nand dump wires if you want to look them over too.
I’m doing a few more nand dumps while I go out for the day, I really hope that I can get matching dumps. I’m not sure what else I can do other than restarting the wiring to the jtag headers to see if I can get better connections.
I forgot to mention, I’m not using the batteries because I read that the chip gets enough power from the computer without it, I got the same error with the batteries connected as well though.
The connections appear to be correct, and the wire length is good, but the soldering isn’t the cleanest. It’s possible some of the wires aren’t actually connected underneath the solder blob. If the chip lights up without a battery then not having a battery is probably fine.
I’ll try to make sure the wires touch the board later tonight, I also got a finer tip soldering iron and flux which should help a lot. Thanks for the replies 🙂 and happy Father’s Day.
SUCCESS, THE ACEV3 IS NOW PROGRAMMED 🙂 All I did was make sure the wires were completely connected and I got about 10 error messages but all at dipperent lines so I just kept going until one of the tries worked 🙂 I’ll have to wait a couple hours to do the soldering on the Xbox for the nand dump and hopefully I can get that done tonight.
I still can’t get good nand dumps and I’m starting to get very frustrated as I’ve resoldered so many times and am now using the pins on the back of the Xbox for cleaner connections. Is there anything else that could be effecting the dumps?
try to use a windows XP windows install
just got 2 360 S slim’s off ebay to mod. so how do i know if my windows xp pc can be used for this i have 2 here. is there anyway to know if it will work? i was reading about this for 3 /4 months now. i see your on steam i am as well can you help me?with this
Most older Windows XP systems that have an LPT port should work. The only way to really know is to try it.
ok .i see the Motherboard IDE Controllers list you have..man i like the xbox 360 Project you have on here.. this is going take me time . i need check more ur lists. on what i need to use like size of the wire.i think i have the program links saved? but ill check. thanks for getting back to me so fast.id like try all ur 306 Projects…i need to read more .. ill be back in 2 /3 days.. i play sh3 GWX.mod.so i mess around with other things as i wait in my uboat..have more then 2 pc… Read more »
i see that link you show X360Ace V3 glitch chip sold out.i looked, google it, id have to get that from china.is there any other kind of glitch chip a guy can use. like a updated glitch chip? what year did you do this, or post this? we dont have do it cheap lets do it so its easy and works,lets be cheap on time spent on trying to get something to work.know what i mean.and i have 2 pc with xp sitting right here.and 3 win 98 all still work and some junk pc here saved shit load wires… Read more »
This post is from 2017. The x360ace v4 came out since then. This guy is selling them in the United States: https://weekendmodder.com/store/index.php?route=product/product&path=60&product_id=242
If you’re talking about a big solder gun that has a trigger to activate then that won’t work. If you’re talking about a cheaper soldering iron that’s a pencil style then that would work.
just found this here new in a box never did get around to use it..https://www.ebay.ca/itm/STARTECH-2-SATA-1-IDE-DRIVE-PCI-CONTROLLER-CARD-PCISA2IDE1/351815139297 … just like this one.
yes i have the $35 pencil style ..ok any way we look at It we need to dump the NAND and get the D drive info ..so i need get a LPT connector where can i rip that off? a old pc or a old wire ill need a look ,google, ebay,… 1..this right 1/2 pound 23 Gauge 0.025 Solder ? 2 ROSIN Solder Flux?.. what is that wire size? are all the wire sizes (gauge) the same for this? what can i use for cleaning up isopropyl alcohol 99% ok? and batteries i have computer batteries. i was reading… Read more »
The guide has a link to where you can buy an LPT connector. Pretty much any solder will work.
I used wires from an ethernet cable. Something around 22 – 25 AWG should work though. 99% Isopropyl alcohol is also ok.
The batteries just need to be able to power the chip up to 3.3V.
im reading about the AceV4 DONT SOUND GOOD ..I have read not much good about ace v4 with trinity. Some say that P1 is not booting at all and with P2 slow boots… saw this off a post .. looks like not booting or low boot time.more then 1 guy has said this.mmm.. oh ya thanks for the weekendmodder link saw the videos on youtube..ill get 2 LPT connectors so i dont need to resolder
I don’t get how did you hook it back up to the computer
How did you hook it back up to you’re computer?
How did you hook it back up to the computer have a picture of the back of the computer?