Powering a PS3 with a PC power supply

Three of the biggest sources of heat within a PS3 are the RSX graphics processor, the Cell processor, and the power supply. Many of the original fat consoles came with power supplies with the model number of ZSSR5391A. Those power supplies are only 66.5% efficient, meaning that lots of unnecessary heat is generated by the power supply.
I’m lucky, my PS3 has the much more efficient APS-226 power supply, which is 83.13% efficient. That’s a lot better than the other model, but is still contributing to the amount of heat that the console has to exhaust.
This post goes through the process of modifying a fat CECHA01 PS3 to use an external power supply. Initially I was going to keep the existing power supply and just make it external, but have decided to instead use a regular ATX computer power supply. My reasoning behind this is the fact that all power supplies stop working eventually. ATX power supplies are much more common than PS3 power supplies. Using an ATX power supply also gets me one step closer to putting the console into a computer case.
Power supply compatibility

My PS3’s power supply provides 32 amps of 12V power, and 3 amps of 5V power. The ATX power supply I use must meet or exceed those same specifications in order to fully power the console. Pretty much any power supply can handle the 5V requirement, but not all can handle the 12V requirement. In my case I have a spare Corsair CX430 power supply. It’s not the best, but has a single 32A 12V rail, and a 20A 5V rail, so it will work. Choose a power supply with a single 12V rail over one with multiple 12V rails.
Power connectors
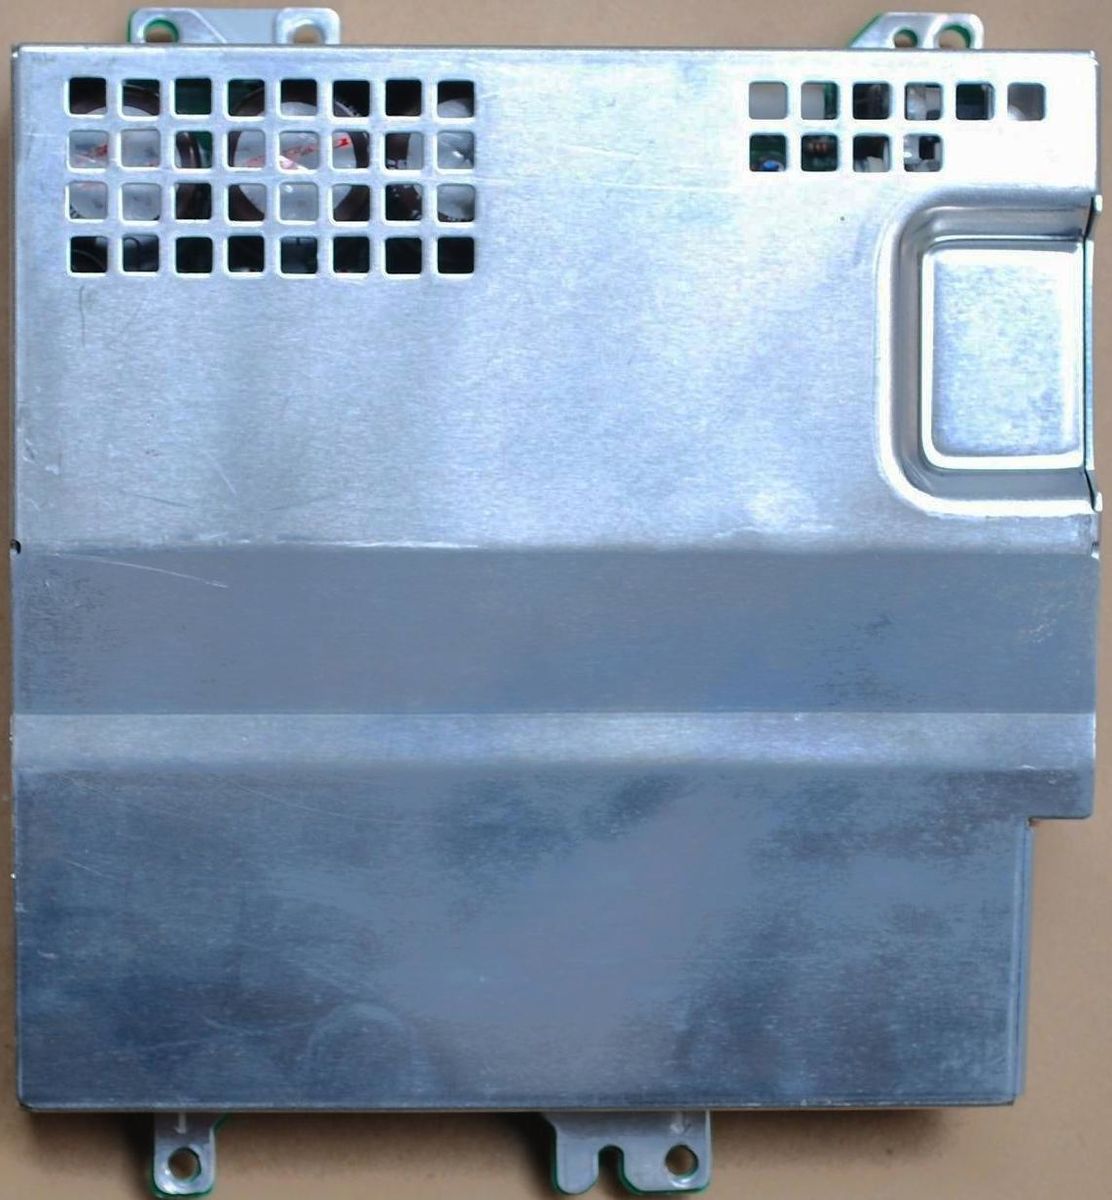
There are three connectors on the PS3’s power supply. At the back there is a plug that connects to the power outlet. On the bottom there are two holes that connect to the long prongs on the motherboard, they are 12V and ground. On the side is a five pin plug, with wires for a power switch, 5V, and ground.
Safety is one area that many of the existing guides ignore. Using the two 12V wires, and a few 5V wires from the 24-pin ATX power connector is what I found most common. Drawing too much current through a wire can melt the wires.
Molex connector
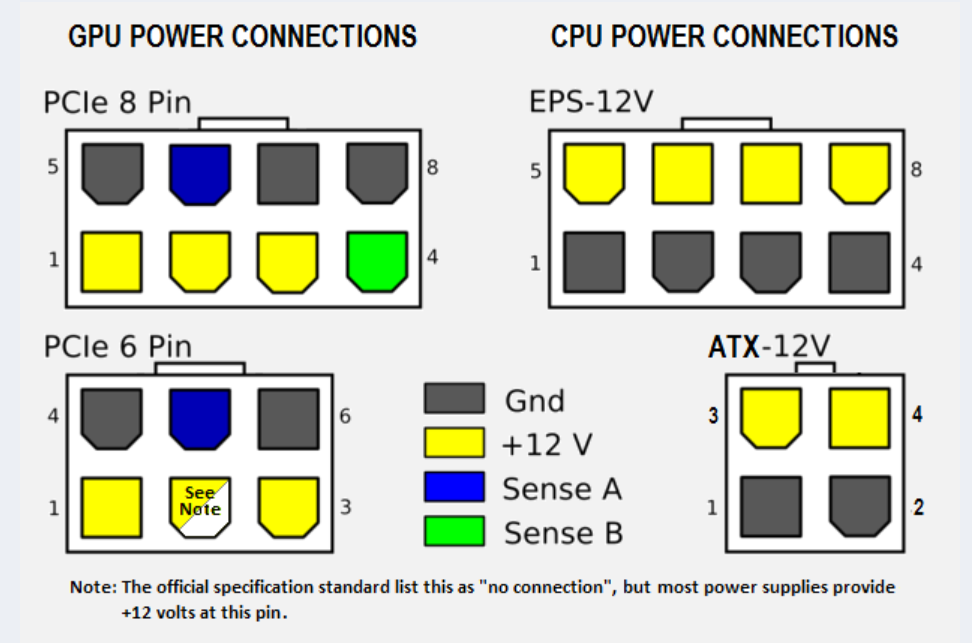
Instead of using the 24-pin connector I will be using the 8-pin CPU power connector. It has four 12V wires, and four ground wires. Since the CPU power connector doesn’t have any 5V wires, I will be using a single 5V wire from a molex connector.
8-pin CPU power connector (top right)
I used 8-pin CPU extension cables, and molex extension cables, so that I would be able to disconnect the power supply from the console when needed.
Preparing the wires
To prepare the 8-pin CPU power cable wires:
- Cut the extension cable near the female end of the cable.
- Strip all of the wires.
- Twist the tips of the black wires together to form a single ground cable, and then solder them together.
- Twist the tips of the yellow wires together to form a single 12V cable, and then solder them together.
To prepare the molex power cable wires:
- Cut the extension cable near the female end of the cable.
- Remove the yellow wire, and the black one next to it.
- Strip the remaining black and red wires.
- Apply solder to the tip of the red wire to make a 5V cable.
- Apply solder to the tip of the black wire to make a ground cable.
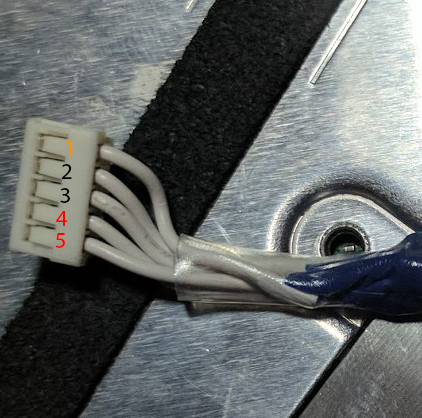
To prepare the 5-pin plug:
- Cut the cable near one of the connectors.
- Strip wires two through five (see the image below to see the pin layout, it may be PSU/motherboard dependent).
- Twist together wires two and three, and solder them together, to form a ground cable.
- Twist together wires four and five, and solder them together, to form a 5V cable.
Connecting the wires to the PS3
Now that you have the wires, you can connect them to the PS3.
Connecting the cable you made from the 8-pin CPU power connector is pretty straightforward, but you need to be careful so that you don’t make any unintended connections. You will be connecting them to the two cylindrical metal prongs sticking out of the PS3’s board.
I started by bending the two soldered wires using pliers, forming hooks that I could wrap around the two plugs.You will also want to apply a decent amount of solder to the plugs so that it is easier to attach the wires. Once tinned, you can solder the wires to the plugs. On my board the plug closer to the front of the console is 12V, and the one towards the back is ground. Make sure that you get a really solid connection with the solder. You don’t want either exposed wire touching the other exposed wire, or any other part of the console.
Once you have the CPU power connector soldered, you’ll want to insulate any exposed wire. I used heat shrink tubing around the wire bundles, and around the solder joints. Electrical tape would also work.
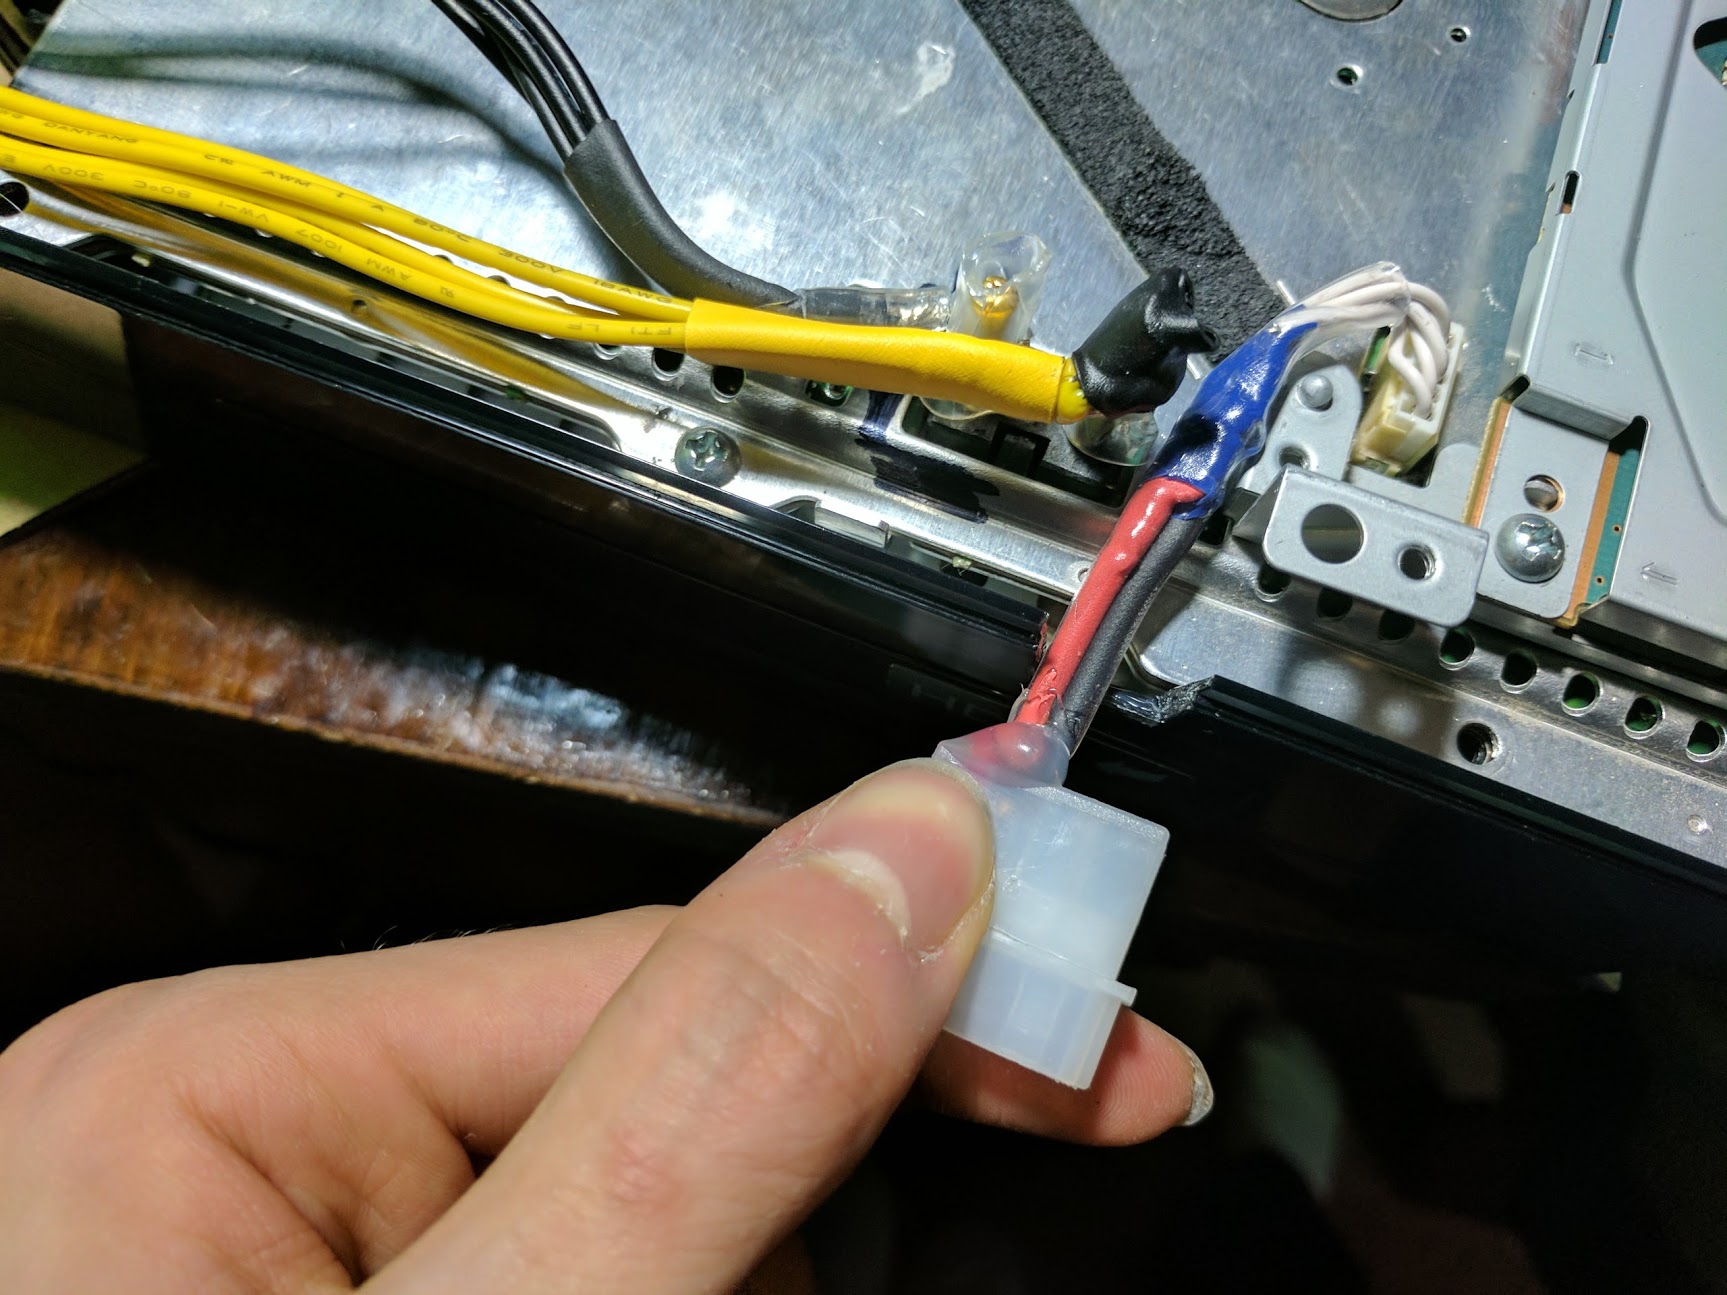
Next you’ll need to connect the molex cable to the 5-pin PS3 cable. Simply solder the 5V lines together, and the ground lines together. Then you can insulate the exposed metal.
Connecting the ATX power supply
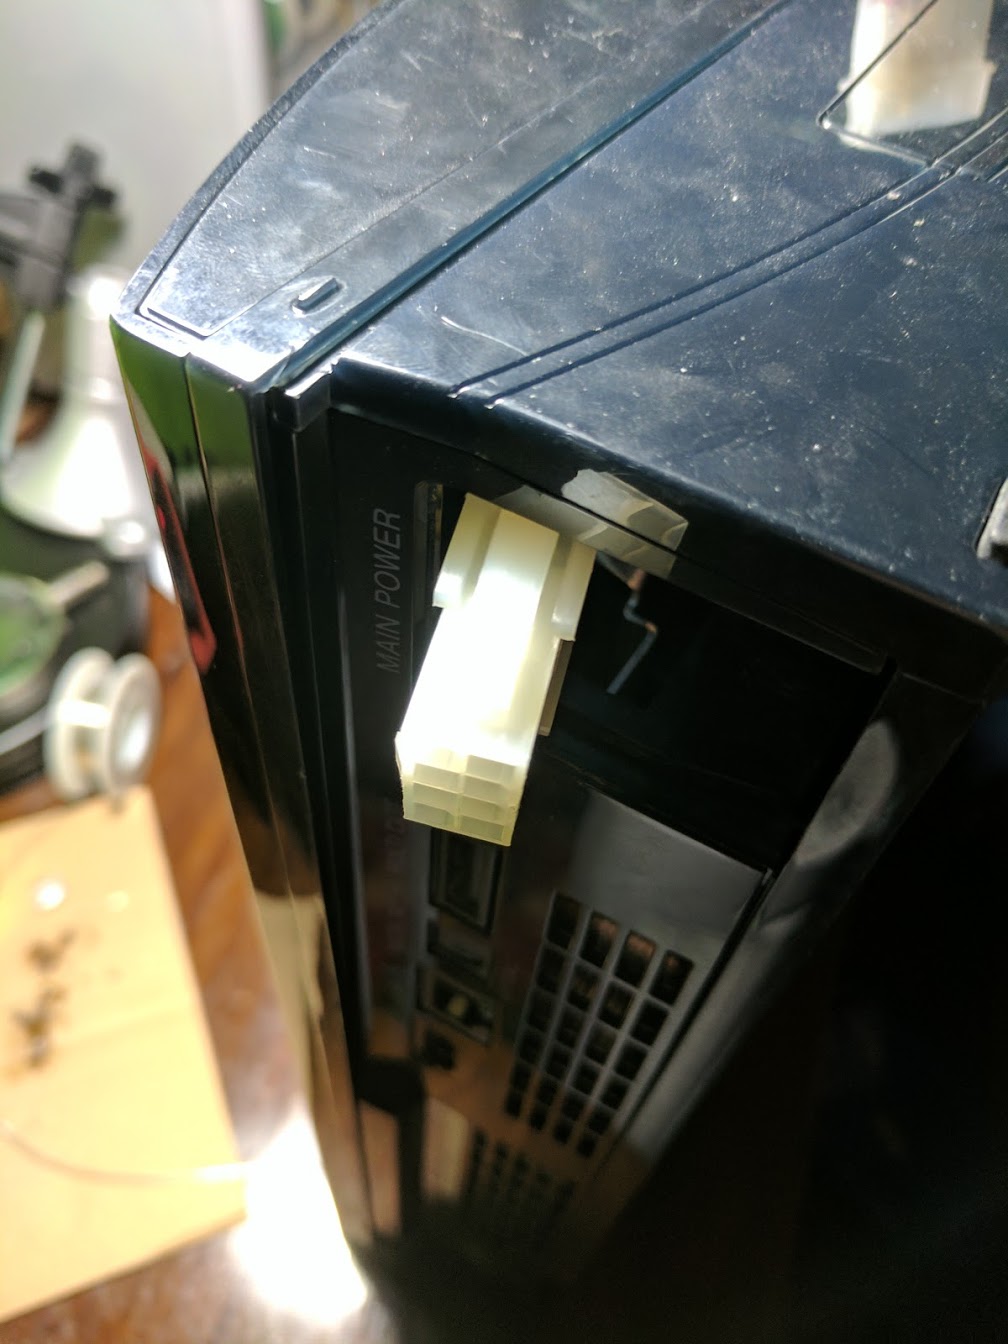
You will need to route the molex cable, and the 8-pin CPU power cable outside of the PS3. I was able to route the 8-pin cable through the hole in the back that was made after removing the original wall power socket.
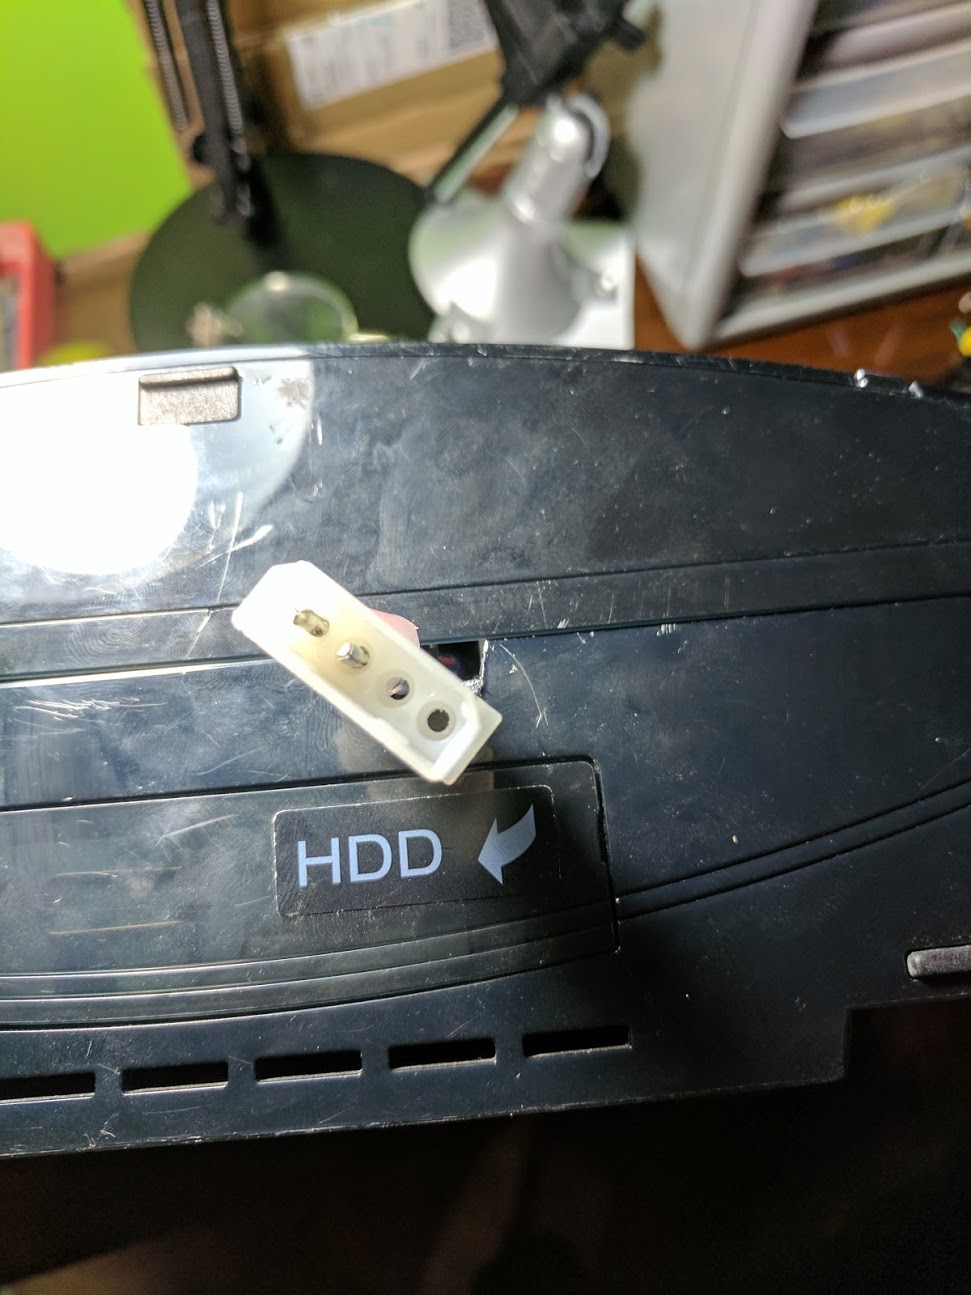
I didn’t make my molex cable long enough to route through the same hole, so I cut a hole in the side of the console right above the hard drive cutout.
To power on the power supply you’ll need to find the 24-pin cable, and connect the green pin, with any black pin. I used a short paperclip that I could permanently leave in place.
You can now connect a molex cable on the power supply to the molex plug on the PS3, and the 8-pin CPU cable on the power supply to the 8-pin plug on the PS3. Once the power supply is plugged, and switched on, the PS3’s red standby power light should turn on just like normal.
I forgot to measure the standby power consumption before, but after the mod my system draws around 7W from the wall in standby. This seems reasonable. If you see the red standby light, you can use your PS3 normally. You can turn it on using the controller, or power button, and turn it off through the interface.
Temperature and noise impact
I did this mod primarily to make my PS3 run quieter, and I’m pleased with the results. The fans tend to stick to the 20% to 40% range while playing games like Uncharted. It’s still audible, but it’s not distracting like it was before.
The fans actually run quieter than they do on my original fat Xbox 360, which wasn’t the case before the mod. Prior to making the power supply external, I delidded the processors, replacing the thermal paste, so there are other factors that are impacting my results.
Final thoughts
I recommend this mod, but it’s not for everyone. A lot of soldering was involved, and if you mess something up you risk damaging your console, starting a fire, or shocking yourself.
If I were to do this mod again I’d make a few changes.
- Instead of using an 8-pin CPU power connector, I would use a combination of 6-pin, and 8-pin PCIe power connectors. This would allow me to get a really large power supply, like something in the 1000W range, and power all of my consoles at once from a single supply. There is usually only one 8-pin CPU power connector, but there are many molex connectors, and PCIe power connectors.
- I would have used longer cables. It’s pretty hard to attach and detach the cables when they are so short. It would have also been nice to have had them both go out of the back.
- I would have looked into replacing the molex connector with a voltage regulator. A 5V, 15W, voltage regular is cheap, and would allow me to have only a single cable going into the console. I had actually thought of this before I started the project, but I only had lower wattage regulators.
- I would have looked into getting banana plug sockets that I could plug the 12V lines into. This would be much safer, and easy to remove. This was also something I had thought about, but didn’t want to wait for them to arrive in the mail.
- I would have cut the edge of the metal casing that covers the PS3 motherboard (the part right next to the plugs). I will need to do this the next time I take off the heatsink, because right now there isn’t a way for the metal housing to come apart since the 8-pin cable is in the way.
Hi, I really appreciate the instructions you gave since i cant think for myself xD. Anyway, ive got a problem, ive used a female molex and female cpu cable just like what u did.
the problem is the led isnt showing when my cpu and molex cables are connected. However, if i only connect the molex cable, the led shows. So there shouldnt be anything wrong with that cable. Would u know what happened?
And fyi im using a seasonic x-850 80+ gold psu.
Did you accidentally wire the CPU cable the wrong way or have any accidental shorts on it?
I wired the cpu cable with the top 4 and bottom 4 together separately, I don’t think there are any shorts to the wire.
Think it would be plausible to salvage the connectors from the original PS3 power supply rather than using the molex connectors and wire?
Nevermind 😮
Hi, I’m also working on a project like this with cecha01. What specific banana plug sockets would you recommend? What website do they sell these plugs? Thank you, this guide makes everything so much easier.
Look for some 4.5mm banana plug sockets. I found these on eBay, which seem to be the right size, you’d need to use two pairs of them to connect to the two PS3 plugs.
Thank you for posting this. Any optimizations that you or anyone else have would be greatly appreciated.
i got 2 ps3 fat cechao1 and bothe hace bad the power suplly so i wana use a atx suply whats happens with the cable number one ive seen u use the 23 and 3 for ground and 4 and 5 for five volts line but number one i see that you do not use it im a coorrect that pin number one is not in use???
I think you’re talking about the 5 pin connector. You are correct, pin 1 isn’t used. Pins 2 and 3 are both ground, and pins 4 and 5 are both 5V.
Hi, and really thanks for this guide also if it’s in English ’cause NOBODY here in Italy have done one. I’m stuck with the connection of the 5pin connector with the wires of the ATX power supply. I’ve left the 1st ‘alone’, 2nd & 3rd with the GROUND blacks of a molex, 4th with the 5v red of same molex and 5th with the red wire of another one molex. When I plug the cable and switch ON in power supply, the fan goes but nothing else, no Standby Mode. What I’m doing wrong? My ps3 is the fat 60gb… Read more »
Did you also make the 12V connection to the PS3?
Did you connect the green/black wires on the power supply to turn it on?
Your power supply also probably isn’t big enough, my PS3 was rated for 32A at 12V, or 384W on just the 12V rail, which exceeds your entire power supply’s 300W rating.
So are we supposed to connect the 2 5v wires on the 5 pin plug to the 5v standbys on the powersuplyy or just the 5v
Connect the 5V to the 5V, not the 5V standby.
Hey, thanks so much for your tutorials. Thanks to you I was able to get both the PS3’s heat spreaders off without damaging anything and get an external power supply to work. I tested my temps three different times on the CPU … first before any modifications, second after replacing thermal paste under and on top of heat spreaders and lastly after using an external power supply. The first test was terrible, I was hitting about 83 degrees C after about 30 minutes idling on the XMB menu. The second test showed the biggest results, after 30 minutes with the… Read more »
I’m glad you did some temperature testing throughout (something I forgot to do).
Well, I decided to try this one more time but this time on a chechA01 PS3. This was one of those models with the 66% efficient power supply and I noticed the CPU, which sat right under it was almost 20 degrees C hotter than the GPU. It was pretty obvious that the power supply was causing this so upon removing it, I tested temps again and now the CPU dropped temps by about 12 degrees C and the GPU dropped by a couple degrees. In this case, I think this project was definitely worth it.
Thanks for the info , I got the external power supply setup, it works well but I must now reflow the gpu and cpu.
is there any other wires that can connect to the female 8 pin cpu wire? Or maybe other wires that can be connected to the two metal prongs?
You can use any cable or connector you want as long as it’s thick enough to carry the high current that the PS3 needs.
i see, i tried using another female 4 pin molex to it but it shows the ylod, does this mean the wire is too thin?
If you have a CECHA01 then you’re going to need more than just a 4 pin connector (an 8-pin may also not work if it doesn’t use thick enough wire). The power supply in my PS3 was rated to deliver 384W of 12V power.
A YLOD could be caused by the wire being too thin, but it could also mean other htings.
How would u rewire it with the 24 pin connector to the 12v and gnd metal prongs? i tried using the 8 pin cpu connector but it doesnt turn on
If you look up a the 24 pin ATX connector pinout you can see which pins are 12V and which are ground.
Does it matter how many pins i use for the 12v and ground pins? like for example i only use a male 4 pin cpu connector to the female 8 pin connector