PS3 delid, Cell CPU and RSX GPU IHS removal
In order to save a little bit of money, maximizing profits, it’s common for companies to use cheap thermal interface material. In the case of the PS3, the thermal paste that Sony used for the Cell processor and the RSX graphics processor doesn’t age very well.
I recently bought an original 60GB PlayStation 3, with the CECHA01 model number. In the past I have used newer PS3s, and they were all reasonably quiet, so I was surprised at what I heard not long after turning on my console. The fan went to full speed, and never went back down to a reasonable level.
I immediately took apart my PS3, and replaced the decade old thermal paste on top of the two processors. After replacing the thermal paste the PS3 would remain quiet for longer, but would still always end up reaching 100% fan speed.
After searching for a solution, I read that delidding the processors to replace the thermal paste underneath the heat spreaders was the solution. That’s what this post is about.
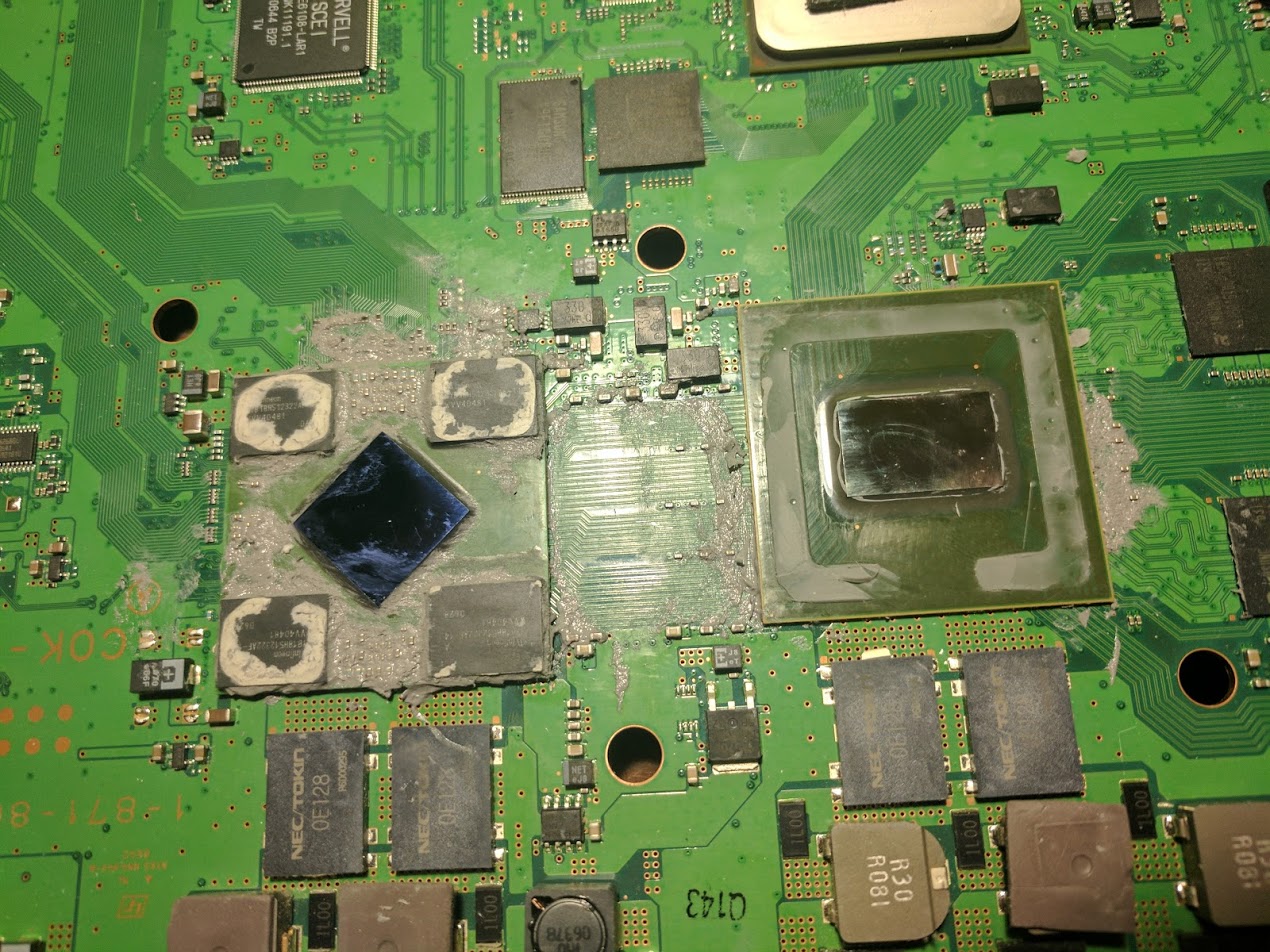
RSX graphics processor IHS removal
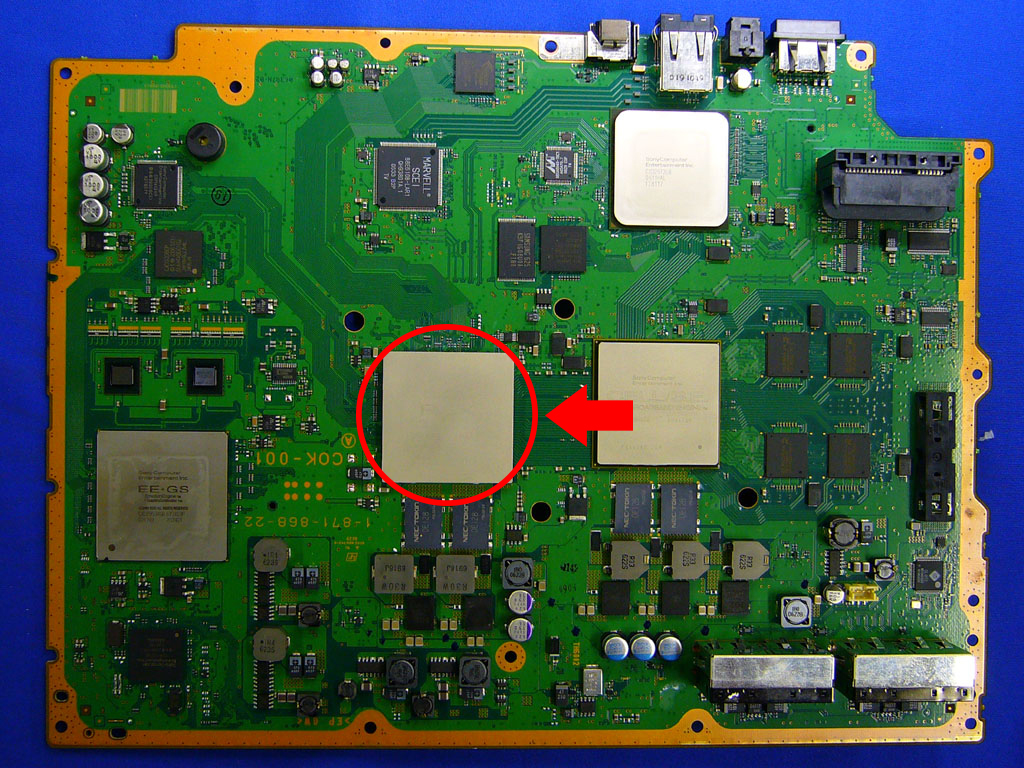
Let’s start with what I consider the easier chip to delid, the RSX graphics processor. The chip is circled in the image above. If you look around the edges of the metal heat spreader you can see that there are four pillars, one at each corner. In between those pillars are gaps.
Those pillars are memory chips, and the gaps make it really easy to remove the IHS. There isn’t any sort of glue holding the IHS, just the thermal paste on those four memory chips, and the graphics die in the middle.
To remove the IHS from the RSX:
- Heat up the heat spreader using a heat gun (or hair dryer). You want it to be hot to the touch, but not so hot that the solder underneath melts.
- Stick a tool underneath the IHS in the gap that the arrow is pointing to. It’s important to use the gap facing the Cell processor, because there aren’t any components on the chip on that side. It’s also important that you don’t stick the tool too far into the gap, you might damage the RSX in the middle.
- Slowly apply a prying pressure to pry the IHS off of the chip. It’s important that you don’t apply too much pressure and damage the chip.
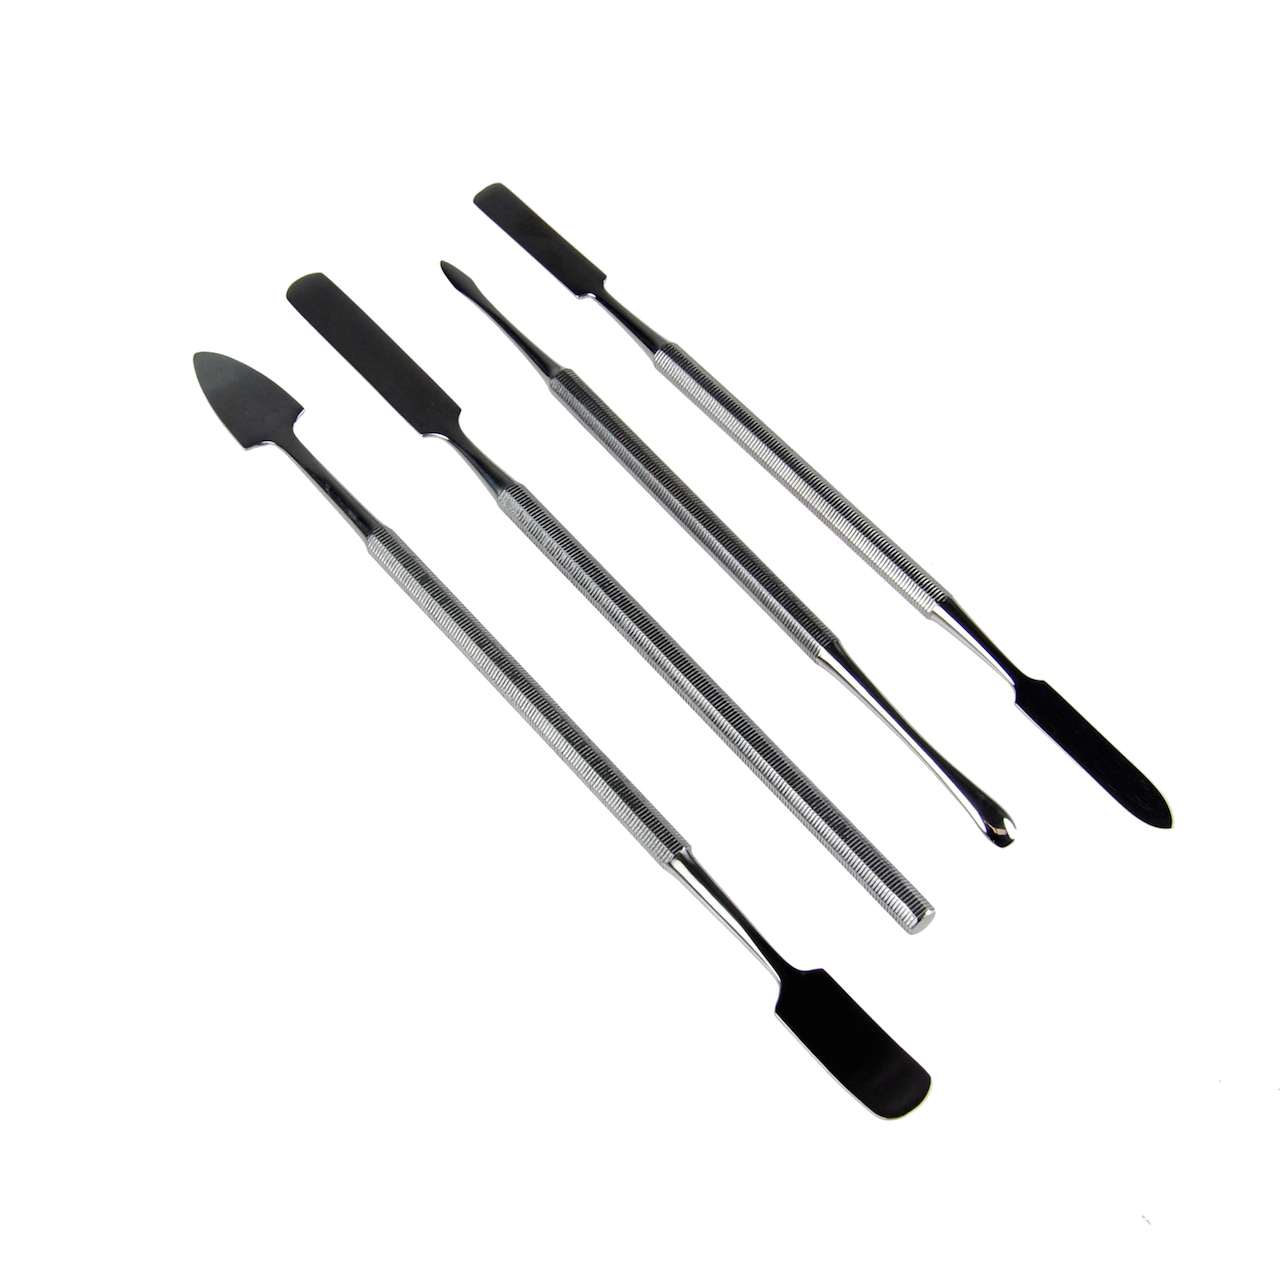
I found a video that follows these same steps. He used a butter knife to pry off the chip really quickly. I was surprised to find out that it worked. I’d recommend going slower though. I personally used a metal spudger from iFixit. I used the bigger rounded curved tool pictured on the left of the image below. It’s safest to use something that’s not sharp, preferably plastic, so that you are less likely to scratch the chip.
Cell processor IHS removal
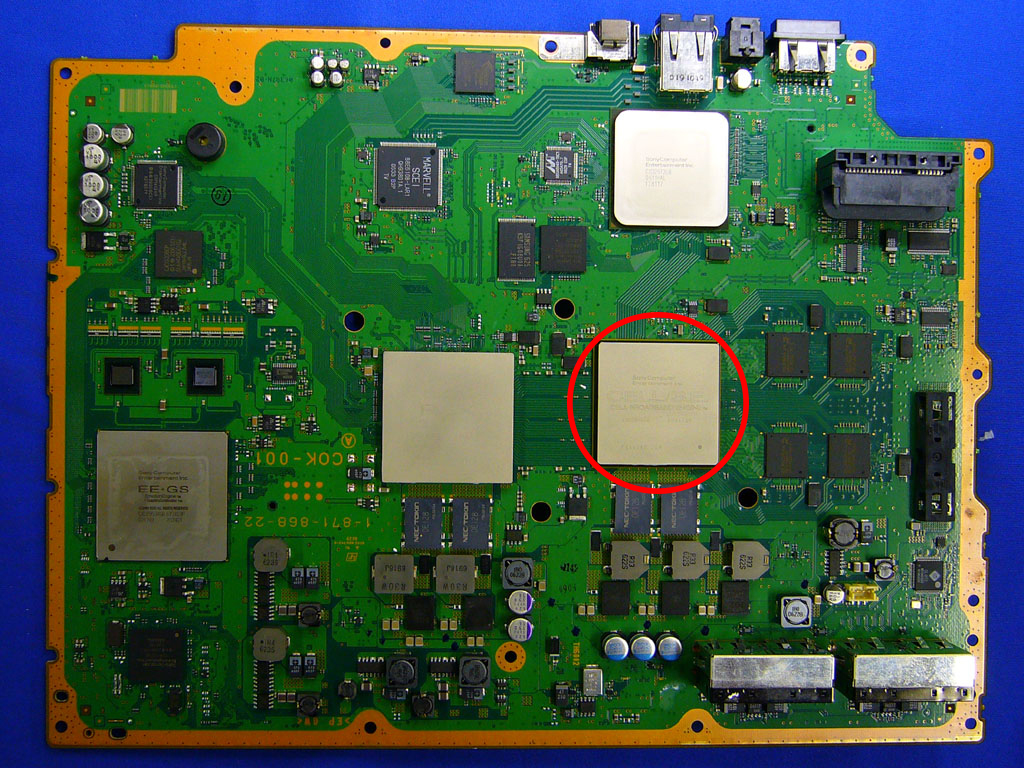
I was really scared to remove the IHS from the Cell processor. When I did it I had just finished flashing custom firmware on the system, I didn’t want to break the chip and have to start fresh with a new PS3. The Cell processor is much harder to remove because there is glue all the way around the chip that you have to cut.
At one point there was a tool made specifically for cutting the glue around the Cell processor, but it’s not being made anymore. There are many different ways to cut the glue. Razor blades are really common, but their sharpness makes it really easy to damage the processor.
One of the more interesting methods I found was someone using a fishing line. He heated up the IHS, cut a corner of glue away, and then used fishing line to saw away the rest of the glue. In theory this should work, but the fishing line I bought was way too thick to get into where I made the cut.
I ended up using a painting knife to successfully cut the glue. They were recommended in a forum, but I was skeptical. I was surprised at how thin the knives were when they arrived in the mail. They are very thin, and not sharp at all, perfect for what I needed them to do.

Here’s what I did to remove the IHS from the Cell:
- Heat up the heat spreader using a heat gun (or hair dryer). You want it to be hot to the touch, but not so hot that the solder underneath melts. I found it useful to occasionally reheat the IHS throughout the remaining steps.
- Using the painting knife marked with a “1”, carefully cut the glue at one of the corners. One corner may be easier to cut than the other. It’s important that you don’t knock off any of the small surface mount components around the processor. Also make sure that you cut the glue, but don’t cut too deeply and damage the processor. It’s also important that you don’t scratch the processor, keep your knife flat.
- Now cut the glue on one side of the processor. I used a combination of the “1” and “4” blades to do this.
- Repeat the third step until you have cut all of the sides away. I was able to cut three of the four sides, and all four corners, and then wiggle the IHS off.
The key with the Cell processor is to go really slowly, and be careful. There’s a lot that can go wrong, many consoles have been destroyed while removing the processor’s IHS. I was able to successfully remove the IHS on my first try.
Painting knives worked extremely well. I was able to get a feel for the amount of pressure needed to cut the glue. The hardest part was removing the glue on the sides where there were a lot of components on the board. That’s where I found the “4” knife useful, it was long enough to reach all the way across a side of the processor.
Putting everything back together
Now that you’ve removed the heat spreaders from the Cell processor, and the RSX graphics processor, it’s time to clean them, and put your PS3 back together.
Cleaning the heat spreaders, and processors
First you’ll want to clean the heat spreaders, and the processors. I used a combination of toilet paper, an iFixit plastic spudger, and isopropyl alcohol. Use the spudger to break away any suck pieces of thermal paste, and the remaining glue. Isopropyl alcohol, and toilet paper will get rid of any of the remaining thermal paste. Make sure that you don’t damage the processors, or any of the small components on them.
Applying thermal paste to the processors
Once you have cleaned the processors, you can apply thermal paste to them. It doesn’t really matter what paste you use, I just used some that I already had. You’ll want to apply some to the middle of the processors, and on all four of the memory chips. Then you’ll want to spread the paste over the surfaces using something plastic, like an old credit card. As long as you aren’t using conductive thermal paste you don’t have to worry about getting the paste on the chips. In general it is better to have too much thermal paste than to have not enough. You should try to have some paste overflowing the edges of the center surfaces (around the edges of the processor die).
I used regular thermal paste, but I might end up switching to some form of metal thermal adhesive in the future. Thermal paste isn’t permanent, so it can be removed and reapplied. Thermal adhesive is permanent, once it has hardened it can’t be removed. The advantage of thermal adhesive is that the heat spreaders won’t move out of alignment. Depending on the adhesive, it can also perform better than thermal paste. I’ll make another post if I end up using thermal adhesive.
Applying thermal paste to the heat spreaders
Now that you have applied thermal paste to the processors, you can place the heat spreaders on top. You can then apply thermal paste to the tops of the heat spreaders. To do this, just put a blob of paste on top of the IHS, and spread it out over the surface using a piece of plastic like an old credit card. You may need to hold the IHS in place because it is just being held in place by thermal paste. Before you install the heatsink, make sure that the heat spreaders are centered on the processors.
Results
The image above was taken right after I had removed the Cell’s IHS. I still needed to do some cleaning up.
After delidding the processors, and putting everything back together, my PS3 ran quite a bit quieter. It was still louder than slim consoles, but it’s much better than before. While playing Uncharted, the fans ran in the 50-60% range, instead of the near maximum speed that they ran before. More importantly, the fans will actually go down in speed when the game is less demanding, and when not playing a game.
I recommend that everyone replaces the thermal paste underneath their heatsinks on their gaming consoles once your warranty expires. It’s really easy to do, and will keep your console alive for longer. I find it harder to recommend delidding your processors. It’s a very risky process. In the case of an old PS3 that I bought for $50, there wasn’t a whole lot to lose. Fortunately both the PS4 and the Xbox One don’t use heat spreaders, so they don’t need delidding.
Leave a comment if you have any questions.
Terrific guide! Wish something this clearly step-by-step was around when I delidded my PS3. You deserve a lot of Internet hits with this.
I just wanted to thank you for helping me bring my 60 gig CECHA01 PS3 back to life! I originally just replaced the thermal paste on top of the heat spreaders. This worked but only for a month or so. I knew then that I had to get under the IHS for the CPU an GPU but I couldn’t get myself to do it. It was a combination of a couple youtube videos by NSC modz and your article here that helped me find the courage to de-lid.. I used NSC mods method for removing the IHS over the GPU… Read more »
Was hoping for your opinion. I did the procedure for the Cell Processor and I believe I scratched the solder mask, I’m not sure how familiar you are with this so hopefully you tell me how deep it looks. It doesn’t look deep to me and seems the copper was spared but someone with experience will probably be able to tell right away I think. It’s in the bottom left corner: https://goo.gl/photos/Yispx5o9n1SuzVJz5 https://goo.gl/photos/V8TSSqv2Udu78rMw6 I also knicked the NEZ N8 thing in the process, but I think that was just that casing and there wasn’t any harm to the internals of… Read more »
I don’t think that scratch is deep enough to cause any actual damage to the processor. From my understanding the scratch would need to be deep enough to cut the copper underneath for any processor damage.
As for the NEZ N8 thing, I did a Google search and it turns out it’s a capacitor. It’s probably fine, but is replaceable.
[…] Zapomniałem zrobić zdjęcie zdeliddowanego CPU, jak i zdjęcia z nacinania nożykiem do farby. Moja wina, ale byłem dosyć zestresowany całą operacją. Zdjęcie ze skalpelem jest z zimy, kiedy zwyczajnie z obawy przed uszkodzeniem konsoli nie deliddowałem CPU. Fotografia ze zdjętą czapką CPU pochodzi ze strony https://quade.co/2017/ps3-delid-ihs/ […]
How can I know if I messed this up? I did this fix, but when I hooked it up to the tv, the PS3 turns on, but there is nothing on the screen. I changed the HDMI cable, i turned both the console and the t.v. off and on, and I even did the trick where you press the on button for a few seconds and it reverts to the most basic video settings, but i still get no image.
What can I do?
If it doesn’t work you may have damaged one of the chips. Did you notice any damage to the top of the processor when you took the lids off?
No, the chips are pristine, not a single problem with them. Should I try another tv?
Did it work with the TV before you removed them?
Yes, it worked with this tv before I attempted this fix.
Something must have gotten damaged in the process then.
Turn on the console, keep holding the power button until you hear it beep again, this will reset the video output.
Is it important you use a thermal adhesive to mount back the IHS or you can use a thermal paste for that?
Thermal paste works, just make sure it doesn’t fall of when putting everything back together.
Could you use a plastic spudger to remove the cpu cell?
Those are probably too thick to work, the cutter needs to be extremely thin. A guitar pick might work though.
What temperature should I run the heat gun over the IHS on the chips to assist with cutting the glue?
You just don’t want the solder to melt, keeping it under 300 F should be plenty safe.
How bad is a scratch like this in the lower green space of the cpu?
I had ylod before this and it hasn’t changed after.
The rate at which it turns yellow hasn’t changed so I’m assuming the system was unaffected by the scratch…
I think it’s probably fine. I don’t think you damaged any traces, just scraped off some solder mask.
Thanks for the immediate feedback!
here’s another angle for clarification (sorry my devices take crabby photos). Was wondering how those dimple marks relate to the plausible relay of solder balls beneath, maybe those are just part of one similar base signal coming from what you called the solder mask and nothing too concerning… I hope lol
Either way I’ve basically given up on the system until I can properly diagnose the issue or get my hands on some tantalum capacitors.
I’ve never delidded before. But which areas if scratched, cause a dead console?
I have a CECH03 in my possession, however I’m not planning to delid but rather use the eraser mod which greatly improved my temperatures on my slim CECH 2503B PS3, but in case it doesn’t work, this might be my last option.
Thanks in advance.
What breaks the chip is cutting a trace on the chip, there are traces all over so you don’t really want to scratch any part of it. If you do a light scratch that doesn’t damage the trace things will still work, if it’s too deep then that’s when you have a problem.
Could I just use the iFixit tool set or is it required for both to open BOTH the Cell and the RSX
It’s worth trying.
The paint knives are too thick. Recommend trimming them down with a file. Component failure is one of the main causes of the YLOD. Most notable is the failing NEC Tokin Caps but utilising the Syscon Diganoses tool is the best way to know what the other fault could be.
I wrote a guide about this: https://gbatemp.net/threads/how-to-delid-and-fix-the-yellow-light-of-death-for-good-nec-tokin-replacement.575455/#post-9256559
Yeah, I recently found out about the capacitor fix. I’ve been planning on trying it on a couple of CECHB01’s that I have that have YLOD issues.
i’m thinking of deliding my ps3, but the problem is that i don’t have access to tools mentioned here (sorry i live in a bit remote area, but i do have a hair dryer). Are there any household items i can use to achieve my goal?
and also, what glue should i use are reliding, can i use some regular glue or is there something specific?
You’ll want to look for the thinnest thing you can find to slide underneath the heat spreader and cut the glue. It’s worth just trying what you have access to since it either will fit underneath or not. You don’t need to reglue it if you are careful when putting the system back together.
Hi. Do you perhaps know the value /description of this component in the attached pic?My one seemed to come off while I was attempting to remove the heat sink.
It’s a capacitor, don’t know the value.
Okay thanks
I… think I’m screwed, aren’t I? When delidding the RSX lid, I clearly used too much force the first time: I guess my whole PS3 is now borked? Welp.
It might still work, it’s possible to scratch just the solder mask without damaging any traces.
I’m screwed aren’t I (bottom left corner)?
https://ibb.co/F622ggv
Maybe, maybe not. It doesn’t look like any of the traces were cut, but it can be kind of hard to tell in a picture.
Looks like a serious one, but the traces here are more like patches, have to clean it up to really tell if and where any circuits overlap (are joined by the copper). Not 100% on this but I believe the system would power back down quicker if the main cause for ylod were shifted to a fault in the cpu chip.
I never got my ylod fixed after the slight scratch but then again I never replaced the capacitors either.