PU-8 MM3 modchip installation diagram

This was one of the earlier PlayStation 1 board designs that included RCA composite video output ports on the back. Most SCPH-1001’s here in the United States had this board inside.
Additionally many Japanese systems had this board including many SCPH-3000, SCPH-3500, and SCPH-5000’s.
For more information about MM3 chips click here, for more information about PS1 modchips click here.
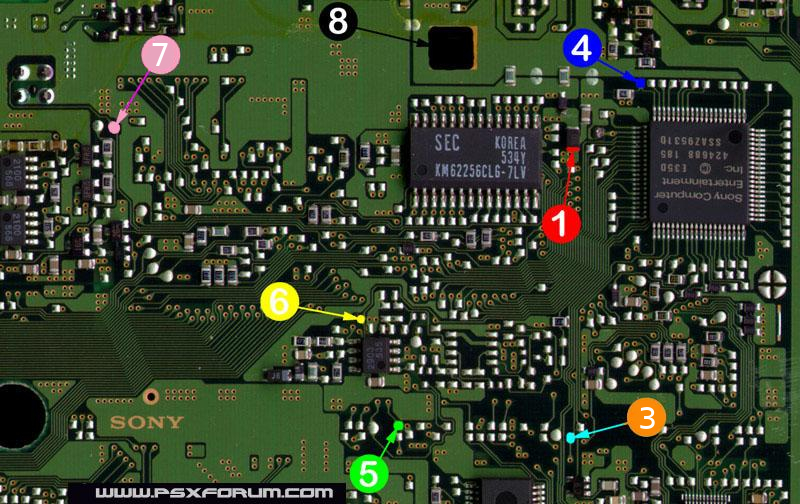
PU-8 MM3 modchip installation diagram
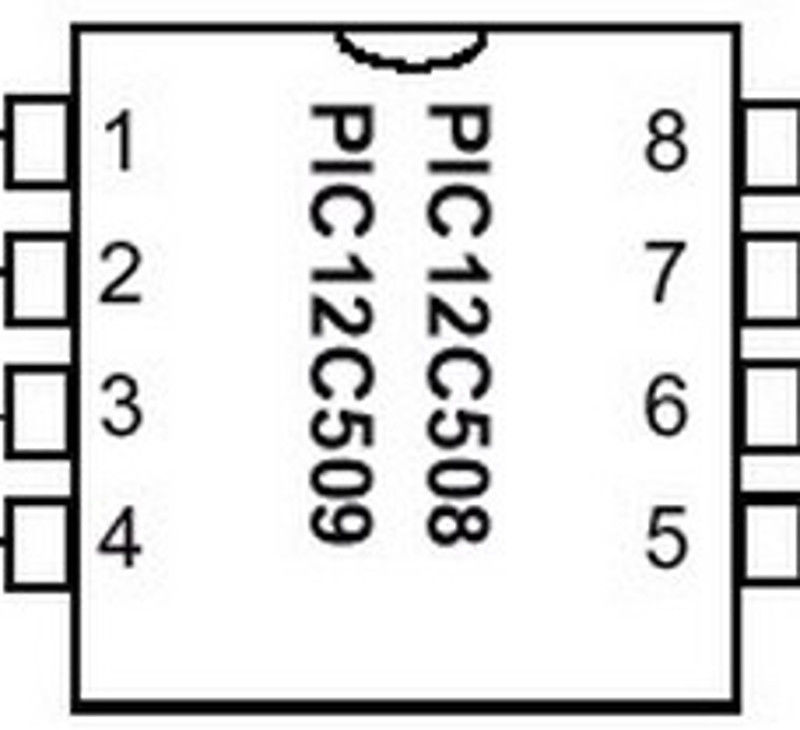
Above is the diagram for the newer version of the PU-8 board. It has the smaller CD mechanics controller chip right next to pin 3.
All of the points being soldered to are pretty straightforward pads. They are all located on the bottom side of the board. You can ignore the other chip on the board. Some early PS1’s had a chip soldered like that onto the board from the factory.
Below is the diagram for the older version of the PU-8 board. It has the larger CD mechanics controller chip right next to pin 4.
Installation tips
Here are some tips I have for you when you are soldering your chip into the PU-8.
- Cut your wires to be as short and direct as possible.
- Don’t connect pin two of the chip to anything.
- Pin 4 can either be connected to the pin 4 location in the diagram, or pulled high by connecting it to pin 1 on the chip.
- Placing the chip towards the middle of all of the pads you need to solder to is ideal. If you flatten the legs on the chip it will fit underneath the board without any modifications.
Example installations
This section has photos of some successful installations which you can use to get a better understanding of how everything is wired and positioned.
Here are some sample installations I have done in SCPH-1001’s:
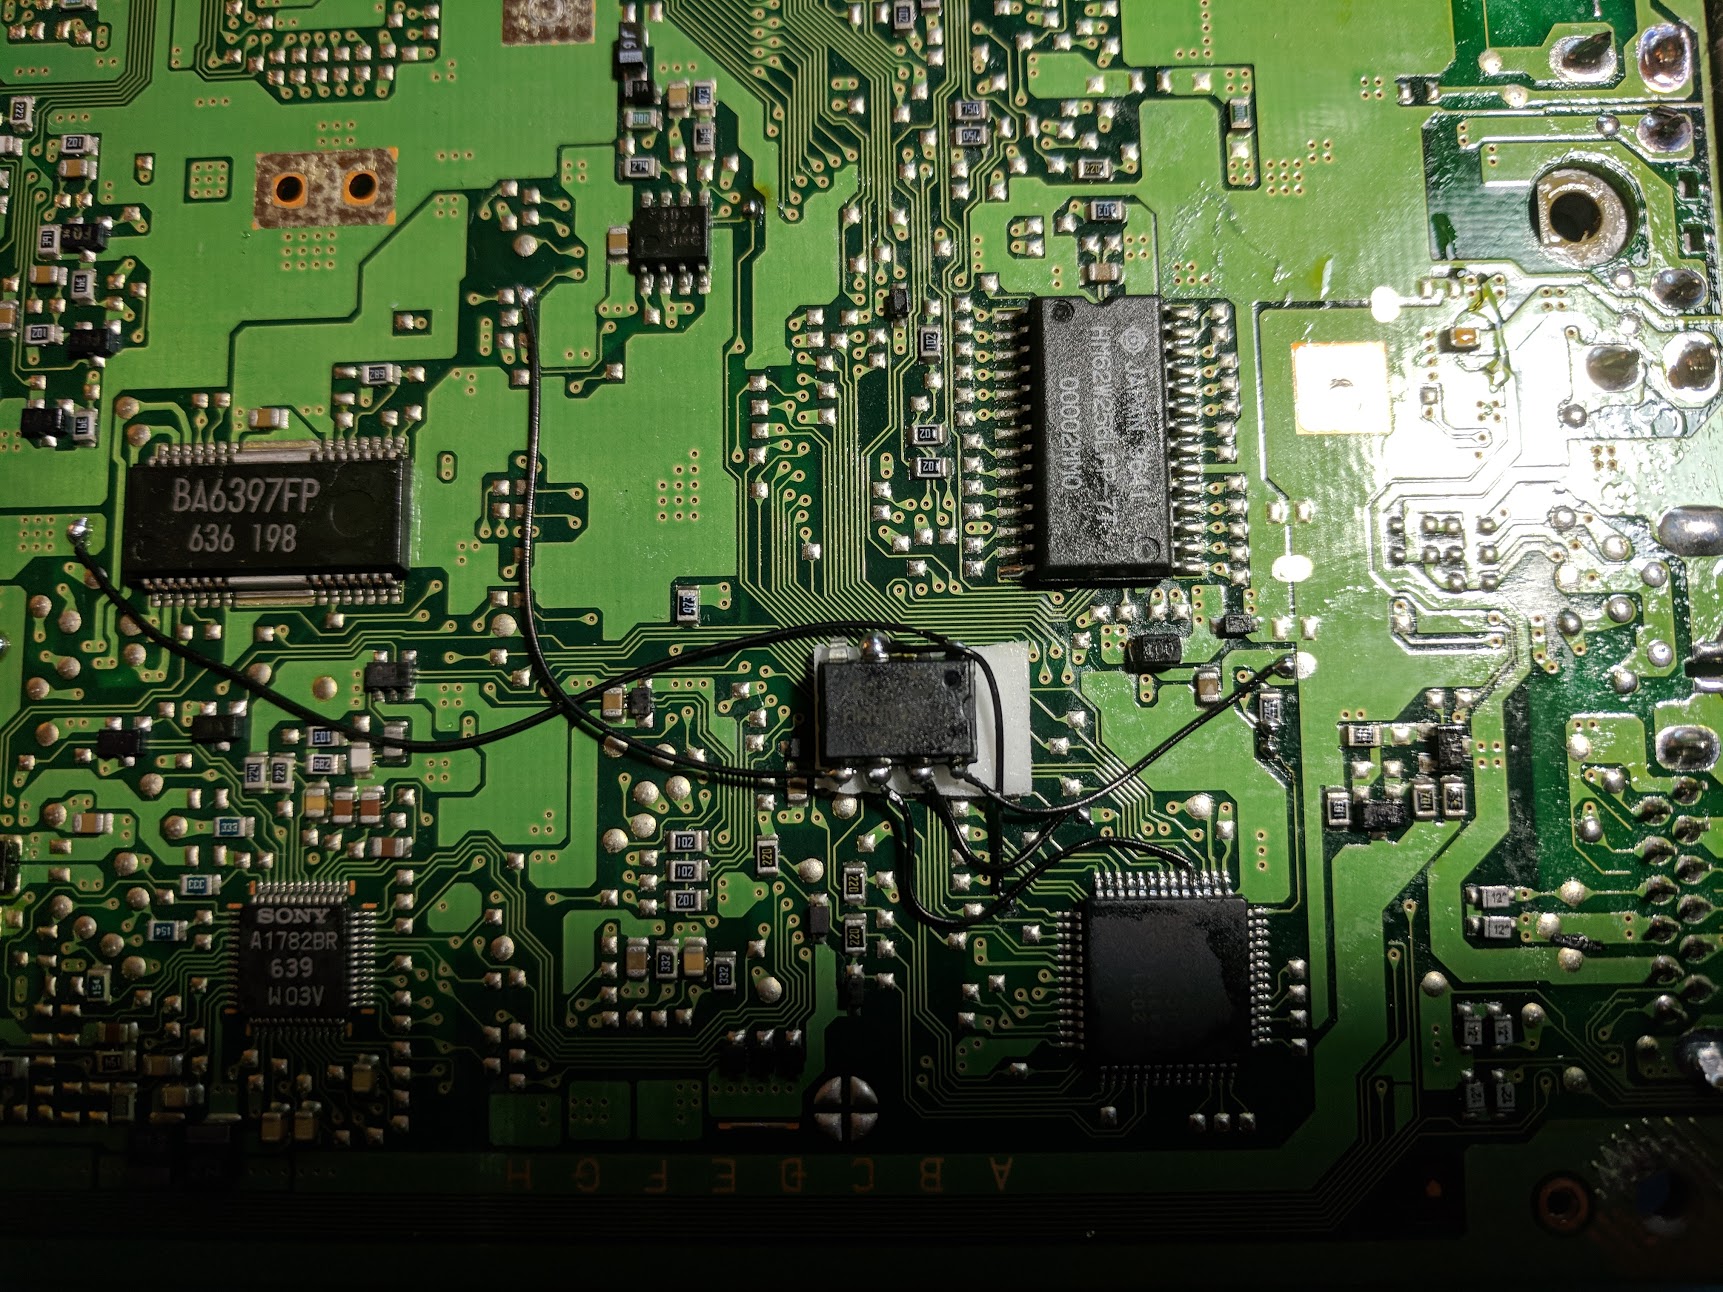
This image shows a cleaner way to install the chip with six wires. I probed the board with a multimeter to find alternate points to solder the wires to that are much closer together. The only real tricky point is soldering pin six to the leg of the surface mount chip.
This absolutely works with an SCPH-1002 and an MM3! I didn’t realise that the MM3 was Stealth for the 1000 Series machines! Thanks William!
I can’t find any info either. For years I programmed chips and followed FatCat NZ install diagrams. I never modded a 1002 because back in 2003, when I was in year 11 at highschool, a mate gave me a broken 1002 which had an old 4 wire chip in it and I couldn’t fix the laser. From what I’ve read with their plastic rails and proximity to the power supply they fail fast even with new unscratched genuine games. I do have one now with the original laser, perfectly working. Good Xstation candidate. Would consider using a chipped one if… Read more »
I return to thank you for your documentation once more. I used your diagrams to install the SIO-X switch board. I’ve also used an alternate soldering point for the reset. My PU-8 didn’t match either board exactly. There’s a small piece of paper towel that was removed prior to putting it back together.
This is a great, definitive guide to console modchipping. Very accurate and detailed info. All I have to say from my experience with xeno GC and a ps1 mod from experience is that you shouldn’t worry too much if your freshly modded console doesn’t function properly after your first batch of tests. I have noticed on both a GameCube and a ps1 that it doesn’t seem to work after testing. However if you just let the console power on and off time to time the modchip should eventually ‘communicate’ to the console board and function as intended. Not sure if… Read more »
Thanks for the install guide bought some chips off you a long time ago I was able to install it in the matter of about 10 minutes and it fired my backups right up
This is the best and most detailed guide that can be found in 2019 to hardmod PSX.
I modded my PU-8 PSX using this guide. Here is the result
The CD reader seems a bit picky but nothing that Verbatim CD’s can’t fix.
Thanks for the guide!
I love the original 1001 models of the playstation, but the cd laser isn’t the best on these. I was able to swap mine with one from the newer slim psone consoles and it works amazing now. Just wanted to mention that if anyone is interested. Going to try this modchip install today, been wanting to play some imports.
Do you know where I can find a similar cd laser? I have the older PU-8 board and some games load fine, but it’s inconsistent and some games are good up until a certain point and things kind of hang or the video is whacked out.
The lasers from newer SCPH-101 series PSone slims work with the PU-8 if you swap the top plastic covers on the assemblies.
Hey there 🙂 Thank you for these guides. I used your guide and, with a multi-meter, buzzed around on my PU-8 board to get closer soldering points. Most soldering points can be done directly to the drive controller chip. Well, a picture speaks a thousand words 🙂 See here for how I did my install:
https://blog.vimuser.org/ps1mods.html
Then I improved it in this follow-up:
https://blog.vimuser.org/better_ps1mods.html
Hello. Thank you for this great guide. I bought a chip mm3 on eBay to install it on my PU-8 1001 psx. I installed it using the second picture. All solder ok. The thing is that 1 out of 15 times that I boot a game will work. It gets stuck at the playstation logo almost every time. I use verbatim CDs and I also tweaked a lot of times the POT on the laser. Nothing works, it’s frustrating. If you have another tip or if you can let me know what I’m doing wrong I will really appreciate. Thank… Read more »
On these older PU-8 systems the lasers aren’t always in the best shape. It can be tricky to adjust the pots on these older boards because there are multiple adjustments that need to be made (if one or more of them is off then the laser won’t work well).
hey just wanted to say that im glad people found my install diagram useful, i made that image a few years ago and uploaded it to eurasia before they shutdown, i still to this day can’t figure out what that PCB module is that’s installed on the bottom of the board, its not a modchip, the console wouldn’t boot backups until i installed the MM3, so i have no idea what this module is used for, if anyone has any idea please let me know
Yeah, thanks for making the diagram. I’m planning to go through all of the boards and make nice new diagrams showing alternate points and things but haven’t gotten around to doing all of the boards yet since it’s time consuming (only have PM-41 (2) done at this point). If you send me some more close up pictures of the board and wiring I may be able to look into it some more. The 1-660-381-11 text on it makes it sort of look like an Sony installed thing. Here are a couple theories: 1. At some point I read about there… Read more »
Hey I’m back. I’m about to swap out the mm3 for a psnee in my scph-1001 and I took a few more pics of my motherboard with that weird chip, where can I send you these? Should I upload to imgur and share the link?
Yeah, Imgur will work.
http://imgur.com/gallery/bX1YLSE
Can any one help am looking for wire points for mod chip Pu 8 scph1002
Yeah, read the post. The diagrams have all of the points labeled.
Thanks for the fantastic guide! I have successfully modded a handful of PU-22’s & 23’s over the last few months. Tonight was my first time working with a PU-8 and I’m having some issues. After the mod, the system starts up and plays standard NTSC games with no issue, but when I try to load a repro or PAL disc, the system recognizes a disc and displays the PS1 load up screen, but then the screen either goes blue or stays on the PS1 logo forever. Something is keeping it from loading those discs. Any suggestions? Thanks!
Are all of the discs that don’t work backups and not genuine black discs? Backups are harder for systems to read. A worn out laser may run genuine discs fine, but have issues with backups.
All of the games I have been trying are black discs, even the repros. I just now swapped a new disc drive onto the PU-8 and it will now read repros with no issue, but PAL games are still not working. When I put in a PAL game, it displays the PS1 logo and then the screen goes blue and the only way to fix it is to hit the reset.
I just put in an MM# on the newer PU-8 following the top image exactly, first try it would boot and play originals, but would boot to a black screen (with boot up sounds) on backups and would not load game. I went back and “improved” some of my soldering and now it has the same black screen behaviour with originals and backups – any ideas what I’m doing wrong?
Sounds kind of like a worn out laser. If it gets to the black logo screen the modchip is working.
Thanks for replying 🙂 I’ve done a bit of tinkering since my previous post. I believe wire 4 may have been shorting to the resistor next to it. i re did it coming from the other side and now the console boots original and backup discs, but is quite slow to start the game after the black logo screen. Music is also glitchy. Someone on Reddit suggested my wires might be too long. The laser is from a lightly used PSOne so I’d be surprised if that was the problem. I cleaned the lens but it made no difference. I… Read more »
Hi, I have a 1002 pu-8 but I can’t have a right reference that match with your scheme, mine have the larger CD controller and I see nothing like the scheme u posted.
Send me a picture. It’s probably the second diagram.
I did it with the second diagram, a rookie work but if you want pictures, it works just fine
I modded mine and it boots backups successfully, however my controller is unresponsive. I thought maybe it was because I plugged in the internals wrong but then I tried a real game and my controller was working just like normal. Is there any reason for this to be happening? I’m not quite sure what to try differently
The modchip doesn’t really do anything related to the controller so it has to be something else.