PU-23 MM3 modchip installation diagram
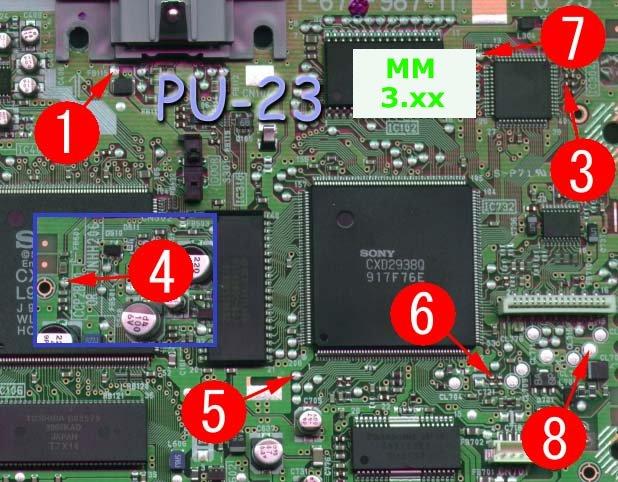
The last version of the original PlayStation 1 design was the SCPH-900x. Most of these consoles have PU-23 boards inside. The most notable difference between the 9000 series and earlier consoles is that Sony removed the parallel IO port on the back. They also shrunk down the size of the board significantly.
For more information about MM3 chips click here, for more information about PS1 modchips click here.
PU-23 MM3 modchip installation diagram
Above is the diagram for the PU-23. Pin four is located towards the top left side of the board.
Since the diagram isn’t the clearest I’d like to mention that pin three connects to the left contact on the middle resistor, and pin six connects to the top contact on the left capacitor.
Installation tips
Here are some tips I have for you when you are soldering your chip into the PU-23.
- Cut your wires to be as short and direct as possible.
- Don’t connect pin two of the chip to anything.
- Pin 4 can either be connected to the pin 4 location in the diagram, or pulled high by connecting it to pin 1 on the chip.
- Pin 3, and 6 can be tricky. Don’t push on the components with your soldering iron or they might get knocked off the board. You can use tweezers to carefully solder them back on one side at a time, the orientation doesn’t matter.
- Make sure the wire on pin 3 and 6 don’t come into contact with both sides of the component (this is especially common if you run the wire directly on top of the component).
- Placing the chip where the pin two circle is, or below it, seems to be the ideal location for placing the chip.
Example installations
This section has photos of some successful installations which you can use to get a better understanding of how everything is wired and positioned.
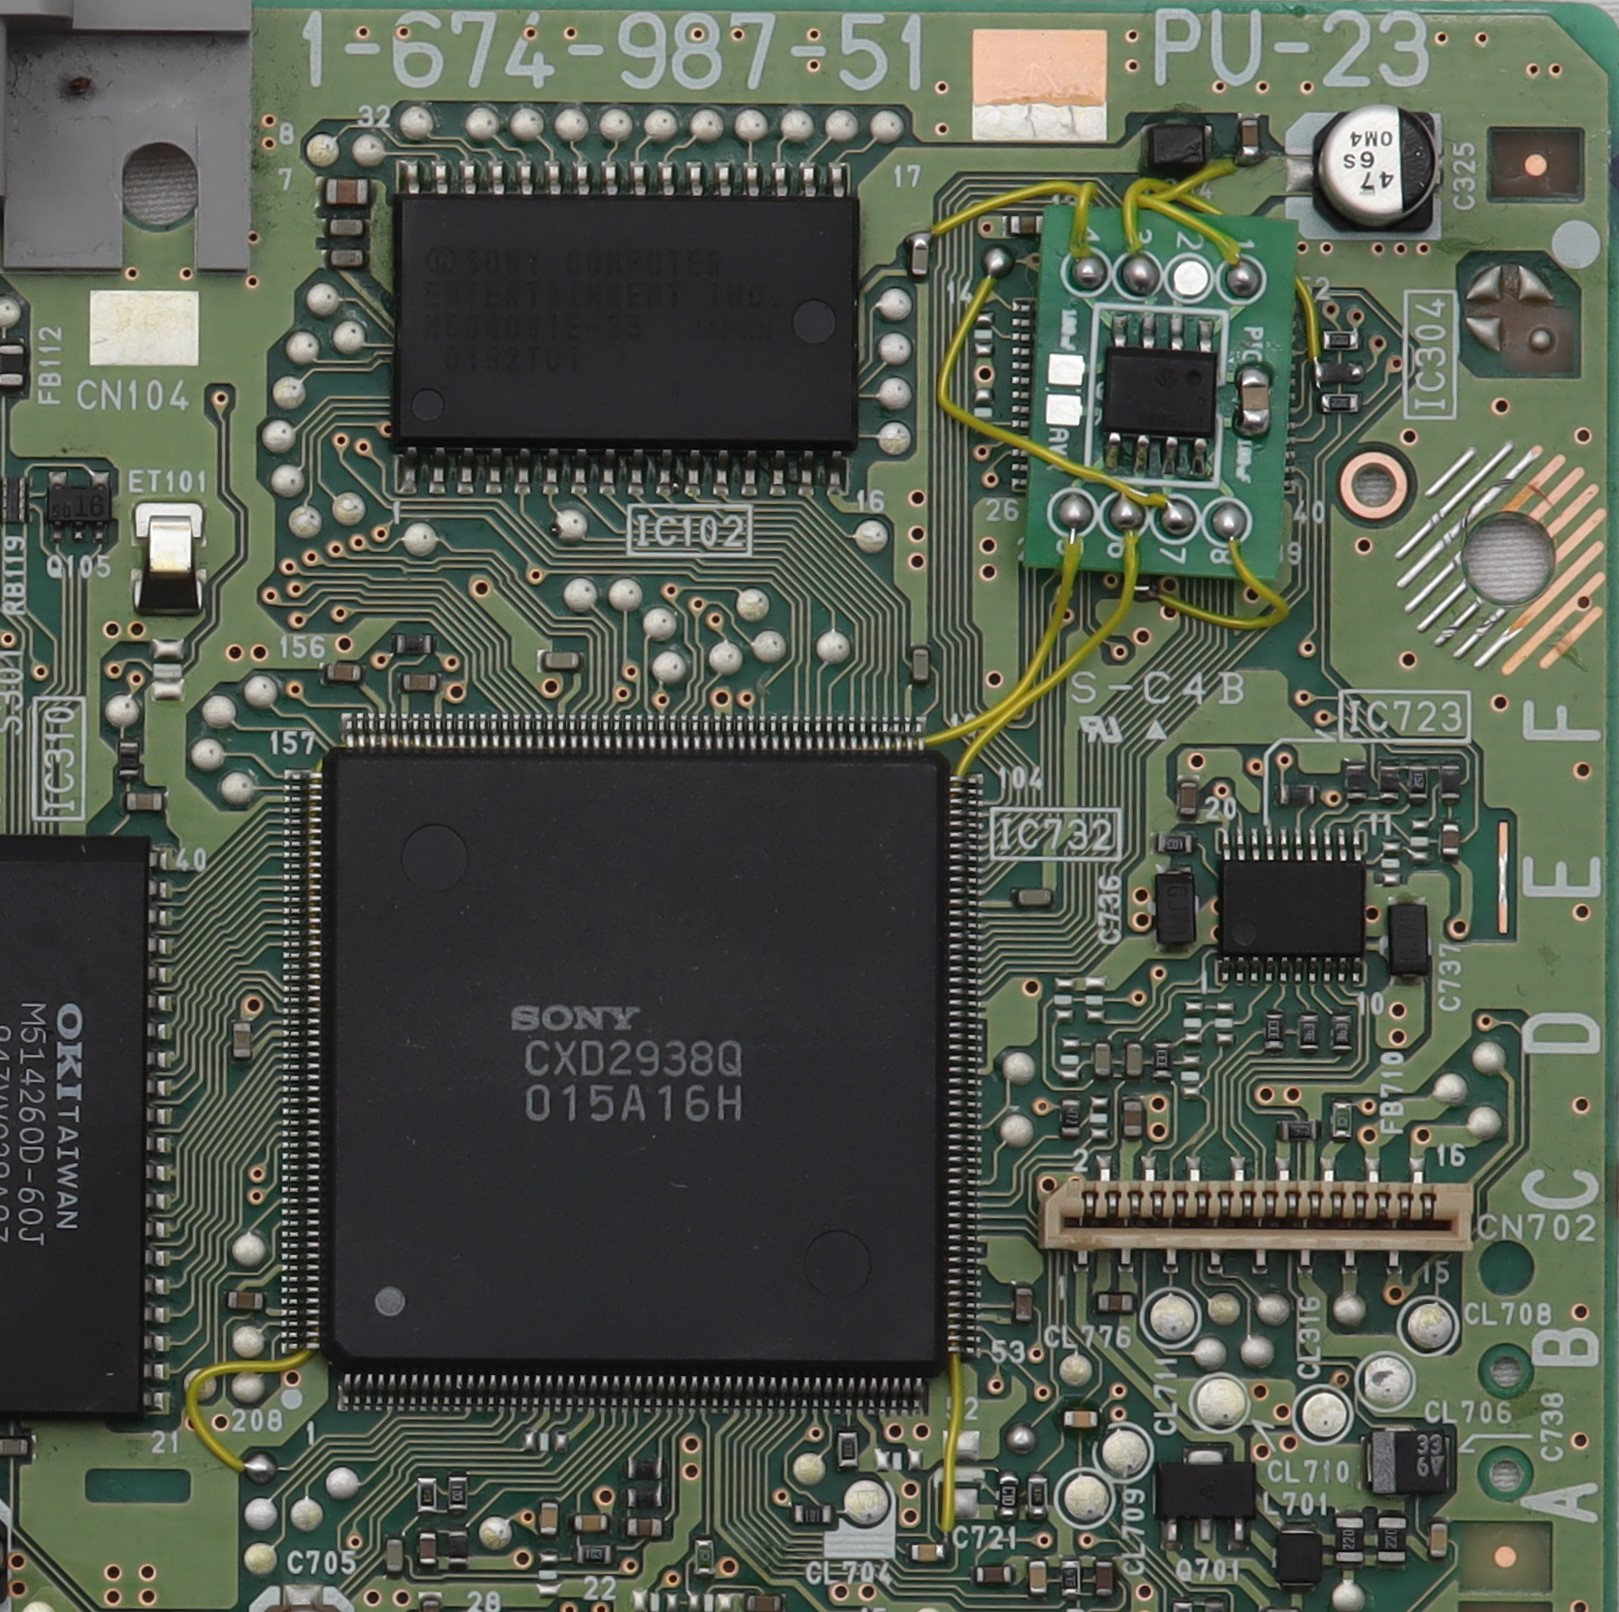
Here is an installation I have done on a PU-23 board. I used some alternative points for the power and ground connections (pins 1 and 8) for a cleaner installation. Pin 6 is also different but is connected to the same place.
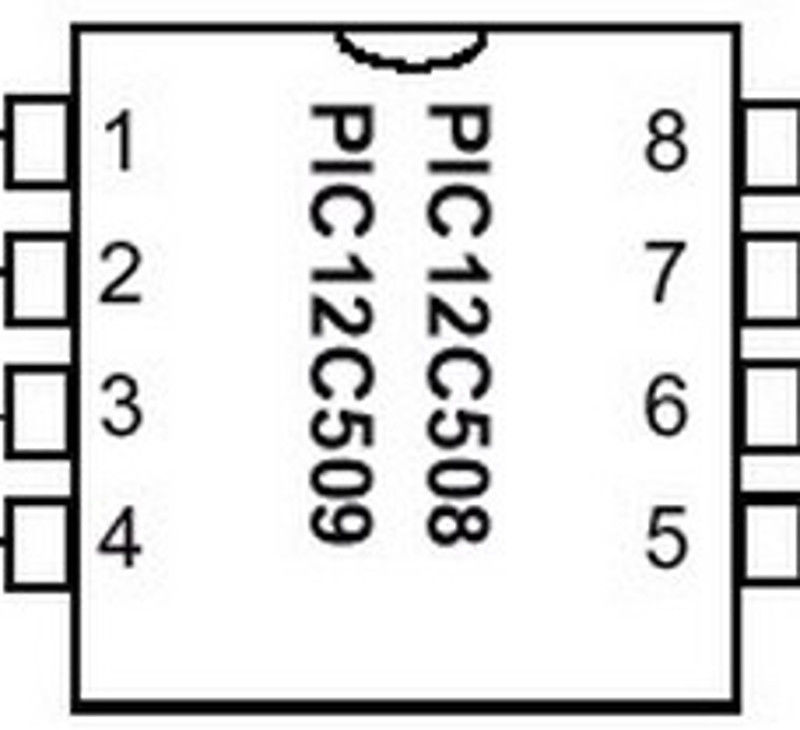
Successfully completed. Hardest part is of course not bridging the pins on the IC. I did bridge the first two pins, and used a piece of solder wick with a chisel tip iron and a bit of fresh solder [on the iron] to pull the bridge from the pins. Be sure to check with a multimeter after removing the bridge to be sure you got it all. IIRC, there was in the megaohms of resistance on those first two pins. Also, use your meter to check the pins on the PIC 12C508 after installation to ensure no pins are shorted.… Read more »
Hi William, I cant thank you enough for all the work you did here on your site, I do appreciate it. I had the choice of modding my original 1001 or a 9001 which I know to be a little tougher so not wanting to touch my baby (the 9001) I went for it on the 9001 and it booted up first time no problems thats to you awesome and straight to the point diagrams. Cheers mate!! Curtz – I think I may have purchased the chip from you as well, any recommendations for a similar chip that will allow… Read more »
You can actually directly boot game backup discs on the Dreamcast, no need for a chip.
There are also mods for the Dreamcast that allow you to boot game backups over something like an SD or CF card.
William,
I recently purchased and installed a chip for my 9001. After installation, when I put in a disk it tries to spin for around two seconds and then stops, remaining on the main menu page. It isn’t the drive motor or laser as I have already tried putting in a different optical lens/laser drive assembly. I was curious if you had any ideas as to what could be the issue.
Thanks
It could be that the laser is worn out, or it could be a bad installation (if the wires are too long, or run over noisy components they can pick up noise and make the system have problems booting). Send me a picture of your installation and I’ll let you know if that’s the problem.
Thanks for the prompt reply! So I took out the modchip and it still won’t read audio CD-Rs. I just put a new laser and drive motor assembly because I also thought that could be the problem. The drive spins the disk twice like it is attempting to read it but then gives up. If you have any insight on why the unit won’t read audio CDs even without the chip installed let me know!
Can it still play genuine copies of games? If it can’t play audio CDs then that would mean that the laser is worn, and would be the reason why backups don’t work.
Hi William,
I’m having problems with my instillation. I’ve tried the discs on other systems and they play perfectly and official PS discs play fine after the install. I don’t see anything bridged, Can I send you pics somewhere and maybe you can tell what I have done wrong?
You can send me an email: liam@quade.co
I just installed a 12C508A into a model 9001 / PU-23 and I tripple checked my wiring which seems good and followed this “dummy proof” guide. However, when the PlayStation powers on, the cd drive keeps spinning. Disc or no disc it just jeeps spinning… so the question. what Did I do wrong???
Thanks
Could you post some links to pictures or your installation, or email them to me: liam@quade.co
Just wanted to say thanks I bought youre chip off eBay and installed it using this guide and it worked fine first go and this was my first big solder job. Just had to practice soldering to the small surface mount parts on an old non working psone. Great job with everything keep up the good work
What is the point of connecting pin 2 in the images if you go on to say that you don’t have to connect pin 2?
It’s an optional pin. It’s just in the original diagram to be complete.
Thanks for this guide, it works with my scph9002. One question for you: why we don’t need to connect pins four and two? What are they for? I have soldered pin4, but pin2 is very hard…
Pin 2 is for the clock line, and is only used for Mayumi chips. Pin 4 is used for the mode selection using the reset button, but isn’t needed because the MM3 supports every game already (some older chips had a disable mode so that games that had anti-modchip code could be played).
Hi William, I have a model scph-9001 console with a PU-23 motherboard. My original laser assembly was broken and i replaced it with a model scph-5501 laser assembly. Would the MM3 work with this installation diagram? Thank you.
Yes, because you still have the PU-23 main board from the SCPH-9001.
Thank you very much.
Installed yesterday, just needed a reminder on where pins 5-8 on the MM3 PIC were. Thanks.
Installed it in my 9001 and it works great. Also the can you explain if pin 2 and 4 hurts to have them hooked up?
Pin 2 for the MM3 does nothing. Leaving it connected likely won’t cause any problems.
Pin 4 is used to switch between operating modes using the reset button, so leaving it connected is not a problem.
Hi william, i’ve just install the mm3 modchip now, i’ve much experience in soldering, i Made a good clean job. But there si 2 strange things that i’ve ti notice, i hope you can help me: 1) i burn Moto Racer 2 EUR with cue file, the playstation read the disc like a music disc, start the media player software and not the game, i used imgBURN at 10x becouse the disc minimum speed is 10x… 2) i tre ti play ah original disc, it load, but sems that the down button is ever pressed and i can’t do nothing… Read more »
Elder Bog,
Not to jump in place of William. Try cutting your wires shorter.
Thanks for your efforts mate 🙂 Good resource. I just installed an mm3 in an Australian PAL 9002 unit. It would not work without pin 4 being connected though. Didn’t need pin 2.
man i love you easy install with your picture much appreciated works flawlessly
Successfully assembled! The schedule works fine but i would appreciate a better image quality. There should also be a ~100 nF capacitor between the power pins on the PIC.
Hello, long time ago i had a PS1 with PU-18 and 12C508A modchip, but it stopped working at one point through the years. I had bought me a year ago another ps1 with pu-23 but it did not had a modchip. I have tried now to transfer the modship in the new ps1 with pu-23 with the help of the diagrams on the webpage here, unfortunately now it does’nt play anything at all anymore? it always transfers directly to the main menu. i’ve checked the wiring couple of times but can not find any fault in it. Checked with a… Read more »
Are you sure the chip is an MM3? There were a lot of modchips that can use the 12C508A.
I don’t know much about it i’m afraid, this picture shows the chip as it was installed in the first PS1 (and always worked very well till the laser was worn out)
https://ibb.co/qN3ccFY
Yeah, that’s definitely not a MM3. It’s a classic 4 wire chip. You might be better off just getting a new modchip (the older chips don’t support anti-modchip games). Here’s a 4 wire diagram I have for the PU-23: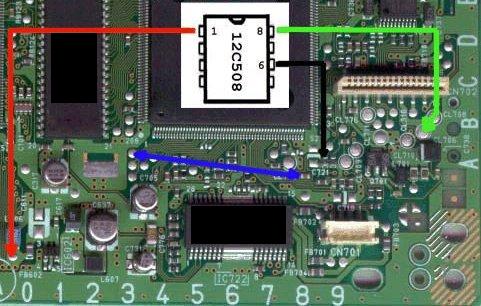
Thanks for the information. i have tried it with the new wire diagram, but no luck, same result.
Also removed the chip completely again, and also same result, doesn’t play any disc anymore now, so i messed it up probably.
But thanks again for the information and your help.
Hello William, right now I’m looking for a modchipped Playstation 1. I’m a newbie in modchips but I found one for a good price, which I think is modchipped just like the diagram you posted above. Is it diagram for the old chip you were talking about or 4 wire diagram for MM3? If it’s the old one, are games like Crash Bandicoot, Spyro and Tony Hawk Pro Skater anti-modchip games? Thank you very much!
I replied to the email you sent.
Hi there, recently got a second hand PSOne and discovered it had the same configuration as this picture, one of the wires had broken off but I resoldered it and it works, it plays backups perfectly fine too. I’m just curious about what difference only having 3 pins soldered with a bridge like this makes to normal function compared to the 7 pin diagram above?
The chips with only a few wires are older chips that may or may not work well for certain games that have anti modchip code.
I have installed the MM3 mod onto my PU-23 SCPH-9001. After installation, the PS1 no longer spins discs or outputs video. Could I email you a picture of my install to get your input on what I may have done incorrectly? The device does still power on, and worked fully before I attempted to install.
You probably messed something up and likely blew some of the onboard fuses. You can email me a picture of your install or link an image gallery here.
Thank you. That is the kind of thing I assumed, and this is the first time I have soldered anything before.
https://imgur.com/a/9Jj13pH
Shorten the wires to be as short as possible. Those wires are way too long.
Thank you, I will do so and report back once done! I appreciate your quick reply and help.
Bought one of these from you, and got it installed, and when I kicked my psx on, the disc dive spun up to max speed and stayed there, while the unit didn’t seem to register there was even a disc inside.
I did some tests and eventually removed the chip, and even with the chip out its behaving the same. It doesn’t look like I bridged any, I cleaned up everywhere that wasn’t an open pad.
Any idea where on the standard installation I might have created a problem like that?
Thanks!
Check the entire board for blown fuses, solder blobs/bridges, and things like that.
Just used this diagram and it works like a charm! First time soldering something like this too. Thanks for the help!
I Soldered (MM3) to PU-23 to all points, it will boot the back up’s, but have to reset a few times?
Some burns won’t load, just black screen after The intro Video…? What Write Speed do we have to use?
Thanks for anyone that can help out!
There is no perfect write speed. It’s all about finding the correct combination of CD burner, write speed, and CD media for your particular console.
Can I show you my work? Maybe you can tell if anything is off??
Yeah. Post a link to a picture.
Uploading now….
https://imgur.com/a/IbEDJhN Clear look at my work lol.
Making some changes to your installation could improve the boot success rate. Most of the connections don’t seem to be very good (cold solder joints), reflowing them with flux would help. Most of the wires can be shortened quite a bit as well. I also recommend finding alternative VCC/GND pin 1/8 points closer to the chip.
@ William Quade Adjusting PS1 Laser “clock wise” helps the laser surpass the oem set omhs. This might help your other customers out that aren’t able to load up Burned CD Disc! I can make/post a photo of the “How-To” if you needed to know.
Yeah, that’s needed in some cases. The key is to only make very small adjustments between tests, and that some lasers are just worn too much.
FYI First time I ever soldered.. I have flux pen and paste, Its hard for me to flow solder in the tight spots.. Not as easy so i thought…. I am using 700F on the solder pen. Tinning the wire and board points, then using flux pen before i take the wire in the board… That how its done? lmao
System having a hard time playing “Back up’s”! *PU-23 Soldered all 7 wires (short) MM3 modchip USA
The chip does let the PS1 load the back up now, just not as smooth as I seem people posting videos about it….
*whats the Write speed for PS1 games…Thank you all!
To all: I can say I burned up 20 Blank Vervatim 700mb CD-R’s With only success at Lower Burn speeds! anything over x8 and the PS1 Cannot decode the data, guessing do to the speed the drive can read at…which is can’t seem to find a true Read speed for the 9001 model Drive… Thanks to the Site owner! much help and fast response is Awesome! Will buy more for this seller!
Noob here, please forgive me lol
so I screwed up pretty bad around #3. the bottom 2 capacitors fell off along with the solder pads, and I managed to lose one of them 😑
Do you know what this capacitor is called? I want to verify that it is included in this replacement surface capacitor pack
Also debating just sending it in to you lol – if I do that would you happen to have the spare capacitors on hand?
They are 22 ohm 0603 size resistors. If you lifted the solder pads along with the components then chances are you wouldn’t be able to repair it yourself (you’d need to solder wires from legs on that nearby chip to the capacitor, and then to the vias on the other side). I’d likely be able to fix it, but you might be better off just getting a new board since these systems aren’t worth that much.
Thank you so much for these guides
I cannot comment on the functionality of the chip since I pretty much destroyed my board after bridging some legs on the tiny chip by wire 3. Tried and tried to remove the solder, but no luck. I guess the moral of the story is if you think you can do this, you most likely can’t. If you know you can, then good luck. Make sure you have the right tools and a good, well lit workspace with a microscope. I’ve modded systems in the past, but this was somehow the most challenging (for me) mod I’ve attempted and failed… Read more »
Gud day do you have a wiring connection for this kind of modchip? for pu23 board, thanks
There were a lot of different types of modchips that used the 12C508, so there really isn’t any way of knowing what it is just by looking at the chip itself.
Can’t make it work on pu23 scph 9002. I buyed a modchip in China, seller confirm that the chip is programed but can’t make it work. Tried the mm3 diagram, the old one diagram only with 3 wires soldered and my last try is the mayumi diagram with pin 2 also soldered. I follow all the steps like no big wires and check all my points, no bridges. I suspect my modchip is not programmed because I try all diagrams. At this moment my console loads original media but can’t load the backups.sometimes goes to music menu but most of… Read more »
It is certainly possible the chip is good but you have a laser that is too worn out to play backups. It’s also possible that the Chinese chip wasn’t programmed or programmed incorrectly. You aren’t the only person on here who has had issues when trying to use a chip from China.
What’s the best way to strip chip wire? Can you get wire strippers that go down to such a small size (0.25mm)? Can i take a lighter the end of the wire to burn off the plastic or is that a big no no? Thank you
There are 0.25mm wire strippers. A lighter might work, but is more likely to just make a mess. Same with soldering iron tips, they will work, but will make a mess.
Thank you for the help, i’m about to mod my 1st ps1. Hope it goes well
Greetings! I tried installing the MM3 mod chip on my 9001 tonight. Once finished the power LED will come on, but the disc wont spin and no image is recognized by the TV.
You messed something up. Maybe try removing the chip, checking for blown fuses, and checking for any solder bridging.
gotcha. Can I email you a picture of my board with the chip installed? See where I went wrong
Yeah.
Here is one that I just did for Ebay. I used the installation guide from Gamefreax.de though. Their guides work with full stealth so I don’t usually deviate from them. (Not real confident about pulling pin 4 high…I’m pretty sure the code needs it for stealth to work.)
Pin 4 is used to detect reset button presses on the console. Connecting it to high is equivalent to the reset button never being pressed so it won’t interfere with anything (the PSones don’t have a reset button so all diagrams for those models pull pin 4 high without causing issues).
Not sure why that didn’t upload…
During the installation I lost the resistor for pin 3, do you know of anywhere to get it or am I sol
They are 22 ohm 0603 size resistors. If you lifted the solder pads along with the components then chances are you wouldn’t be able to repair it yourself (you’d need to solder wires from legs on that nearby chip to the capacitor, and then to the vias on the other side). I’d likely be able to fix it, but you might be better off just getting a new board since these systems aren’t worth that much.
Would I have to soder pin 4
Pin 4 is required.
I Cant find were pin 4 would go
Look at the top left side of the board.
ok
all my pins are right but putting in a backup said please insert PlayStation rom every thing is right what could be wrong
Could be a few things. The wires could be too long (need to be shortened to be as short as possible for best results). The wires could be connected to the wrong places (a lot of times people confuse the order of pins 5-8). Or it could be a worn out laser.
i got this to work once today but the PlayStation logo came up but it would not load
Same applies as what I said before. If it gets to the black PlayStation logo the chip is working but the laser isn’t able to read the disc well enough to fully load the game.
alight
my disc was dirty do it did not read
pu-23 successfully modded, used the second installation pic, went super smooth didnt have to adjust the laser, thanks again for making/selling/teaching how to install these, u have my graditude
btw love the idea of running the two leads under the pins of the chip!
Simple mod, only took about 10 minutes. Had just finished a wii portable with lots of tiny magnet wire so this was a breeze!
Just installed this in 3 9001 models. All 3 work great! I didnt use pin 2 or 4. Thank you for posting the install.
I totally knocked off the component off of where pin 3 goes and lost it. am i completely f’ed? disk continues to spin even with disk cover open, and normal discs don’t even register being in.
You’d need to replace the resistor.
can they be ordered from somewhere?
Yeah, some place like Digikey. Order a 22 ohm 0603 size resistor.
like this one? https://www.digikey.com/en/products/detail/stackpole-electronics-inc/RMCF0603FT22R0/1760726
Yes
Hello, thank you for your guide. I’ve got a doubt related to a component value as I messed it up.
I has written C10, in the bottom next to C721.
100k ohm resistor, 0603 surface mount package.
Hello!
I was soldering the wire on point 3 and 2 of the resistors there fell off after i kept my soldering iron on them for too long. A member of my family touched the place where i was keeping them and lost them, can the psone still boot without them and if so can i still install the modchip on it without those components? If not how do i find replacements for them.
They are 22 ohm 0603 size resistors. The system won’t work without it.
Would a 30 ohm resistance work? That’s the only type i can find in my area.
Probably not, but you could certainly try it. Just buy the right part from Digikey.
Thank you William for all the wisdom, you’ve been incredibly helpful
Hi there! First, thanks for making this great guide! I apparently messed up my installation, though it’s entirely my fault as my soldering skills aren’t very good yet (I’ve region modded a Genesis, installed an adjustable GBA LCD, and replaced several GB and NES cart batteries; that’s the full extent of my experience.) Maybe you could offer some advice? I first installed my chip using your diagram, thought I did a passable job. Slightly messy but nothing was bridged that shouldn’t be. Reassembled, tested, the power indicator came on but disc didn’t spin, and no video came through. Re-checked my… Read more »
I’d recommend checking for blown fuses on the PS1 board (there are a bunch of them).
Just installed successfully. Had wires 5-8 backwards but William responded to my email right away and was able to assist! Now I can play my back ups 🙂
So I notice you have a 8 pin SOP breakout board. Where can I get one? My google skills just can’t seem to find it. Or else is there a gerber I can upload to PCBWay?
So I recently installed this onto my pu-23 and it was working fine for a bit until the disc laser started freaking out and making a horrible grinding. I’ve made sure there are no grounds, and my next thought is to remove the mod and test it without again…could it be a faulty chip, a dead disc drive or (and I just thought of this) the wires are too long? –
Most likely a worn out disk drive, or installation issue (long wires, shorts, soldering to the wrong places, mixing up wires).
wiring locations were fine, they were just a bit too long. I trimmed and re-applied the mod did some fiddling with the pot and it’s working like a charm now, Thanks!
That is not an MM3.